Configuration Manager 2012 R2 SDK and Toolkit released

Microsoft yesterday released a updated version of the SDK for Configuration Manager 2012 R2, you can find it here –> http://bit.ly/1bsv2T8

This also includes an updated Application Workflow setup (Which allows you to integrate application approval process into Service Manager instead of IT managers needing to go into Configuration Manager to do application approval processes.

Microsoft has also released an updated version of its Toolkit for Configuration Manager –> http://bit.ly/14TYKRn which I have blogged about before –> https://msandbu.wordpress.com/2013/02/05/configuration-manager-2012-toolkit/

But now there are some new tools included in the package.

  • * DP Job Manager – A tool that helps troubleshoot and manage ongoing content distribution jobs to Configuration Manager distribution points.
  • * Collection Evaluation Viewer – A tool that assists in troubleshooting collection evaluation related issues by viewing collection evaluation details.
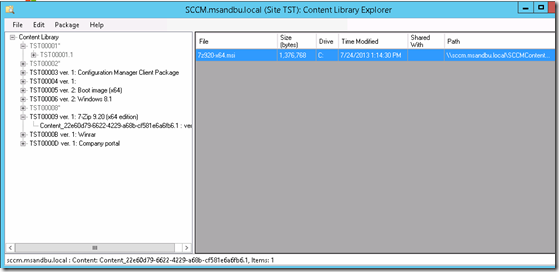
  • * Content Library Explorer – A tool that assists in troubleshooting issues with and viewing the contents of the content library.

Including a Security Configuration Wizard for R2, now the cool thing here is the Content Library Explorer, which allows you to explore content and the source files of applications and such.

image

#configuration-manager-2012, #sccm-2012, #toolkit

Managing Ubuntu Clients with Configuration Manager

Microsoft recently released a preview of System Center 2012 R2 and with it, they released a new version of the additional clients for Configuration Manager.
You can download them from here –> http://www.microsoft.com/en-us/download/details.aspx?id=39360

The pack includes clients for:

  • AIX Version 7.1, 6.1, 5.3
  • Solaris Version 11 (SPARC and x86) , 10 (SPARC and x86), 9 (SPARC)
  • HP-UX Version 11iv2 (PA-RISC and IA64) , 11iv3 (PA-RISC and IA64)
  • RHEL Version 6 (x64 and x86) , 5 (x64 and x86), 4 (x64 and x86)
  • SLES Version 11 (x64 and x86), 10 (x64 and x86), 9 (x86)
  • CentOS Version 6 (x64 and x86), 5 (x64 and x86)
  • Debian Version 6 (x64 and x86), 5 (x64 and x86)
  • Ubuntu Version 12.4 LTS (x64 and x86), 10.4 LTS (x64 and x86)
  • Oracle Linux 6 (x64 and x86), 5 (x64 and x86)
    • Mac OS X 10.6 (Snow Leopard)
    • Mac OS X 10.7 (Lion)
    • Mac OS X 10.8 (Mountain Lion)

For my part I see more and more using Mac in the enterprise, but at my former job we had alot of RHEL and Ubuntu users as well, so therefore I wanted to show how we can manage these types of clients in the enterprise.

Now in order to setup a client we need to download two files to the ubuntu computer.
The CCM-universal package and the install file.

After the files are downloaded you have to open terminal and run the following command from the download folder

NOTE: Be sure that the linux client can find the ConfigMgr servers by nslookup.
You might need to alter the resolv.conf file to point to another DNS server.
You might also need to define a domain name in order to use the FQDN
domainname AD.fqdn from terminal

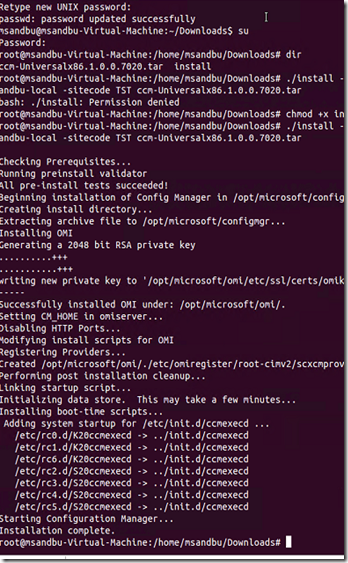
./install -mp <computer> -sitecode <sitecode> <property #1> <property #2> <client installation package>

NOTE: You have to change the rights on the install file by running chmod +x install from temrinal

So in my case ./install –mp configmgr.msandbu.local –sitecode TST ccm-Universal-x86.tar

image

image

After this is done you can review logs from the /var/opt/microsoft/scxcm.log folder.
NOTE: If you run the installation again you will get a message if you wish to overwrite in case you entered the wrong info during setup, if you wish to uinstall it completely you can run the command /opt/microsoft/configmgr/bin/uninstall

Note: from CU1 Linux clients now support FSP as well which you can specify during the installation. –fsp fsppoint.fqdn

#configuration-manager-2012, #sccm-2012, #ubuntu

Configuration Manager and hierarchy planning

With 2012 release of System Center Configuration Manager, planning and designing a hierarchy became a bit more difficult.
Not because of the limitations, but because of the huge mix of different possibilities you have.
For instance with the introduction of CAS role (Which sits on the top of the hierarchy and is used for management purposes of many primary sites) you have even more options of how to manage your infrastructure.

In addition, with SP1 you have even more options, for instance you can now have more than one SUP for a primary site. (Which you could not have before SP1) and that the CAS SUP now doesn’t need to sync directly with Windows Update as well) so this post is what factors you need to think of in terms of planning and how to manage the devices. In addition, for many which have multiple domains, trusted and untrusted, and in different forests and depending on how you want the flow of traffic to go it takes a lot of planning!

This post is meant as a guideline and might not always present the best options but just to show some possible examples of how you deploy Configuration Manager 2012 SP1.

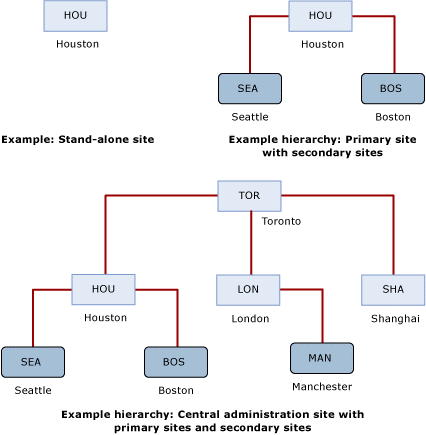
Now first I am going to define how the hierarchy in Configuration Manager looks like.
In the first picture we have a stand-alone site (Primary Site) in the secondary picture we have a Primary site with two secondary sites.
In addition, in the last picture we have the CAS with three primary sites and with their secondary sites.


Source: http://i.technet.microsoft.com/dynimg/IC638818.gif

First I’m going to specify the limits of each hierarchy role:

CAS: (Does not process client data, and does not support clients assignments.
400.000 clients (If you use SQL Enterprise) 50,000 if you use standard.
25 Child Primary Sites
Roles:
Asset Intelligence synchronization point (Can only be one in the hierarchy)
Endpoint Protection point (Can only be one in the hierarchy)
Reporting services point
Software update point
System Health Validator point
Windows Intune connector

Primary Site:
250 secondary sites
100,000 clients (50,000 clients if the SQL is installed on the same computer as the site server)
10,000 WES clients
50,000 Mac
Roles:
Application Catalog web service point
Application Catalog website point
Asset Intelligence synchronization point (not if it’s a child primary site)
Distribution point
Fallback status point
Management point
Endpoint Protection point (not if it’s a child primary site)
Enrollment point
Enrollment proxy point
Out of band service point
Reporting services point
Software update point
State migration point
System Health Validator point
Windows Intune connector (not if it’s a child primary site)

Secondary Site: (Must be linked to a primary site, MP and DP are installed automatically, installs SQL Express if nothing else is available)
5,000 clients.
Distribution point
Management point
Software update point
State migration point

Software Update Point:
25,000 clients (That is installed on the same server as the site server 100,000 else)
After SP1 (Supports multiple SUP per Site)

Distribution Point:
4,000 clients
250 DP per Primary Site
250 DP per secondary site
10,000 packages and applications

Management Point:
25,000 clients
10,000 Mac computers
10 MP per primary site

Now there are some roles that cannot be deployed in a untrusted domain:
These are out of band service point and the Application Catalog web service point.

But always think simplicity, so if it is possible avoid the CAS role where it seems logical.

(1 domain) ( 1 location ) 1 Primary Site

Depending on how many clients you have in your infrastructure, but with one location and one domain this is only and easiest way to go ahead, for high-availability purposes you should have 2 of each system role and a clustered SQL server for the site server.

( 1 domain ) ( 2 locations) 1 Primary Site 1 Secondary Site (Slow link)
Lets for the purpose of this post say that you have 1 location where you have most of your infrastructure, you have one remote site with 200 clients which has a limited connection to the primary site, one secondary site on the remote location would be the best approach. Clients there would talk directly to the management point and the distribution point of the secondary site.

(1 domain) ( 2 locations) 1 Primary Site and 1 Distribution Point (Fast link for secondary site)
In this case we have also a remote location but we have a fast wan link so we don’t need a secondary site which has the agents and the applications and packages. Therefore, we have a distribution point at the remote location and clients communicate with a MP in the central location.

(1 domain) (2 locations) ( one small branch office )
I would recommend using branch cache on a distribution point and for the clients, when the first client requests content from the DP it will download it and cache it for other clients on the same subnet. This requires a DP installed with Branch cache.

NOTE: Remember that for a remote domain installation to work properly you would need to install the management point with an account that has access to the Configuration Manager database. You configure this during the installation of the Management Point.

( 2 domains untrusted forest ) ( 1 locations) 1 Primary Site in Primary (1 Management Point 1 Distribution Point)

Now we cannot install a primary or secondary site in a untrusted domain, we can only install user facing system roles in a untrusted domain. So therefore, we install a management point and a distribution point in the untrusted domain.
And we can also publish the site in AD for the untrusted domain as well.

( 2 domains trusted forest ) ( 1 location )

This depends on the number of clients but again a solution with a distribution point and a management point in the other domain could be a solution. In case there are too many clients, you would need to expand the hierarchy with a CAS and a primary site in each forest.

(Multiple domains untrusted) (Multiple domains)

Primary site or depending on how many clients. Use Primary Site in one domain (Pref the largest one) and deploy a distribution point and a management point in the other domains.

Here I will also link to some example hierarchy scenarios from Microsoft
http://technet.microsoft.com/en-us/library/gg712989.aspx

Identify requirements to plan for a hierarchy
http://technet.microsoft.com/en-us/library/gg712310.aspx

I would also recommend that you read Microsoft’s own hierarchy for their internal Configuration Manager solution
http://blogs.msdn.com/b/shitanshu/archive/2011/10/16/configuration-manager-2012-deployment-real-world-experience-part-1.aspx

#configuration-manager, #sccm, #sccm-2012

Remote Control for Configuration Manager

I actually see a lot of search terms on this blog regarding Remote Control so therefore I wanted to write a post to clarify it’s functionality and how to set it up. It allows for administrators to connect to a client without using RDP and even without a user logged on and you can interact with the user as well, allowing you to see what the users sees. All communication happens over port TCP 2701 and uses Kerberos for authentication (if it cannot authenticate using Kerberos it will try with the less secure NTLM)

To enable Remote Control for a set of clients
In the Configuration Manager console, click Administration.

  1. In the Administration workspace, click Client Settings.

  2. Click Default Client Settings.

  3. On the Home tab, in the Properties group, click Properties.

  4. In the Default dialog box, click Remote Tools.

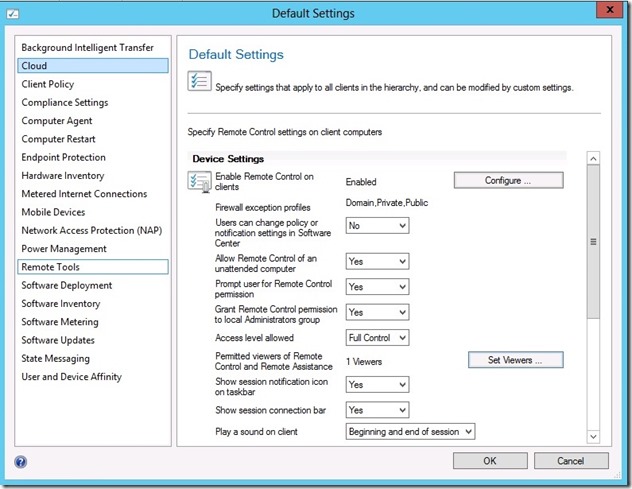
  5. Configure the remote control, Remote Assistance and Remote Desktop client settings.

Now there are some settings there are some bunch of settings there that you need to configure before you start.

Enable Remote Control on clients Firewall exception profiles
Select whether Configuration Manager remote control is enabled for all client computers that receive these client settings. Click Configure to enable remote control and optionally configure firewall settings to allow remote control to work on client computers. (Just to remember that Remote Control is disabled by default)
1

Allow Remote Control of an unattended computer
Select whether an administrator can use remote control to access a client computer that is logged off or locked. Only a logged-on and unlocked computer can be remote controlled when this setting is disabled.

Prompt user for Remote Control permission
Select whether the client computer will display a message asking for the user’s permission before allowing a remote control session.

Grant Remote Control permission to local Administrators group
Select whether local administrators on the server initiating the remote control connection can establish remote control sessions to client computers.

Access level allowed
Specify the level of remote control access that will be allowed.

Permitted viewers
Click Set Viewers to open the Configure Client Setting dialog box and specify the names of the Windows users who can establish remote control sessions to client computers.

Now after you have changed the settings here you need Press OK and save the settings. If you need to change these settings or have different set of settings for different users, create a separate client settings and deploy it to a new collection.

2

And Viewers can be set to domain users and different viewers can be deployed to separate collections. You just have to create a separate Client Policy.
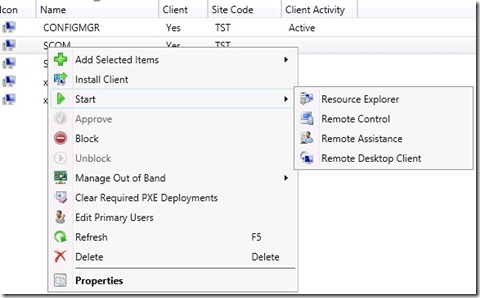
After these settings are changed to can go back to your computers right click and choose Remote Control

3

4

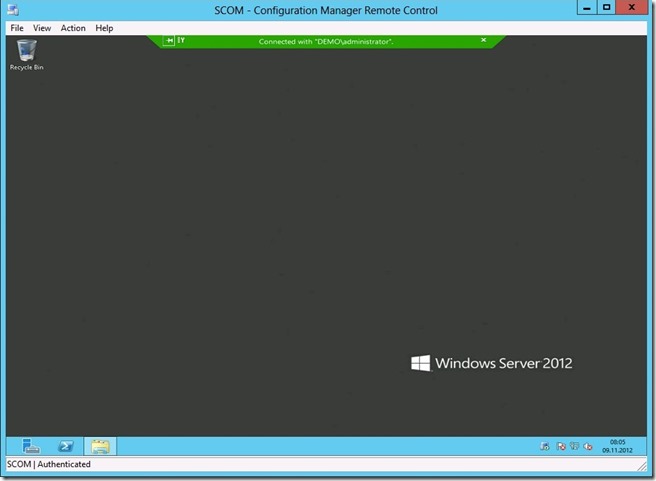
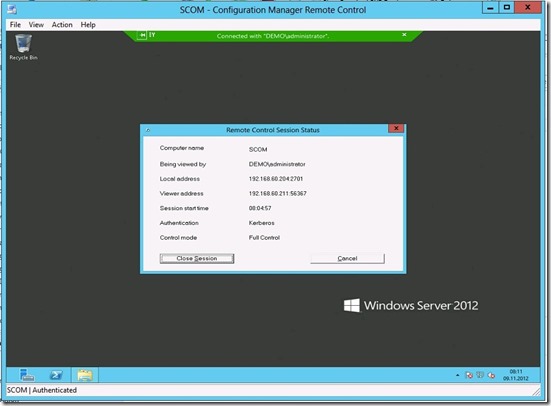
Now with the green bar appeared we have connected. The user will also see this green bar so it knows who is connected.
We can also see that it successfully used Kerberos to authenticate.

5

#configmgr, #sccm-2012

Configuration Manager and Collections

I see a lot of questions on the forums and lot’s of traffic on my blog regarding computer collections. In many cases you want to separate your managed computers / servers into different collections.
For instance you would want to separate clients from two network segments because they need separate client settings or the clients in the one location needs one piece of software that the other one’s don’t need.
And in many cases collections can be a life-saver for software management.
For instance you can create a dynamic computer collection based on a registry value (To check if adobe reader is < version 9 if true then the computer is added to collection 1, where the IT-admin has deployed the newest Adobe reader as a required software. Next time the collection update happens the computer will no longer be present in the collection.
And also remember that a dynamic collection is based upon a query. And queries in ConfigMgr are based on WQL which basically is SQL for WMI.

Now where do we create collection ?
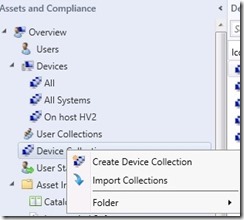
Open the ConfigMgr console –> Assets and Compliance –> Device Collections
Right click and choose Create

1

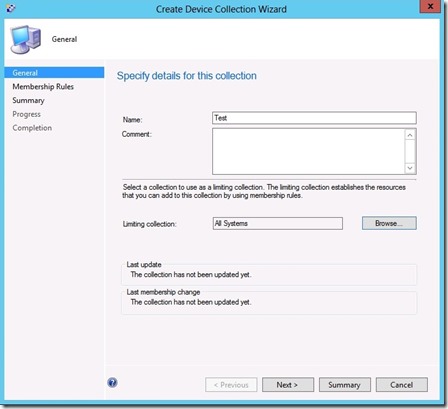
Now enter a name for the collection and choose a limit collection. This narrows down the collection. So if you have a lot of collections you should be more aware of using the limit collection, since this will lighten the database load.

2

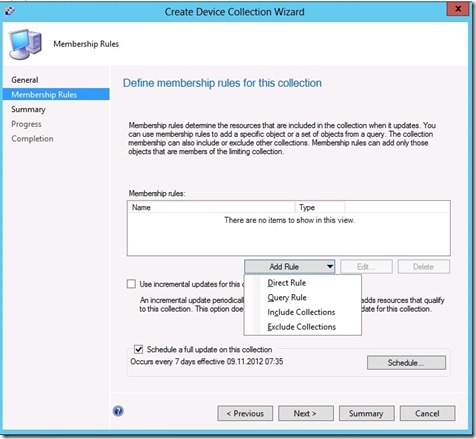
Now under membership rules choose Query Rule –>

3

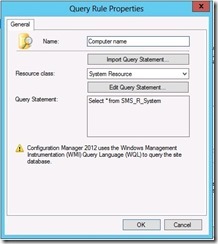
Now the query editor will open –>
4

And from here we choose Edit (We could also choose import another query but that we can do later)
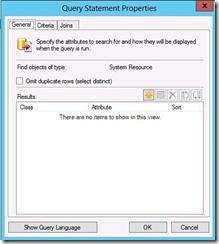
So when we press Edit we come to the Query statement properties pane.

Under the general pane we choose for what attributes we wish to search for.

5

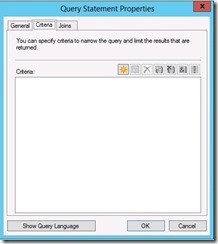
Under Criteria we choose what attributes we wish to add a statement for instance if a value is true or not.

6

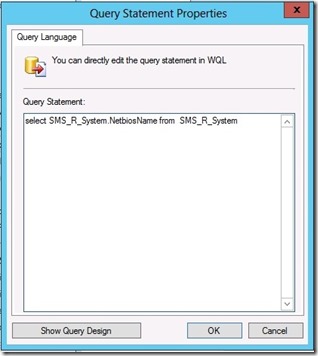
So if we press the “Show Query Language” you can see the query that is being generated from the menu. IF you wish you can just import a finished query here (further down below in this post )
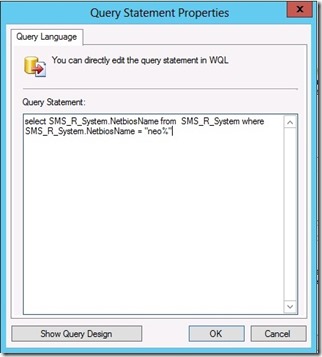
Now we are going to go trough a query that will find all computers that start with the name neo.

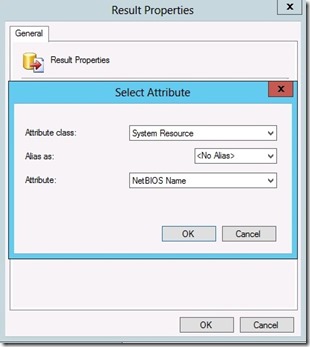
Go back to general and press the + Sign choose simple attribute and  select attribute from there choose System Resource and NetBIOS name. Press OK and OK
8

If you press the Show Query Language now we can see that the query changed

9

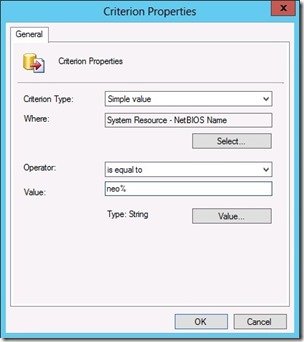
Now we are going to make a criteria, so I do practically the same here

10

The sign % is for wildcard so all computers that have the netbios name that starts with neo will be fetched by this query.

11

After that is done you can press OK and OK.

And you need to remember the logic of a collection query.

1 SELECT (what do I need to show) Netbiosname = Computer Name
2 (What are the requirements that need to be fulfilled in order for the query to return true?)
3 If Computer 1 has Adobe Reader = True then inn to the collection you go.
You also need to remember that the symbol % is wildcard
So if you want to search for something that start with n you use this n% in your query
if you what a query with something that ends with n you use n%

Now some examples of queries that you can use (By using the import query button –> )

Adobe Reader Version from Add/Remove Programs in Control Panel
select SMS_R_System.NetbiosName,
SMS_G_System_ADD_REMOVE_PROGRAMS.DisplayName from 
SMS_R_System inner join SMS_G_System_ADD_REMOVE_PROGRAMS on
SMS_G_System_ADD_REMOVE_PROGRAMS.ResourceId =
SMS_R_System.ResourceId where
SMS_G_System_ADD_REMOVE_PROGRAMS.DisplayName like «%Adobe Reader%»

Computer based on OU
select SMS_R_System.NetbiosName,
SMS_R_System.SystemOUName from 
SMS_R_System where
SMS_R_System.SystemOUName = «OU Name»

Spesific computer name in this case every computer that starts with neo
select SMS_R_System.NetbiosName from 
SMS_R_System where SMS_R_System.NetbiosName like «neo%”

Windows 8 computers
select SMS_R_SYSTEM.ResourceID,
SMS_R_SYSTEM.ResourceType,SMS_R_SYSTEM.Name,SMS_R_SYSTEM.SMSUniqueIdentifier,
SMS_R_SYSTEM.ResourceDomainORWorkgroup,SMS_R_SYSTEM.Client from SMS_R_System
inner join SMS_G_System_COMPUTER_SYSTEM on SMS_G_System_COMPUTER_SYSTEM.ResourceId = SMS_R_System.ResourceId
where SMS_R_System.OperatingSystemNameandVersion like "%Workstation 6.1%" or SMS_R_System.OperatingSystemNameandVersion like "%Windows 8%

#configmgr, #sccm-2012, #wql

XenApp Connector for Configuration Manager in Tech preview

The long awaited connector for XenApp to Configuration Manager 2012 is now available for TechPreview on Mycitrix.com
Link here –> https://t.co/bPPw0Eny

You can see a video regarding  the functionality here –> http://www.youtube.com/watch?v=CncS4Tp3Vgg&feature=youtu.be

Ill come back with more when I get to work with the details about it Smile

#project-thor, #sccm, #sccm-2012, #xenapp

Integrating Configuration Manager and RES Workspace Manager

As I stated in a earlier post is that you have the ability to integrate RES Workspace Manager with Configuration Manager.
https://msandbu.wordpress.com/2012/06/21/res-workspace-manager-2012/

Workspace Manager is a product that allows you to design how the desktop should appear to the user.
Instead of using Group Policy and slow login scripts you can move all those tasks into Workspace Manager.
For instance Printer mapping, drive mapping, +++
I has a lot of features but take a look at my previous post if you wish to know more about it Smile

Workspace Manager also allows for a lot of integration. With for instance XenApp, App-V, RDS, Vmware Thinapp and Configmgr.
With Configmgr integration you can allow for Workspace Manager to deploy application (Automation task) to a users desktop.

When a user logs on for the first time, and clicks a predefined shortcut for that application, Workspace Manager will automatically deploy the software to the desktop by contacting the MP that is configured.

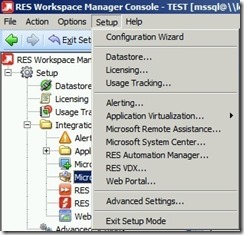
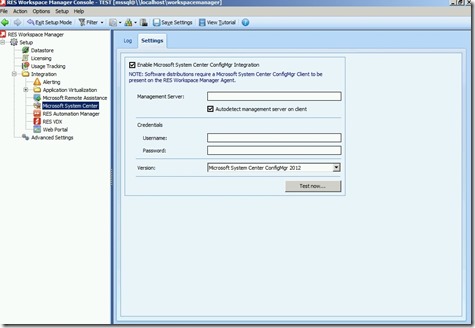
First we start by adding the ConfigMgr integration, Click Setup –> Microsoft System Center,

1

Now on the Menu, click Settings. Click on the “Enable Microsoft System Center ConfigMgr Integration” And remember as it states there. You need a Configmgr agent and a Workspace Manager agent installed on the client where you are going to use this.
Enter credentials, and choose which version of ConfigMgr you have in your environment.
2

And Click Test Now (A list of packages that are deployed should now appear). Remember that it only supports ConfigMgr Packages not Applications as with 2012.
3

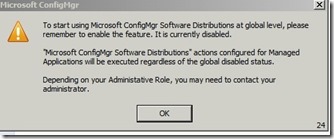
After this is applied you should get this message. (Even thou the integration is in place, the software distribution option is not enabled, so we have to enable this )

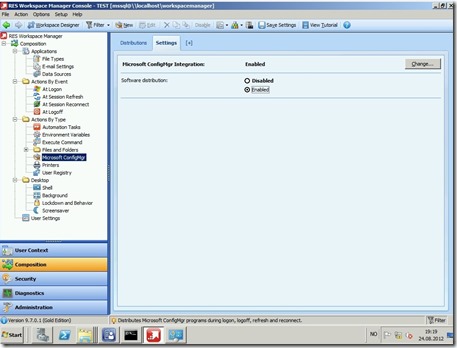
Exit the setup mode and go back to composition, and enable Software distribution.

4

And before we can deploy the software we have to attach the package to a application that is defined within Workspace Manager.

image

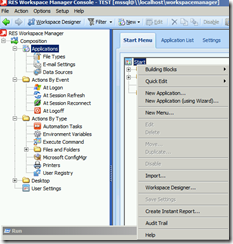
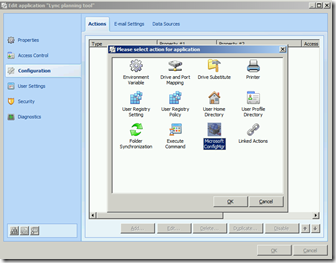
Click Start and press “New Application” if you are unfamiliar using the different options you can choose the wizard. I have created a “Lync planning tool” application. Right click and choose Edit, go down to configuration and press Add. From there choose ConfigMgr

image

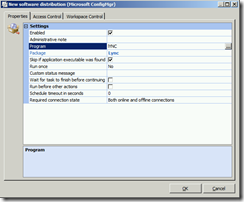
Now press the package you need to add. IF not mark the “Program” option and choose the button on the right side and add the package.

image

Then Press OK and close.
For all Managed desktop (With RES Agent and ConfigMgr Agent) Will now get this application.

#res-workspace-manager-2012, #sccm-2012

SCCM 2012 CAS

Something new in ConfigMgr 2012 is that Microsoft added a new site type, which is the CAS (Central Administration Site)
Microsoft says the following about it” The central administration site coordinates inter-site data replication across the hierarchy by using Configuration Manager database replication. It also enables the administration of hierarchy-wide configurations for client agents, discovery, and other operations. Use this site for all administration and reporting for the hierarchy”

This role is needed for large scale deployment and sits at the top of the hierarchy in ConfigMgr 2012. The top reasons for using this role is:
       * If you have over 100.000 clients in your environment.
       * If you wish to split up your environment in general.
       * If you need more then 1 Primary site

Top reasons not to use this role:
        * One extra server to maintain with licensing, monitoring and such.
        * SQL enterprise is most likely needed since this supports up to 400.000 clients (SQL server standard)  
           only support up to 50.000 clients.
        * The CAS role needs some heavy machinery since it needs to process a lot of data. Microsoft
            recommends 16 cores, 64 GB of ram and 1.5 TB disk space for all the files.
            If your environment  consists of 100.000 clients the database files alone will take approx. 500 GB                    
 
The CAS can support up to 25 child primary sites.

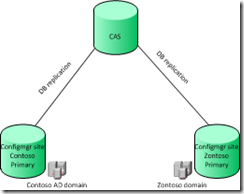
A typical CAS setup would look like this (If we had 2 domains)

image

Something that you need to know about the CAS role

It does not process data from clients

It does not accept client assignments

It participates in database replication

So this is a role that just “sits” there and receives data from other sites in the hierarchy.  Since the CAS also participates in database replication all inventory data and information will be replicated to the CAS server, therefore it is very useful to use for reporting services.

Also something to consider, in a multiple domain forest and multiple sites. Who has access to the CAS, who has admin access on the CAS? The users that have access to the CAS has access to every sites and its db information.

But remember if you need to use a CAS site in your environment, remember that you have to install the CAS role BEFORE you install a primary site. If you installed the primary site first, the only way to join that primary site to the CAS is to reinstall it.

http://technet.microsoft.com/en-us/library/gg712681.aspx#BKMK_ChooseCAS
http://technet.microsoft.com/en-us/library/hh846235.aspx

#cas, #sccm-2012, #sccm-cas

Forefront Endpoint Protection in SCCM 2012

Microsoft has been in the anti malware/virus business for a couple of years now. Going back to the first version of Windows Defender and going on today  with the most used antivirus product on the market (Which is free) Microsoft Security Essentials. Microsoft likes to label its security product as Forefront, their Forefront products are not only based on anti-malware/virus but also consists of Forefront TMG (Threat Management Gateway formally called ISA server) And Forefront UAG ( User Access Gateway ) Which is their Network Edge Security products.

Microsoft also has a their own anti-virus/malware product for enterprise businesses, which is called Forefront Endpoint Protection (Which is basically a converted Security Essentials, with added management capabilities)

Now with System Center 2012 release, Microsoft has a different approach. They have included the endpoint protection service with Configmgr 2012.   Therefore now you can manage forefront via SCCM console.

Not sure where Microsoft is headed with this, since if a business wants Forefront they would need to invest in SCCM as well (Even if they don’t need it).  On the other hand, Microsoft can now brag about having a system that does everything. Maybe its something they needed to compete with Symantec Altiris ? (Just a thought)

Let’s take a look at how you setup Forefront in ConfigMgr, and how you can manage it.
First you have to install the Endpoint Protection role via the console.

After that is done, you would need to alter the default client policy (Since by default it is disabled )

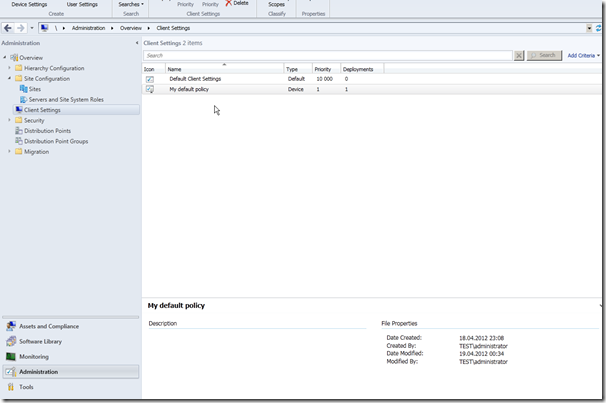
In my case I have created a custom client policy which I intend to use.

image

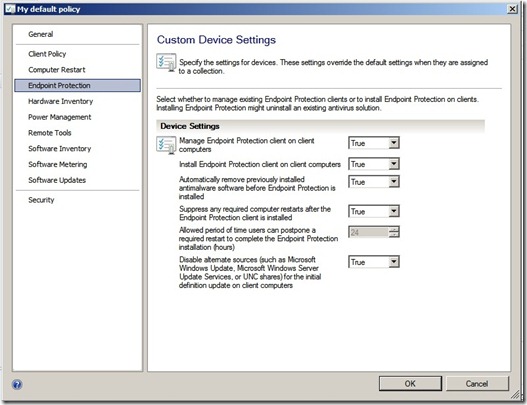
I open the policy and change the following settings,

forefront-policy

After I have changes these, I have to deploy the client settings to a computer collection that I wish to have forefront installed.
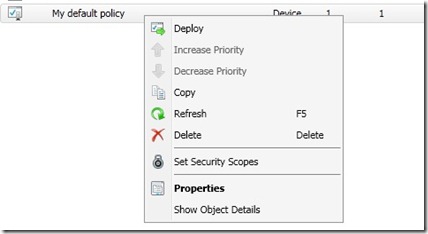
So I right click the policy and choose “Deploy”

forefront-policy2

When you now install a agent on a computer that resides within that collection, I will get SCEP installed.
If you watch the install log ccmsetup.log you will find multiple references to scep.exe file.
NOTE: That you need to restart the computer eventually for the installation to finish
After the installation is complete, you will get a new icon down in the system tray.
image That looks like this ( It might say “At risk” but this is because it only has the installed definitions.
Now that you have installed scep you also need to change the policy for how scep is going to function.
Since in the previous Client Policy all you did was install the scep software on the client.

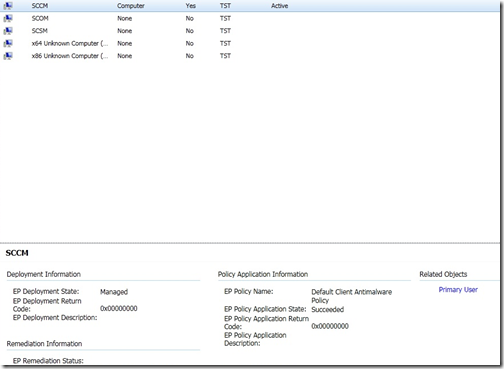
You can also see in the Console under Assets –> “A computer with SCEP installed”
That it says EP managed.
image
Now then over to the client policy

image

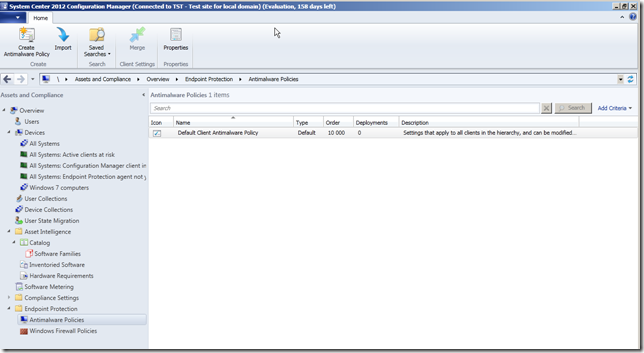
Head over to Assets and Compliance –> Endpoint Protection –> Antimalware Policies (There you will have a default client policy, which is the only we are going to alter, since this applies to all SCEP agents in the site)
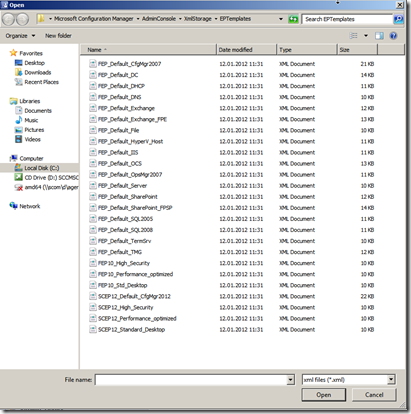
You can also choose import a policy, Forefront comes with a bunch of premade policies that Microsoft has created.

image

But lets alter the policy, and see what we need.

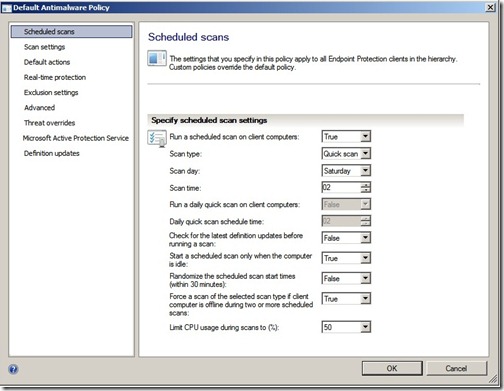
forefront1

First pane is about scans. The values you see here are the defaults (So im going to leave it at that )

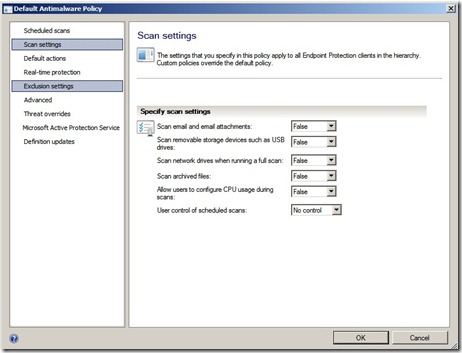
forefront2
Next is the Scan settings, this is also default values ( You should change it to scan removavle storage devices ) Now a days many business computers gets infected by an employees usb drive.
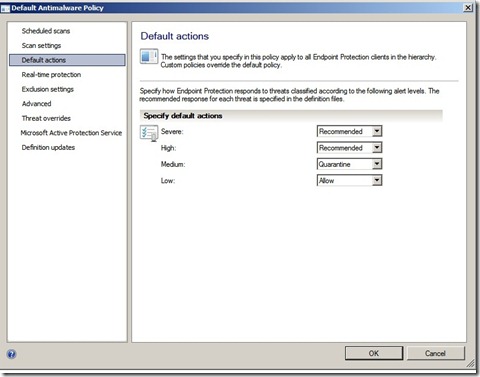
forefront3
Next is the default actions. If SCEP find the signature of a know virus which is under the category of “Severe” the recommend action attatched to that virus is run (Which is most cases is delete/remove)

forefront4

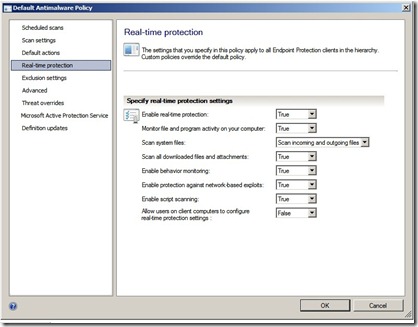
Next is real-time protection,  most values here should stay as default.
forefront5

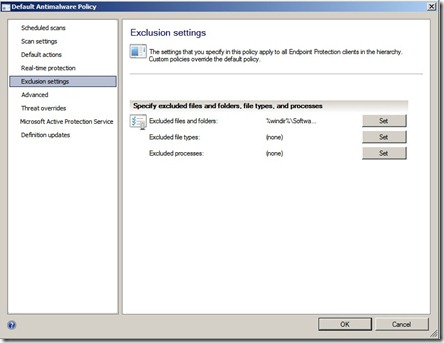
Next is Exclusion settings (Here you need to figure out, on what computers is this policy going to be deployed? )
If you have a SharePoint servers, it would need different Exclusion settings from a Terminal Server or Exchange.
forefront6

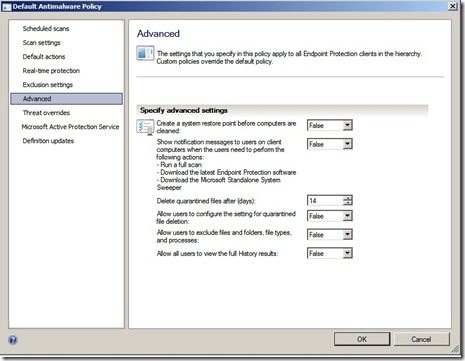
Next is Advanced, the default values here is also recommended. We don’t want to bug the user with notifications about updates every 2 hours, or scans happening.

forefront7
Next is the Threat Override here you can define for instance if you have multiple users that are installed Cain & Abel, SCEP will automatically place it into quarantine, here you can create an override so that users can use the tool.

forefront8

On to the MAPS, which basically sends info to Microsoft regarding malware (If something new is found with a unknown signature your contribution might allow Microsoft to create a fix)
forefront9

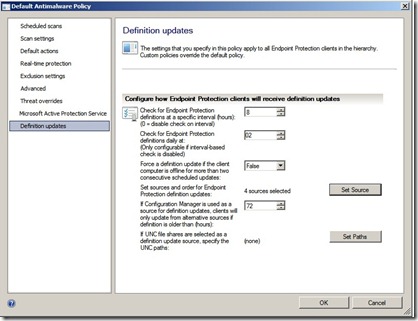
Next are the definition updates, here you set the settings for how the client updates.
By default there are 4 sources where the client is allowed to get updates from.

1: WSUS
2: SCCM
3: Microsoft Update
4: Microsoft Malware Protection Center

After you are done with the settings Click OK. 
It might take some time before the policy is updated on the computer.
You can watch the EndpointProtectionAgent.log file under C:\windows\ccm\logs

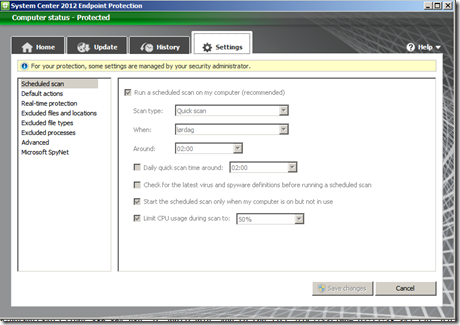
Now when you open settings on the SCEP agent you will notice that it says “Some settings are set by the administrator”
image

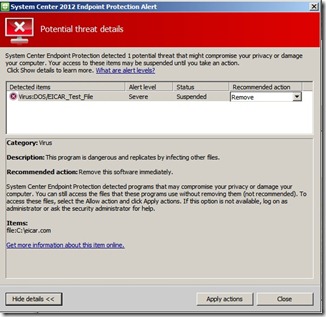
And for the purpose of this demo I wanted to test the SCEP agent and see what happens and how it interacts with the SCCM console when a virus appears on a computers.
So therefore I turned to EICAR.
EICAR is a test file to test the response of computer (AV) programs
What you need to do is open notepad
Enter this value

X5O!P%@AP[4\PZX54(P^)7CC)7}$EICAR-STANDARD-ANTIVIRUS-TEST-FILE!$H+H*
Save it as EICAR.COM and see what happens Smile


forefront-eicar

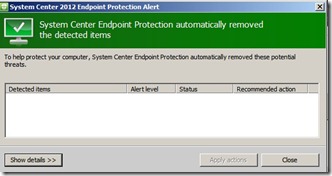
And the agent responded instantly, before I was able to finish writing it had automatically removed the file

forefront-eicar2

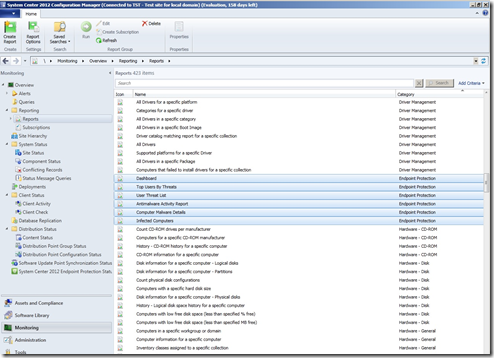
So now I am interested to see if the console saw that the virus appeared. therefore im going to use the report functionality,
Go over to the Monitoring tab –> Reporting –> Reports.

image

You can see that by default it includes 6 “Endpoint Protection” reports.
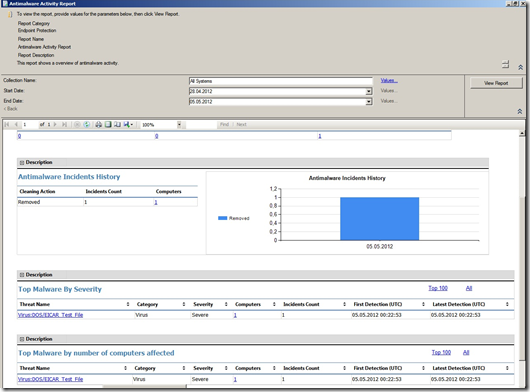
Im going to view the Antimalware Activity Report.

image

And there we go, the info has already been exported to the system.

#anti-virus, #endpoint-protection, #forefront, #sccm-2012

SCCM 2012 and PKI

This is going to be a huge post, but hopefully someone will find it useful for future references Smile
In my previous SCCM 2012 post, I showed how-to install SCCM, but not how to configure it for encrypted communication.

So out-of-the box SCCM traffic goes unencrypted via HTTP, which is clear text. So if you manage to get inside the LAN, fire up an arpspoof or macof (or any other MITM method) you can
read the traffic going back and fourth from the client to the site servers. So therefore I’m going to show you how to install your very own Microsoft PKI infrastructure and how you enroll the different types of Certificates that you need in order for SCCM to encrypt traffic.

Before I start, I want to show you how I designed my lab for this demo. This is in a fully virtual lab environment, much of the setup I do here is not “Best Practice” but in order to make this post readable, I wanted to keep it as short as I possibly could. I have excluded much of the setup regarding CRL, OSCP and config files (If you are unfamiliar with these terms go to this page http://technet.microsoft.com/en-us/library/cc772393%28WS.10%29.aspx )

In my lab I have

1 * SQL Server (Running the Configrmgr site SQL database)
1 * ADCS (Active Directory Certificate Services) Server running Enterprise Subordinate CA (Which we are going to install in this post ) Running Server 2008 R2 Enterprise
1 * ADCS Server running Stand-alone root CA (Is also going to be installed in this post ) Running Server 2008 R2 Enterprise
1 * ConfigrMgr server ( Which was installed in a previous post  )

What we are going to start with is the Stand-alone root CA, this is a server that is not connected to the network (For security reasons, and therefore not domain joined) Since we are going to create a trusted root CA, which the sub CA is going to use to issue certificates. The reason why I setup a two-tier PKI is because this is the most common used setup.

To but we do first, is install a virtual computer with server 2008 r2 ( or regular 2008 ) after the server is finished installing, you start by installing the server role ADCS
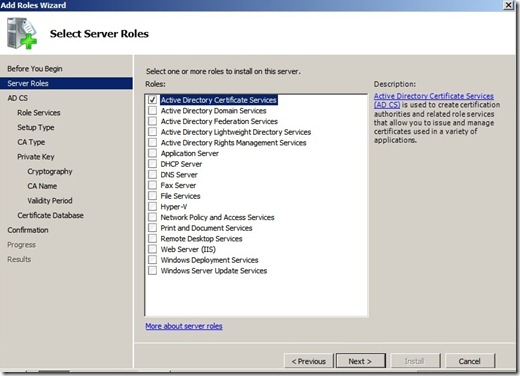
1

Click next and choose Certification Authority
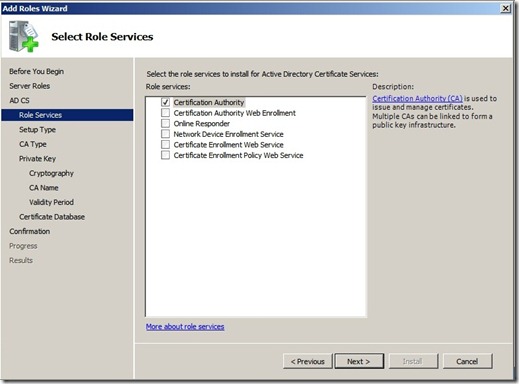
2

Click next and choose Standalone CA (As you can see Enterprise is unavailable since this server is not a part of a domain )
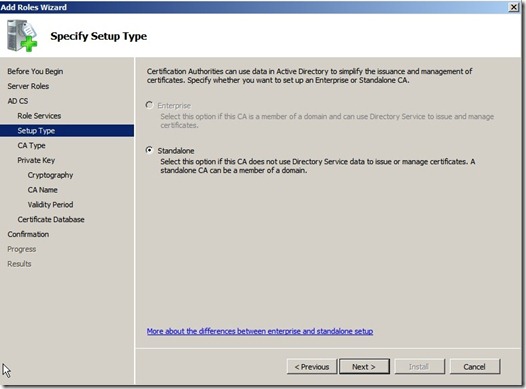
3

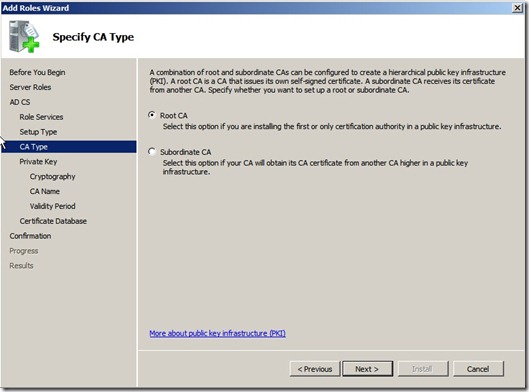
Click next and choose Root CA,

4

Click next and choose “Create a new private Key”
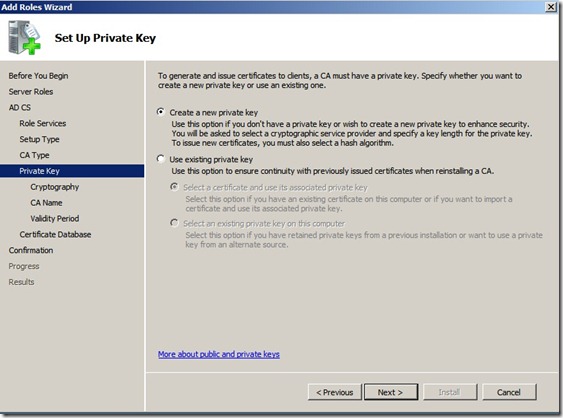
5

Click next, and next again ( Let it stay at the default on Cryptography )  and here by default it uses the hostname of the server (Since this was a fresh install and had the jibber is name WIN-i3ou423io I changed the name to ROOTCA1 (Which is the name that will appear on the trusted root certificate )
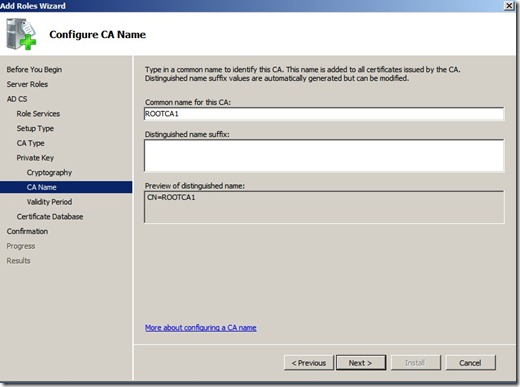
7

Click Next, next and Install.
Now after it is finished installing, go to the folder C:\windows\system32\certsrv\certenroll
There you will now have 2 files.

1 . crt file (Which is the Trusted root certificate)
1 . crl file (Which is the Certification Revocation List, which is basically a list that contains all the certification that have been revoked )

Now we have to export these files and import them on the subordinate server, so we have to install that first before we can continue. But after it is installed open a powershell prompt as a domain admin. Run the following commands.

certutil –dspublish –f filename.crt RootCA

certutil –addstore –f root filename.crt
certutil –addstore –f root ROOTCA1.crl

The first command places the root CA public certificate into the Configuration container of Active Directory. Doing so allows domain client computers to automatically trust the root CA certificate and there is no additional need to distribute that certificate in Group Policy. The second and third commands place the root CA certificate and CRL into the local store of the SUBCA. This provides SUBCA immediate trust of root CA public certificate and knowledge of the root CA CRL. SUBCA could obtain the certificate from Group Policy and the CRL from the CDP location, but publishing these two items to the local store on SUBCA is helpful to speed the configuration of SUBCA as a subordinate CA.
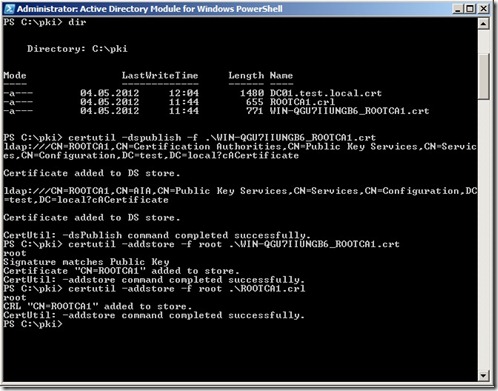
pki6
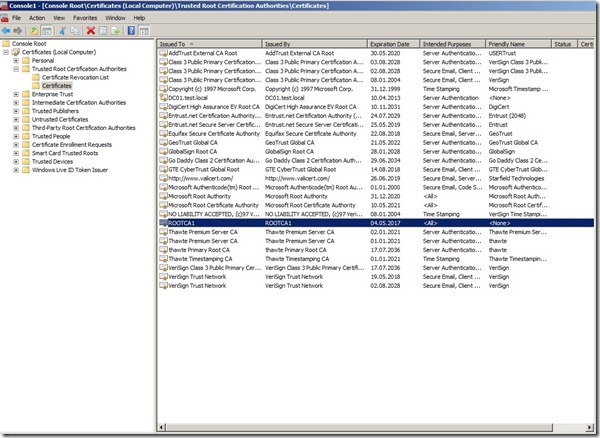
If you open the Local Certificate store on the server you can see that the Root CA and the Root CA CRL is in the local store.
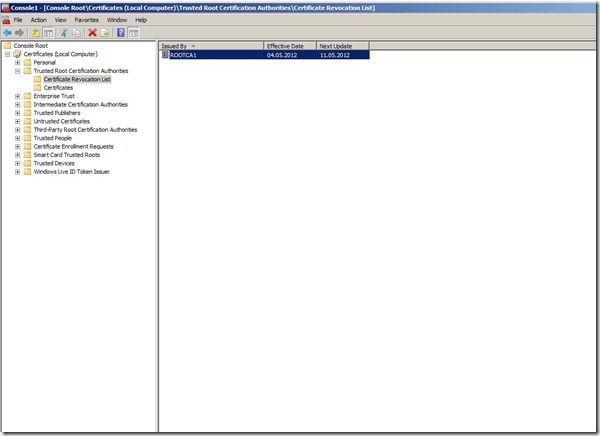
pki8

pki7

Now we can continue with the Sub-ordinate install ADCS.
The Setup is basically the same,
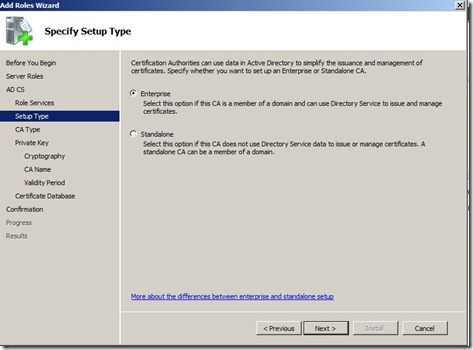
maskin2-1

Instead we choose Enterprise CA, click next.
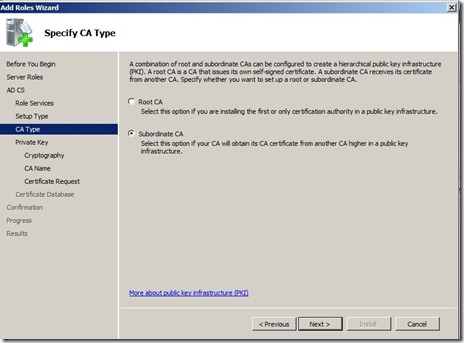
maskin2-2

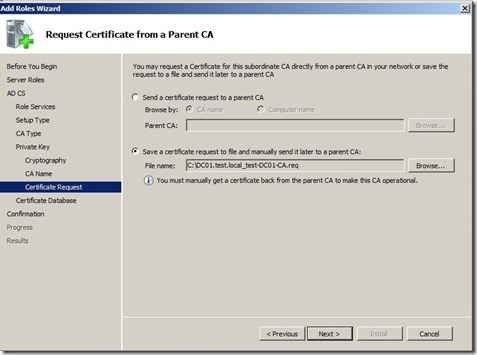
Choose Subordinate CA, click next.

maskin2-4

Here we choose “Save a certificate request to file” and choose a location. We need to copy this file over to the Root CA and issue a certificate in order to make the CA operational.
Click Next, and install. After you finished installing copy the file to the Root CA. Open a command prompt (ON THE ROOT CA) (PowerShell) And type the command
certreq -submit F:\APP1.corp.contoso.com_corp-App1-CA.req (remember to change the file name to match the one you have)

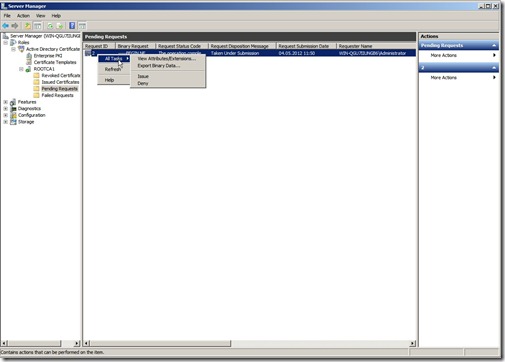
After you have done that, open the Certification Authority  MMC, Expand  and then click Pending Requests.
ROOT CA
pki2

Choose the certificate and click “Issue” now we have to copy the certificate back to a removable drive.
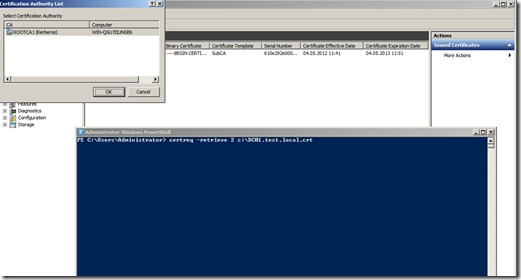
Open a powershell promt and run the command certreq –retrieve <RequestId> F:\filename.crt.

You can see the Request ID in the Issued Certificates tab.
Click enter and choose the ROOTCA1 from the List and click OK.
ROOT CA
pki4

This command, will copy the certificate of the server + the root CA certificate and crl.
(If not go to the Windows\System32\certsrv and copy the other files as well)

After you have copied the files to a removable drive you can turn of the Root CA as it is no longer needed.

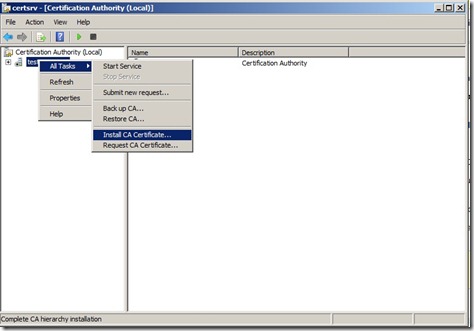
Now back to the Subordinate CA, open the Certification Authority mmc. Right click on the server click All Tasks, and then click Install CA Certificate.
pki9

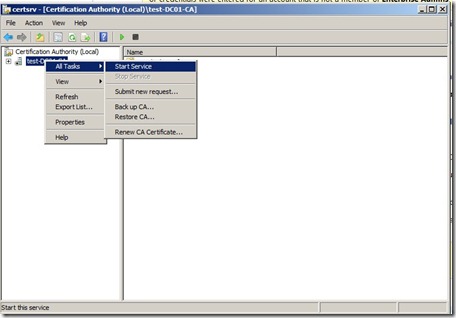
In the Select file to complete CA installation, set the file type to X.509 Certificate (*.cer; *.crt) and then navigate to the removable media and select hostname.crt. Click Open, now that we’ve imported the certiciate we can start the service.
pki10

Now what did we actually do here ?
First we setup the Root CA, which is the center of trust in this case(Tier 1). We created a Enterprise Root Certificate, we exported the Enterprise Root CA to Active Directory and to the Subordinate CA. And we installed a subordinate CA, made a certificate request, imported that to the root CA and issued the request. What it  basically does is that the sub-ca says to the root “I have a request, I wish to issue certificates” and then the
root ca says to the subordinate. “I trust you, here is your certificate so now you can issue certificates on my behalf”
Since all the domain computers get the Root CA certificate in the trusted root certificate authorities, they will automatically trust all the certificates that the Subordinate CA issues to the domain.

Hopefully that made some sense Smile
Now we are done with the PKI setup, now we have to start with the SCCM part of the certificates.
What kind of certificates do SCCM need ?

In this demo we are going to create two templates that will automatically deployed via AD.

  • ConfigMgr Client Certificate

By default, Configuration Manager looks for computer certificates in the Personal store in the Computer certificate store.
With the exception of the software update point and the Application Catalog website point, this certificate authenticates the client to site system servers that run IIS and that are configured to use HTTPS.

  • ConfigMgr Web Server Certificate

This web server certificate is used to authenticate these servers to the client and to encrypt all data transferred between the client and these servers by using Secure Sockets Layer (SSL).

You can see the entire list here.
http://technet.microsoft.com/en-us/library/gg699362.aspx

Lets start with the Client Certificate
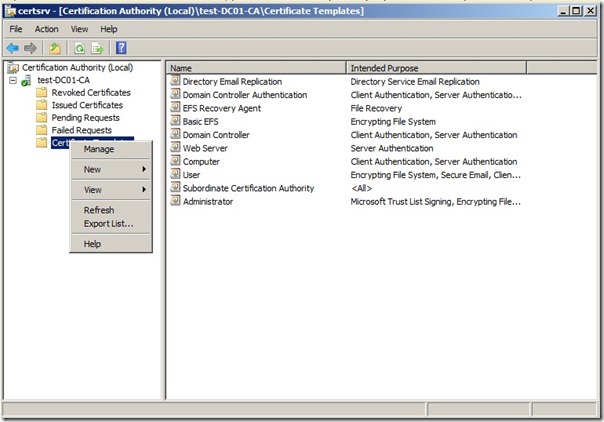
On the subordinate root CA open the Certification Authority console, right-click Certificate Templates, and then click Manage to load the Certificate Templates management console
pki11

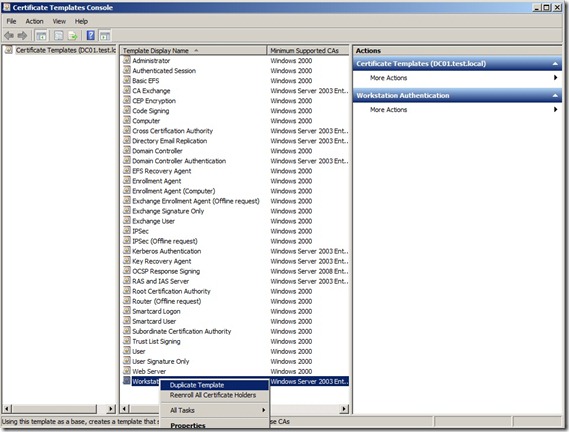
right-click the entry that displays Workstation Authentication in the column Template Display Name, and then click Duplicate Template.
pki12

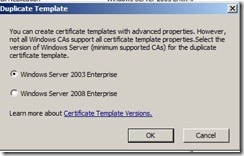
In the Duplicate Template ensure that Windows 2003 Server, Enterprise Edition is selected, and then click OK. (2008 Server is not supported by ConfigMgr 2012)
pki13

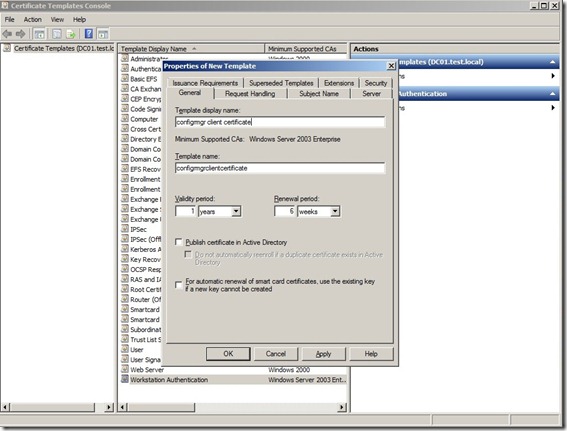
In the Properties of New Template dialog box, on the General tab, enter a template name to generate the client certificates that will be used on Configuration Manager client computers, such as ConfigMgr Client Certificate.
pki14

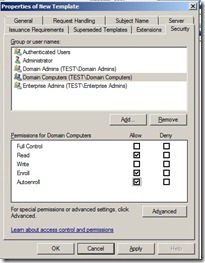
Click the Security tab, select the Domain Computers group, and select the additional permissions of Read and Auto enroll. Do not clear Enroll (This gives domain computers the permission to get this certificate)
pki15

Click Ok, and close the Console.

Now back to the Certification Authority console, right-click Certificate Templates, click New, and then click Certificate Template to Issue.
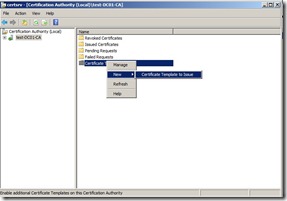
pki16

In the Enable Certificate Templates dialog box, select the new template that you have just created, ConfigMgr Client Certificate, and then click OK.
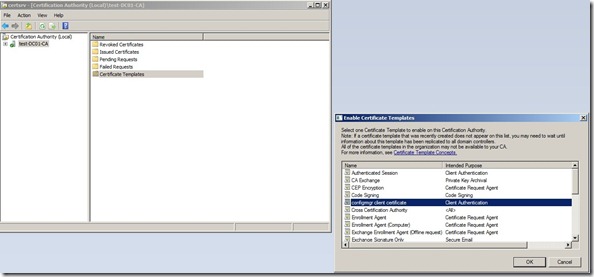
pki17

Next we need to create a group policy that allows the clients in the domain to do auto enrollment.

Open the group policy management console, and create a new group policy object.

In the Group Policy Management Editor, expand Policies under Computer Configuration, and then navigate to Windows Settings / Security Settings / Public Key Policies

Right-click the object type named Certificate Services Client – Auto-enrollment, and then click Properties.

From the Configuration Model drop-down list, select Enabled, select Renew expired certificates, update pending certificates, and remove revoked certificates, select Update certificates that use certificate templates, and then click OK.
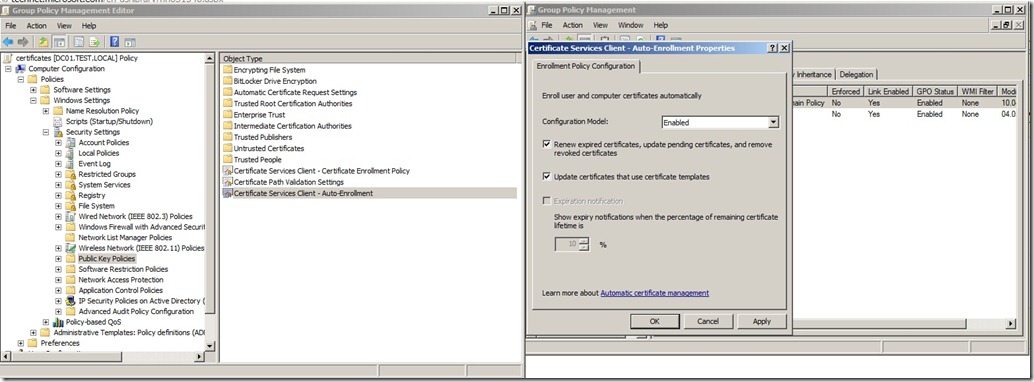
pki-gpo

Then close the Group Policy Management Console.

If you have a client computer in the domain, reboot the computer. When the client is finished booting the client will check its policy.
1: See that it has auto enrollment enabled
2: See what certificates it has access to (Since we added Domain computers to the ConfigMgr client certificate, it fill automatically fetch a certificate from the subordinate CA)

You can double check this by opening the local certificate store on the client computer.
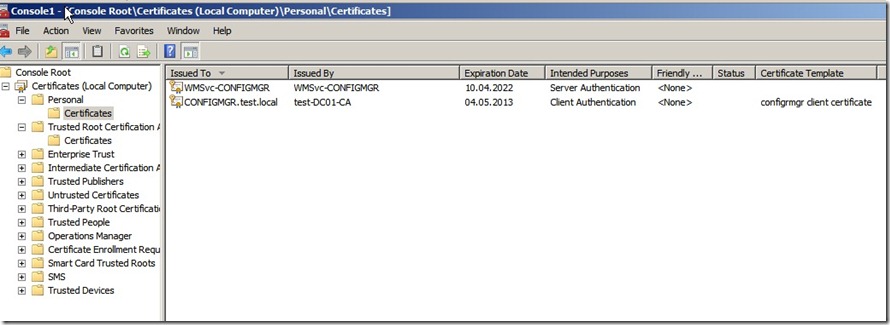
pki-sccm2

Now we need to repeat this for creating a certificate template for the Configmgr server roles.
Follow the same steps as before, but there are some other changes.
Instead of the Workstation template, choose the Webserver template and choose duplicate template.

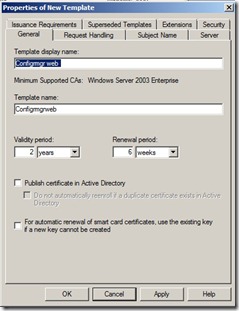
Properties of New Template dialog box, on the General tab, enter a template name to generate the web certificates that will be used on Configuration Manager site systems, such as ConfigMgr Web Server Certificate.
pki-web

Click the Subject Name tab, and make sure that Supply in the request is selected.
pki-web2

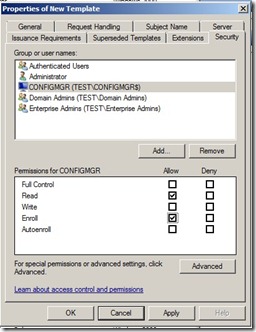
Click the Security tab, and remove the Enroll permission from the security groups Domain Admins and Enterprise Admins. Click Add, enter the name of the configmgr computer names in the text box, and then click OK. Select the Enroll permission for this group or computer account, and do not clear the Read permission. (This gives the ConfigMgr server right to enroll for this template) Then click OK.
pki-web3

In the Certification Authority console, right-click Certificate Templates, click New, and then click Certificate Template to Issue

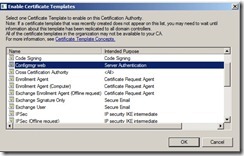
In the Enable Certificate Templates dialog box, select the new template that you have just created, ConfigMgr Web Server Certificate, and then click OK.
pki-web4

Now head over to the ConfigMgr server.

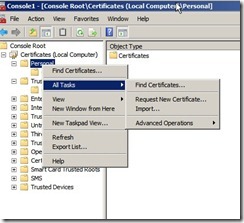
Open the local Certificate Store on the server, select computer account. Click on the personal store, Right-click Certificates, click All Tasks, and then click Request New Certificate.
pki-sccm3

On the Before You Begin page, click Next

If you see the Select Certificate Enrollment Policy page, click Next.

On the Request Certificates page, identify the ConfigMgr Web Server Certificate from the list of displayed certificates, and then click More information is required to enroll for this certificate. Click here to configure settings.
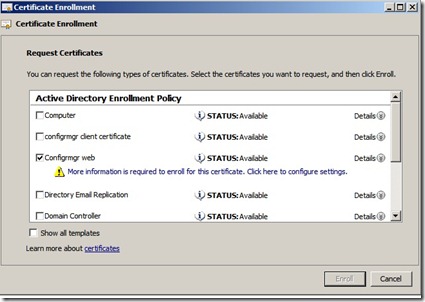
pki-sccm4

In the Certificate Properties dialog box, in the Subject tab, do not make any changes to the Subject name. This means that the Value box for the Subject name section remains blank. Instead, from the Alternative name section, click the Type drop-down list, and then select DNS.

In the Value box, specify the FQDN values that you will specify in the Configuration Manager site system properties, and then click OK to close the Certificate Properties dialog box.
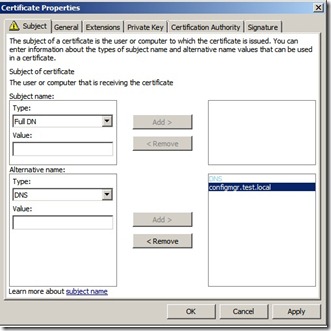
pki-sccm5

On the Request Certificates page, select ConfigMgr Web Server Certificate from the list of displayed certificates, and then click Enroll.
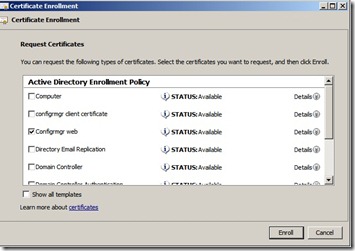
pki-sccm6

Now the ConfigMgr server will have a certificate available which I can use.
Open IIS Manager, Expand Sites, right-click Default Web Site, and then select Edit Bindings.

Click the https entry, and then click Edit. In the Edit Site Binding dialog box, select the certificate that you requested by using the ConfigMgr Web Server Certificates template, and then click OK. After that is done, close the console.
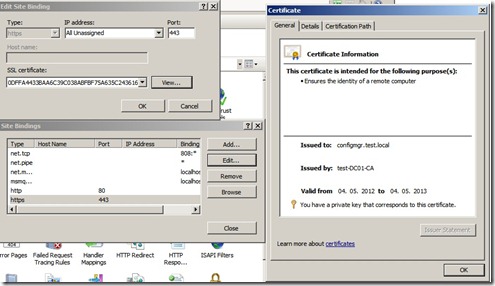
pki-sccm7

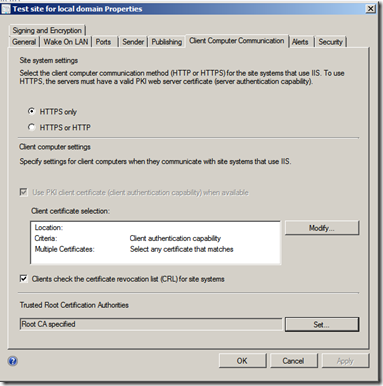
Since I’ve done this after the SCCM got installed, I have to do some configuration in the console as well. Go to Administration –> Sites –> Right click and choose properties, go to client computer communication –> Choose use HTTPS and import the Root CA crt in the bottom menu.
image

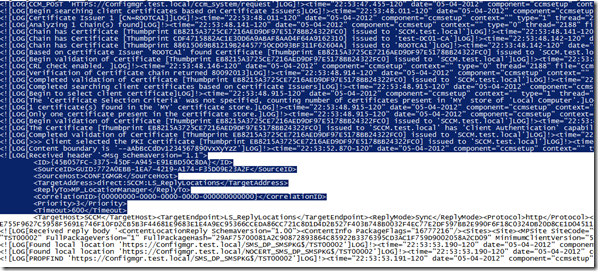
Now im going to install the SCCM client on a new computer and see that its communicating on port 443. As you can see during the install, the setup looks for a certificate under the Personal Store on the computer, and uses that in order to communicate with the site server.
image

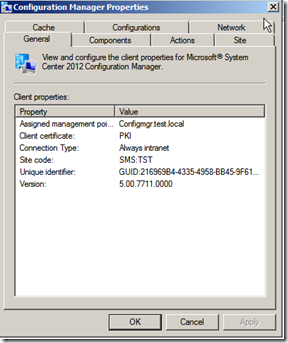
Now if I open the agent on the client I can see that it says client certificate it says PKI,
image

Now If I choose a Action like fetch Machine Policy, It should communicate with the Site server using https:
I can also open the Application portal, and it should be using the new certificate.

And Voila there you have it, encrypted communication between client and ConfigMgr site server (Management Point) My next blog will include the Distribution point, which uses a diffenrent type of certificate.
If you choose https mode on DP after you completed this demo you will get some error messages from your client.

#adcs, #certificate, #pki, #sccm-2012, #sccm-and-pki, #system-center-2012