So this is a blogpost based upon a session I had at NIC conference, where I spoke about how to optimize the delivery of Office365 in a VDI/RSDH enviroment.
There are multiple stuff we need to think / worry about. Might seem a bit negative, but that is not the idea just being realistic ![]()
So this blogpost will cover the following subjects
- Federation and sync
- Installing and managing updates
- Optimizing Office ProPlus for VDI/RDS
- Office ProPlus optimal delivery
- Shared Computer Support
- Skype for Buisness
- Outlook
- OneDrive
- Troubleshooting and general tips for tuning
- Remote display protocols and when to use when.
So what is the main issue with using Terminal Servers and Office365? The Distance….
This is the headline for a blogpost on Citrix blogs about XenApp best pratices

So how to fix this when we have our clients on one side, the infrastructure in another and the Office365 in a different region ? Seperated with long miles and still try to deliver the best experience for the end-user, so In some case we need to compromise to be able to deliver the best user experience. Because that should be our end goal Deliver the best user experience

User Access
First of is, do we need to have federation or just plain password sync in place? Using password sync is easy and simple to setup and does not require any extra infrastructure. We can also configure it to use Password hash sync which will allow Azure AD to do the authentication process. Problem with doing this is that we lose a lot of stuff which we might use on an on-premises solution
- Audit policies
- Existing MFA (If we use Azure AD as authentication point we need to use Azure MFA)
- Delegated Access via Intune
- Lockdown and password changes (Since we need change to be synced to Azure AD before the user changes will be taken into effect)

NOTE: Now since I am above average interested in Netscaler I wanted to include another sentence here, for those that don’t know is that Netscaler with AAA can in essence replace ADFS since Netscaler now supports SAML iDP. Some important issues to note is that Netscaler does not support • Single Logout profile; • Identity Provider Discovery profile from the SAML profiles. We can also use Netscaler Unified Gateway with SSO to Office365 with SAML. The setup guide can be found here
https://msandbu.wordpress.com/2015/04/01/netscaler-and-office365-saml-idp-setup/
NOTE: We can also use Vmware Identity manager as an replacement to deliver SSO.
Using ADFS gives alot of advantages that password hash does not.
- True SSO (While password hash gives Same Sign-on)
- If we have Audit policies in place
- Disabled users get locked out immidietly instead of 3 hours wait time until the Azure AD connect syng engine starts replicating, and 5 minutes for password changes.
- If we have on-premises two-factor authentication we can most likely integrate it with ADFS but not if we have only password hash sync
- Other security policies, like time of the day restrictions and so on.
- Some licensing stuff requires federation
So to sum it up, please use federation
Initial Office configuration setup
Secondly, using the Office suite from Office365 uses something called Click-to-run, which is kinda an app-v wrapped Office package from Microsoft, which allows for easy updates from Microsoft directly instead of dabbling with the MSI installer.
In order to customize this installer we need to use the Office deployment toolkit which basically allows us to customize the deployment using an XML file.
The deployment tool has three switches that we can use.
setup.exe /download configuration.xml
setup.exe /configure configuration.xml
setup.exe /packager configuration.xml
NOTE: Using the /packager creates an App-V package of Office365 Click-To-run and requires a clean VM like we do when doing sequencing on App-V, which can then be distributed using existing App-V infrastructure or using other tools. But remember to enable scripting on the App-V client and do not alter the package using sequencing tool it is not supported.
The download part downloads Office based upon the configuration file here we can specify bit editions, versions number, office applications to be included and update path and so on. The Configuration XML file looks like this.
<Configuration>
<Add OfficeClientEdition=»64″ Branch=»Current»>
<Product ID=»O365ProPlusRetail»>
<Language ID=»en-us»/>
</Product>
</Add>
<Updates Enabled=»TRUE» Branch=»Business» UpdatePath=»\\server1\office365″ TargetVersion=»16.0.6366.2036″/>
<Display Level=»None» AcceptEULA=»TRUE»/>
</Configuration>
Now if you are like me and don’t remember all the different XML parameters you can use this site to customize your own XML file –> http://officedev.github.io/Office-IT-Pro-Deployment-Scripts/XmlEditor.html
When you are done configuring the XML file you can choose the export button to have the XML file downloaded.
If we have specified a specific Office version as part of the configuration.xml it will be downloaded to a seperate folder and storaged locally when we run the command setup.exe /download configuration.xml
NOTE: The different build numbers are available here –> http://support2.microsoft.com/gp/office-2013-365-update?
When we are done with the download of the click-to-run installer. We can change the configuration file to reflect the path of the office download
<Configuration> <Add SourcePath=»\\share\office» OfficeClientEdition=»32″ Branch=»Business»>
When we do the setup.exe /configure configuration.xml path
Deployment of Office
The main deployment is done using the setup.exe /configure configuration.xml file on the RSDH host. After the installation is complete
Shared Computer Support
<Display Level="None" AcceptEULA="True" />
<Property Name="SharedComputerLicensing" Value="1" />
In the configuration file we need to remember to enable SharedComputerSupport licensing or else we get this error message.

If you forgot you can also enable is using this registry key (just store it as an .reg file)
Windows Registry Editor Version 5.00
[HKEY_LOCAL_MACHINE\SOFTWARE\Microsoft\Office\15.0\ClickToRun\Configuration]
«InstallationPath»=»C:\\Program Files\\Microsoft Office 15»
«SharedComputerLicensing»=»1
Now we are actually done with the golden image setup, don’t start the application yet if you want to use it for an image. Also make sure that there are no licenses installed on the host, which can be done using this tool.
cd ‘C:\Program Files (x86)\Microsoft Office\Office15’
cscript.exe .\OSPP.VBS /dstatus

This should be blank!
Another issue with this is that when a user starts an office app for the first time he/she needs to authenticate once, then a token will be stored locally on the %localappdata%\Microsoft\Office\15.0\Licensing folder, and will expire within a couple of days if the user is not active on the terminalserver. Think about it, if we have a large farm with many servers that might be the case and if a user is redirected to another server he/she will need to authenticate again. If the user is going against one server, the token will automatically refresh.
NOTE: This requires Internet access to work.
And important to remember that the Shared Computer support token is bound to the machine, so we cannot roam that token around computers or using any profile management tool.
But a nice thing is that if we have ADFS setup, we can setup Office365 to automatically activate against Office365, this is enabled by default. So no pesky logon screens.
Just need to add the ADFS domain site to trusted sites on Internet Explorer and define this settings as well
Automatic logon only in Intranet Zone

Which allows us to basically resolve the token issue with Shared Computer Support ![]()
Optimizing Skype for Buisness
So in regards to Skype for Buisness what options do we have in order to deliver a good user experience for it ? We have four options that I want to explore upon.
- VDI plugin
- Native RDP with UDP
- Natnix PCoIP
- Native ICA (w or without audio over UDP)
- Local app access
- HDX Optimization Pack 2.0
Now the issue with the first one (which is a Microsoft plugin is that it does not support Office365, it requires on-premises Lync/Skype) another issue that you cannot use VDI plugin and optimization pack at the same time, so if users are using VDI plugin and you want to switch to optimization pack you need to remove the VDI plugin
ICA uses TCP protcol works with most endpoints, since its basically running everyone directly on the server/vdi so the issue here is that we get no server offloading. So if we have 100 users running a video conference we might have a issue ![]() If the two other options are not available try to setup HDX realtime using audio over UDP for better audio performance. Both RDP and PCoIP use UDP for Audio/Video and therefore do not require any other specific customization.
If the two other options are not available try to setup HDX realtime using audio over UDP for better audio performance. Both RDP and PCoIP use UDP for Audio/Video and therefore do not require any other specific customization.
But the problems with all these are that they make a tromboning effect and consumes more bandwidth and eats up the resources on the session host

Local App from Citrix access might be a viable option, which in essence means that a local application will be dragged into the receiver session, but this requires that the enduser has Lync/Skype installed. This also requires platinum licenses so not everyone has that + at it only supports Windows endpoints…
The last and most important piece is the HDX optimization pack which allows the use of server offloading using HDX media engine on the end user device
And the optimization pack supports Office365 with federated user and cloud only users. It also supports the latest clients (Skype for buisness) and can work in conjunction with Netscaler Gateway and Lync edge server for on-premises deployments. So means that we can get Mac/Linux/Windows users using server offloading, and with the latest release it also supports Office click-to-run and works with the native Skype UI
So using this feature we can offload the RSDH/VDI instances from CPU/Memory and eventually GPU directly back to the client. And Audio/video traffic is going to the endpoint directly and not to the remote session

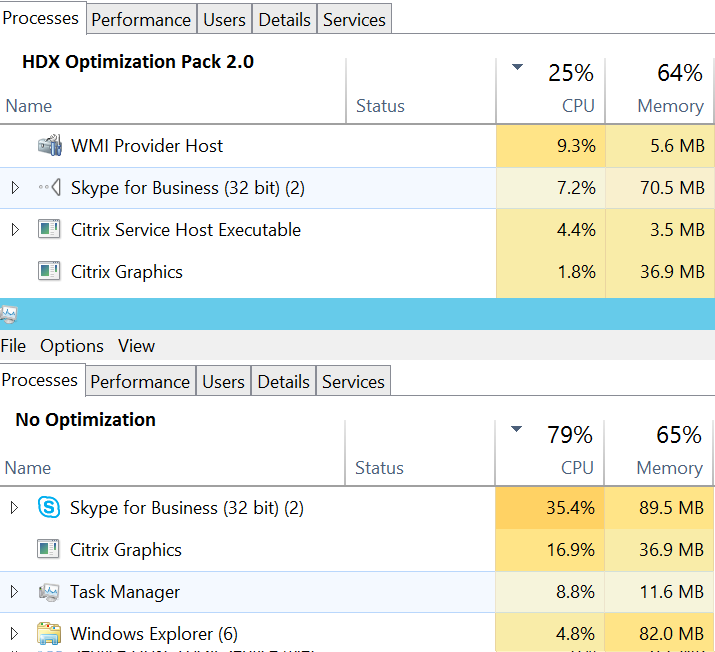
Here is a simple test showing the difference between running Skype for buisness on a terminal server with and without HDX Optimization Pack 2.0
Here is a complete blogpost on setting up HDX Optimization Pack 2.0 https://msandbu.wordpress.com/2016/01/02/citrix-hdx-optimization-pack-2-0/
Now for more of the this part, we also have Outlook. Which for many is quite the headache…. and that is most because of the OST files that is dropped in the %localappdata% folder for each user. Office ProPlus has a setting called fast access which means that Outlook will in most cases try to contact Office365 directly, but if the latency is becoming to high, the connection will drop and it will go and search trough the OST files.
Optimizing Outlook
Now this is the big elefant in the room and causes the most headaches. Since Outlook against Office365 can be setup in two modes either using Cached mode and the other using Online mode. Online modes uses direct access to Office365 but users loose features like instant search and such. In order to deliver a good user experience we need to compromise, the general guideline here is to configure cached mode with 3 months, and define to store the OST file (Which contains the emails, calender, etc) and is typically 60-80% than the email folder) on a network share. Since these OST files are by default created in the local appdata profile and using streaming profile management solutions aren’t typically a good fit for the OST file.
. Important to note that Microsoft supports having OST files on a network share, IF! there is adequate bandwidth and low latency… and only if there is one OST file and the users have Outlook 2010 SP1
NOTE: We can use other alternatives such as FSLogix, Unidesk to fix the Profile management in a better way.
Ill come back to the configuration part later in the Policy bits. And important to remember is to use Office Outlook over 2013 SP1 which gives MAPI over HTTP, instead of RCP over HTTP which does not consume that much bandwidth.
OneDrive
In regards to OneDrive try to exclude that from RSDH/VDI instances since the sync engine basically doesnt work very well and now that each user has 1 TB of storagee space, it will flood the storage quicker then anything else, if users are allowed to use it. Also there is no central management capabilities and network shares are not supported.
There are some changes in the upcoming unified client, in terms of deployment and management but still not a good solution.
You can remove it from the Office365 deployment by adding this in the configuration file.
<ExcludeApp ID=»Groove» />
Optimization and group policy tuning
Now something that should be noted is that before installing Office365 click-to-run you should optimize the RSDH sessions hosts or the VDI instance. A blogpost which was published by Citrix noted a 20% in performance after some simple RSDH optimization was done.
Both Vmware and Citrix have free tools which allow to do RSDH/VDI Optimization which should be looked at before doing anything else.
Now the rest is mostly doing Group Policy tuning. Firstly we need to download the ADMX templates from Microsoft (either 2013 or 2016) then we need to add them to the central store.
We can then use Group Policy to manage the specific applications and how they behave. Another thing to think about is using Target Version group policy to manage which specific build we want to be on so we don’t have a new build each time Microsoft rolls-out a new version, because from experience I can tell that some new builds include new bugs –> https://msandbu.wordpress.com/2015/03/09/trouble-with-office365-shared-computer-support-on-february-and-december-builds/

Now the most important policies are stored in the computer configuration.
Computer Configuration –> Policies –> Administrative Templates –> Microsoft Office 2013 –> Updates
Here there are a few settings we should change to manage updates.
- Enable Automatic Updates
- Enable Automatic Upgrades
- Hide Option to enable or disable updates
- Update Path
- Update Deadline
- Target Version
These control how we do updates, we can specify enable automatic updates, without a update path and a target version, which will essentually make Office auto update to the latest version from Microsoft office. Or we can specify an update path (to a network share were we have downloaded a specific version) specify a target version) and do enable automatic updates and define a baseline) for a a specific OU for instance, this will trigger an update using a built-in task schedulerer which is added with Office, when the deadline is approaching Office has built in triggers to notify end users of the deployment. So using these policies we can have multiple deployment to specific users/computers. Some with the latest version and some using a specific version.
Next thing is for Remote Desktop Services only, if we are using pure RDS to make sure that we have an optimized setup. NOTE: Do not touch if everything is working as intended.
Computer Policies –> Administrative Templates –> Windows Components –> Remote Desktop Services –> Remote Desktop Session Host –> Remote Session Enviroment
- Limit maximum color depth (Set to16-bits) less data across the wire)
- Configure compression for RemoteFX data (set to bandwidth optimized)
- Configure RemoteFX Adaptive Graphics ( set to bandwidth optimized)
Next there are more Office specific policies to make sure that we disable all the stuff we don’t need.
User Configuration –> Administrative Templates –> Microsoft Office 2013 –> Miscellaneous
- Do not use hardware graphics acceleration
- Disable Office animations
- Disable Office backgrounds
- Disable the Office start screen
- Supress the recommended settings dialog
User Configuration –> Administrative Templates –>Microsoft Office 2013 –> Global Options –> Customizehide
- Menu animations (disabled!)
Next is under
User Configuration –> Administrative Templates –> Microsoft Office 2013 –> First Run
- Disable First Run Movie
- Disable Office First Run Movie on application boot
User Configuration –> Administrative Templates –> Microsoft Office 2013 –> Subscription Activation
- Automatically activate Office with federated organization credentials
Last but not least, define Cached mode for Outlook
User Configuration –> Administrative Templates –> Microsoft Outlook 2013 –> Account Settings –> Exchange –> Cached Exchange Modes
- Cached Exchange Mode (File | Cached Exchange Mode)
- Cached Exchange Mode Sync Settings (3 months)
Then specify the location of the OST files, which of course is somewhere else
User Configuration –> Administrative Templates –> Microsoft Outlook 2013 –> Miscellanous –> PST Settings
- Default Location for OST files (Change this to a network share
Network and bandwidth tips
Something that you need to be aware of this the bandwidth usage of Office in a terminal server enviroment.
Average latency to Office is 50 – 70 MS
• 2000 «Heavy» users using Online mode in Outlook
About 20 mbps at peak
• 2000 «Heavy» users using Cached mode in Outlook
About 10 mbps at peak
• 2000 «Heavy» users using audio calls in Lync About 110 mbps at peak
• 2000 «Heavy» users working Office using RDP About 180 mbps at peak
Which means using for instance HDX optimization pack for 2000 users might “remove” 110 mbps of bandwidth usage.
Microsoft also has an application called Office365 client analyzer, which can give us a baseline to see how our network is against Office365, such as DNS, Latency to Office365 and such. And DNS is quite important in Office365 because Microsoft uses proximity based load balancing and if your DNS server is located elsewhere then your clients you might be sent in the wrong direction. The client analyzer can give you that information.

(We could however buy ExpressRoute from Microsoft which would give us low-latency connections directly to their datacenters, but this is only suiteable for LARGER enterprises, since it costs HIGH amounts of $$)

But this is for the larger enterprises which allows them to overcome the basic limitations of TCP stack which allow for limited amount of external connection to about 4000 connections at the same time. (One external NAT can support about 4,000 connections, given that Outlook consumes about 4 concurrent connections and Lync some as well)
Because Microsoft recommands that in a online scenario that the clients does not have more then 110 MS latency to Office365, and in my case I have about 60 – 70 MS latency. If we combine that with some packet loss or adjusted MTU well you get the picture ![]()
Using Outlook Online mode, we should have a MAX latency of 110 MS above that will decline the user experience. Another thing is that using online mode disables instant search. We can use the exchange traffic excel calculator from Microsoft to calculate the amount of bandwidth requirements.
Some rule of thumbs, do some calculations! Use the bandwidth calculators for Lync/Exchange which might point you in the right direction. We can also use WAN accelerators (w/caching) for instance which might also lighten the burden on the bandwidth usage. You also need to think about the bandwidth usage if you are allow automatic updates enabled in your enviroment.
Troubleshooting tips
As the last part of this LOOONG post I have some general tips on using Office in a virtual enviroment. This is just gonna be a long list of different tips
- For Hyper-V deployments, check VMQ and latest NIC drivers
- 32-bits Office C2R typically works better then 64-bits
- Antivirus ? Make Exceptions!
- Remove Office products that you don’t need from the configuration, since this add extra traffic when doing downloads and more stuff added to the virtual machines
- If you don’t use lync and audio service (disable the audio service! )
- If using RDSH (Check the Group policy settings I recommended above)
- If using Citrix or VMware (Make sure to tune the polices for an optimal experience, and using the RSDH/VDI optimization tools from the different vendors)
- If Outlook is sluggish, check that you have adequate storage I/O to the network share (NO HIGH BANDWIDTH IS NOT ENOUGH IF STORED ON A SIMPLE RAID WITH 10k disks)
- If all else failes on Outlook (Disable MAPI over HTTP) In some cases when getting new mail takes a long time try to disable this, used to be a known error)
Remote display protocols
Last but not least I want to mention this briefly, if you are setting up a new solution and thinking about choosing one vendor over the other. The first of is
- Endpoint requirements (Thin clients, Windows, Mac, Linux)
- Requirements in terms of GPU, Mobile workers etc)
Now we have done some tests, which shown the Citrix has the best feature across the different sub protocols
- ThinWire (Best across high latency lines, using TCP works over 1800 MS Latency)
- Framehawk (Work good at 20% packet loss lines)
While PcoIP performs a bit better then RDP, I have another blogpost on the subject here –> https://msandbu.wordpress.com/2015/11/06/putting-thinwire-and-framehawk-to-the-test/


