Setting up XenDesktop 7.7 against Microsoft Azure

Starting of the new year with a long awaited feature on my part, setting up integration between XenDesktop and Microsoft Azure which is now a supported integration in 7.7 which was released now a week ago. This integration allow us to provision virtual machines directly from Studio. NOTE: Important to note however that XenDesktop as of now only supports V1 (Classic) virtual machines in Azure, so no Resource Groups yet, which might make it a bit confiusing for some but ill try to cover it as good as I can.

But a good thing with this is that we can either setup XenDesktop in a hybrid setting where we have the controller and studio running from our local infrastructure or that we are running everything in Azure which is also another setup.

Now after setting up XenDesktop 7.7 you have a new option when setting up a new connection now, you need to get publish information from Azure before continuing this wizard, that can be downloaded from https://manage.windowsazure.com/publishsettings

image

Important that when downloading a publish profile that the subcribtion contains a virtual network (Classic virtual networking) within the region we choose later in the wizard, or else you will not be able to continue the wizard.

This can be viewed/created from the new portal under the “classic” virtual network objects

image

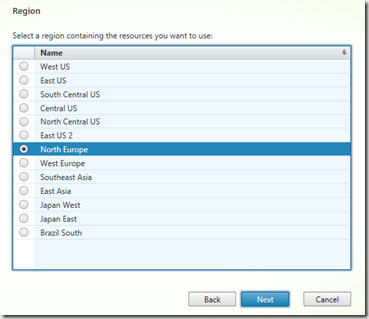
Now after verifying the connection profile you will get an option of different regions available within the subscription.

image

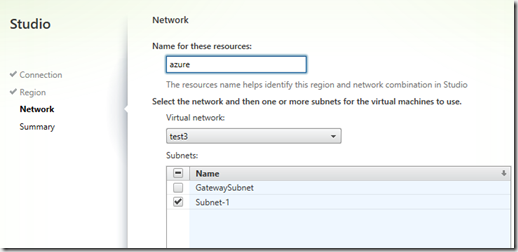
After choosing a region the wizard will list out all available virtual networks within the region, and will by default choose a subnet which has valid IP-range setup.
NOTE: The other subnet is used for Site-to-site VPN and should not be chosed in the wizard.

image

This part just defines which virtual networks the provisioned machines are going to use. So after we are done with the wizard we can get started with the provisioning part. Now in order to use MCS to create a pool of virtual machines in Azure we need to create an master image first. This can be done by creating a virtual machine within Azure, installing the VDA, doing any optimization, installing applications and doing sysprep and shutting down the virtual machines. Then we need to run PowerShell to capture the image. The reason for this is that the portal does not support capturing images in a state called specialized.

NOTE: A simple way to upload the VDA agent to the master image virtual machine is by using for instance Veeam FASTSCP for Azure, which uses WinRM to communicate and be able to download and upload files to the virtual machine.

image

DONT INSTALL ANYTHING SQL related on the C: drive (Since it uses a read/write cache which might end up with a corrupt database, and don’t install anything on the D: drive since this is a temporary drive and will be purged during a restart.

A specialized VM Image is meant to be used as a “snapshot” to deploy a VM to a good known point in time, such as checkpointing a developer machine, before performing a task which may go wrong and render the virtual machine useless.  It is not meant to be a mechanism to clone multiple identical virtual machines in the same virtual network due to the Windows requirement of Sysprep for image replication.

image

ImageName = the image name after the convertion

Name = virtual machine name

ServiceName = Cloud service name

Also important that the vmimage HAS NOT other data disks attached to it as well. After the command is done you can view the image within the Azure Portal and you can see that is has the property specialized

image

Also with this you also now have a master image which you just need to allocate and start when the need for a new update to the master image is needed.

image

So now that the image is in place, we can start to create a machine catalog. When creating a catalog, Studio will try to get all specialized images from the region that we selected

image

Then we can define what kind of virtual machines that we can create.

image

NOTE: Citrix supports a max of 40 virtual machines as of now)

Basic: Has a limit of 300 IOPS pr disk

Standard: Has a limit of 500 IOPS pr disk, newer CPU.

We can also define multiple NIC to the virtual machines, if we have any and select what kind of virtual network it should be attached to. Note that the wizard also defines computer accouts in Active Directory like regular MCS setup, so in order to do that we need to have either a S2S VPN setup so the virtual machines can contact AD or that we have a full Azure setup( site to site setup here –> https://azure.microsoft.com/en-us/documentation/articles/vpn-gateway-site-to-site-create/)  After that we can finish the wizard and Studio will start to provision the virtual machines.

NOTE: This takes time!

image

Eventually when the image is finished creating the virtual machine you will be able to access the virtual machines from a IP from within the Azure region. Stay tuned for a blogpost, involving setting up Azure and Netscaler integration with 7.7

#azure, #citrix, #microsoft-azure, #xendesktop, #xendesktop-7-7

Implementing Citrix Netscaler on Azure

So this week, Citrix finally launched Netscaler on Azure. The reason why they couldnt do this before well there has been alot of limitations on Azure and there still are so therefore the appliance itself is also a bit limited, but ill get to that.

So whats important to know about Netscaler on Azure, is that

  • Its bring your own license
  • Runs as a A2 Linux instance (Which costs about 44$ a month) by default, this can be changed.
  • Runs in single IP mode (meaning that VIP – SNIP and NSIP run using the same IP
  • Bandwidth is also an extra cost on Azure (Meaning traffic that is going out of Microsofts datacentres)
  • Since it runs a single IP mode you do not need to enter a SNIP address (even thou the welcome configuration wizard will bug you about it)
  • Runs a custom firmware build Build 51.1048.e, and you we cannot upgrade it.
  • Adding a Azure DNS server should be done using TCP not UDP’’
  • IP is given using the DHCP service of Azure
  • Use the Static IP address feature in Azure to avoid changing IP address in case of reboots and so on.
  • There are some features which are not supported

Clustering
IPv6
Gratuitous ARP (GARP)
L2 Mode
Tagged VLAN
Dynamic Routing
Virtual MAC (VMAC)
USIP
GSLB
CloudBridge Connector

Note that we can also use multiple NICs within Azure, this allows to have multiple NICs on a Netscaler intance, but Citrix does not recommend using this feature, and therefore the regular Netscaler VPX in Azure has 1 NIC.

VPX 10, 200 and 1000 is supported in Azure. If you need to have the VPX 1000 you need to scale up the virtual machine in order to support the amount of bandwidth. Since a medium machine A2 instance only supports up to 200 mbps of bandwidth

So now that we know some about how do we set it up ? The easiest way is by using the Marketplace feature in Azure (This requires an active subscription, but can also be setup if you have for instance an MSDN partner sub)

image

Just search for Citrix and you can find it there.

Now you need to enter a password (or public key) for SSH for the nsroot user. Make sure that by default it is a A2 istance, which I mentioned has limits for bandwidth.

image

Now we nee to alter some networking configurations as well, before we can create the VPX. By default IP is set by DHCP in Azure, but this can changed to static by using the new portal

image

And we have two options, one for VIP (Which is the external public IP address) and the Private IP internal address. You should change them both (VIP to Reserved) and Private range to static to be sure that the IP is static on the VPX in case of reboot and such.

Also be sure to add other endspoints if you for instance want to manage the VPX using HTTP/HTTPS, by default only SSH is added as an endpoint

image

After the provisioning is done you can now access the VPX using the public DNS address.

image

And voila!

image

Important to remember when setting up public services that you cannot use the following ports for external services

The following ports are reserved by the NetScaler virtual machine. You cannot define these as private ports when using the cloud service IP address for requests from the Internet.

Ports 21, 22, 80, 443, 8080, 67, 161, 179, 500, 520, 3003, 3008, 3009, 3010, 3011, 4001, 5061, 9000, 7000.

#microsoft-azure, #netscaler-azure

Multiple vNet site-to-site configuration in Microsoft Azure

In many cases you would need to establish a site-2-site VPN connection between different subscribtions in Microsoft Azure, now this is a pretty simple process in Azure and can be easily done using the management portal.

Example: We have 2 vNETs configured in Microft Azure within the same region (Note that this does not consume bandwith cost, only gateway hours)

vNets:

vNEt 1 (Test1) IP adsress subnet space 10.0.0.0/24 and with a Gateway address of 23.100.60.100

vNet 2 (Test 2) IP address subnet space 10.10.0.0/24 and with a Gateway address of 23.100.70.100

In order to setup a Site-to-site VPN connection I just need to define both of these as local networks as well to each other.

Local Networks:

Local vNet 1(Test1) IP address subnet space 10.0.0.0/24 and with a Gateway address of 23.100.60.100

Local vNet 2(Test2) IP address subnet space 10.10.0.0/24 and with a Gateway addres of 23.100.70.100

So in the management portal I can just define them as local networks to each other

vNet 2 –> Local vNet 1

vNet 1 –> Local vNet 2

and from there just add a same shared key and allow them to connect.

What if we want a third vNet to integrate with one of the other vNets using a Site-to-Site VPN? Is it possible ? Sure it is. With Microosft Azure it is possible to create up to 10 different VPN tunnels, problem is that the management portal only allows for one VPN tunnel at the time for one vNet. So we need to use PowerShell and a custom network xml file in order to finish the configuration here.

We need to create a new virtual entwork called vNet 3 (Test 3) IP address subnet space 10.20.0.0/24 and with a Gateway address of 100.100.20.100 (This also has to be created as a local network site as well in order to bind it up to another vNet.

In this examples we will bind vNet 3 to vNet 1, which already has an VPN tunnel activated for vNet 2.

image

First we need to download the vNet configuration XML, which can be done using the command

get-azurevnetconfig –exporttofile c:\folder\name.xml

Open it up and locate the virtualnetwork site for vNet1

<VirtualNetworkSites>
    <VirtualNetworkSite name=»test» Location=»North Europe»>
      <AddressSpace>
        <AddressPrefix>10.0.0.0/24</AddressPrefix>
      </AddressSpace>
      <Subnets>
        <Subnet name=»Subnet-1″>
          <AddressPrefix>10.0.0.0/27</AddressPrefix>
        </Subnet>
        <Subnet name=»GatewaySubnet»>
          <AddressPrefix>10.0.0.32/29</AddressPrefix>
        </Subnet>
      </Subnets>
      <DnsServersRef>
        <DnsServerRef name=»10.0.0.100″ />
      </DnsServersRef>
      <Gateway>
        <ConnectionsToLocalNetwork>
          <LocalNetworkSiteRef name=»test2″>
            <Connection type=»IPsec» />
          </LocalNetworkSiteRef>
          <LocalNetworkSiteRef name=»test3″>
            <Connection type=»IPsec» />
          </LocalNetworkSiteRef>

        </ConnectionsToLocalNetwork>
      </Gateway>

Here is where we need to define our local network we which this vNet to connect to. For vNet 3 which does not have any VPN connection set up we can do this via the managmenet portal. or add a

          <LocalNetworkSiteRef name=»test1″>
            <Connection type=»IPsec» />
          </LocalNetworkSiteRef>

In the vnet xml file. After we are done adding the connection path to vNet we need to import the XML file to our azure subscribtion.

This can be done using the set-azurevnetconfig –configurationpath c:\folder\file.xml

After this is done we need to change the sharedkey so that the vNets have the same key.

Set-AzureVnetGatewayKey –VnetName test1 –Localnetworksitename test3 –SharedKey 12345QWERT

Set-AzureVnetGatewayKey –VnetName test3 –Localnetworksitename test1 –SharedKey 12345QWERT

After this is done the connections should be established. Note that if they don’t you need to go into the management portal, into vNet 3 and choose connect.

Then you can go into vNet 1 and see the connection is setup against two vNets.

1

#microsoft-azure, #vnet