What is Microsoft doing with RDS and GPU in 2016? and what are VMware and Citrix doing?

So it was initially labed Server 2016, for then I forgot an important part of it, which ill come back to later.

This year, Microsoft is most likely releasing Windows Server 2016 and with it a huge number of new features like Containers, Nano, SDN and so on.

But what about RDS? Well Microsoft is actually doing a bunch there,

  • RemoteFX vGPU support for GEN2 virtual machines
  • RemoteFX vGPU support for RDS server
  • RemoteFX vGPU with OpenGL support
  • Persional Session Desktops (Allows for an RSDH host per user)
  • AVC 444 mode (http://bit.ly/1SCRnIL)
  • Enhancements to RDP 10 protocol (Less bandwidth consuming)
  • Clientless experience (HTML 5 support is now in tech preview for Azure RemoteApp) which will also most likely be ported for on-premises solutions as well)
  • Discrete Device Assigment (Which in essence will be GPU-passtrough) http://bit.ly/1SULnLD

So there is all these stuff happening in terms of GPU enhancements and performance increase of the protocol and of course delivering hardware offloading uses the encoder.

Another important piece is the support for Azure which is coming with the N-series, which is DDA (GPU-passtrough) in Azure which will allow us to setup a virtual machine with dedicated GPU graphics running for a per hour price when we need it! and also in some cases can be configured for an RDMA backbone where we have need for high compute capacity for deep-learning. This N-series will be powered by NVDIA and K80 & M60.

So is still RDS the way to go in terms of full-scale deployment ? Can be, RDS has gotten from a dark place to become a good enough solution (even thou it has its limitations) and the protocol itself has gotten alot better (even do I miss alot of tuning capabilities for the protocol itself..

Now VMware and Citrix are also doing their things, with a lot of heavy-hitting being done at both sides, but also this again gives ut alot of new feature since both companies are investing alot in their EUC stack.

The interesting part is that Citrix is not putting all their eggs in the same basket, with now adding support for Azure as well (Which already includes support for ESXi, Amazon, Hyper-V and so on), meaning that when Microsoft releases the N-series as well, Citrix can easily integrate to the N-series to deliver the GPU using their own stack which has alot of advantages over RDS. Horizon with GPU usage is limited to running on ESXi.

VMware on the other hand is focusing on a deep partnership with Nvidia and also moving ahead with Horizon Air Hybrid (which will be a kinda Citrix Workspace Cloud setup) and also VMware is doing ALOT on their Stack

  • AppVolumes
  • JIT desktops
  • User Enviroment Manager

Now 2016 is going to be an interesting year to see how these companies are going to evolve and how they are going to drive the partners moving forward.

#azure, #citrix, #hyper-v, #microsoft, #nvidia, #vmware

Free eBook on Optimizing Citrix NetScaler and services

So alas, it is here!

This is something I have been working on for some time now, and my intention is that this is just the beginning  of something bigger.. (Hopefully)

For a couple of years now I have been writing for Packt Publishing and authored some books on NetScaler which has been a fun and a good learning experience. The problem with that is… These projects take alot of time! and the problem these days is that the releases are becoming more and more frequent and same goes for other underlying infrastructure which makes it cumbersome to have up-to date content available.

This is the first step in an attempt to create a full (free) NetScaler eBook, for the moment in time I decided to focus on Optimzing NetScaler traffic features. Hopefully other people will tag along as well, since there are so many bright minds in this community!

So what’s included in this initial release.
CPU Sizing
Memory Sizing
NIC Teaming and LACP
VLAN tagging
Jumbo Frames
NetScaler deployment in Azure
NetScaler Packet flow
TCP Profiles
VPX SSL limitations
SSL Profiles
Mobilestream
Compression
Caching
Front-end optimization
HTTP/2 and SPDY
Tuning for ICA traffic

Also I would like to thank my reviewers which actually did the job of reading through it and giving me good feedback! (and of course correcting my grammar as well) a special thanks to Carl Stalhood (http://carlstalhood.com) https://twitter.com/cstalhood a Citrix CTP who contributed with alot of content to this eBook as well.

Also to my other reviewers as well!

Carl Behrent https://twitter.com/cb_24

Dave Brett https://twitter.com/dbretty  (http://bretty.me.uk)

How do I get it?
By signing up using your email in the contact form below, and ill send you an PDF copy after the book is finished editing sometime during the weekend, wanted to get this blogpost out before the weekend to see the interest.

The reason why I want to have an email address is that it makes it easier for me so send update after a new major version is available. Also I want some statistics to see how many are actually using it to see if I should continue on with this project or not. The email addresses I get will not be used to anything else, so no newsletters or selling info to the mafia…

Feedback and how to contribute?
Any feedback/corrections/suggestions please send them to my email address msandbu@gmail.com also if you want to contribute to this eBook please mail me! since I’m not an expert my all means, so any good ideas should be included so it can be shared with others.

#citrix, #front-end-optimization, #http2, #netscaler

A better explanation on Framehawk

After speaking with Stephen Vilke (One of the brains behind Framehawk) the other day, he elaborated on what Framehawk actually is and what it actually isn’t.

You know I have been caught up thinking about Framehawk as a simple display protocol and ran a bunch of comparisons between it and ThinWire and also with PCoIP and RDP… And my conclusion was simply:
it uses alot more bandwidth, cpu and memory then the other protocols display protocols.

But if we think about it, why is the reason why people implement ThinWire plus for instance? to SAVE bandwidth, because they have limited bandwidth capacity, and in order to get more users on to their platform. Why do people implement Cloudbridge in order to optimize traffic? simple.. to SAVE bandwidth.

When thinking about Framehawk now, I have this simple scenario.

ThinWire is simply put it the Toyota Prius, its cheap, moves from A to B and gives an OK driver experience. And since it is cheap we can get many of these.

Framehawk on the other hand is a friccking truck with Jet engines!!,  its not cheap, but it plows trough everything at a ridiculous speed!! (directly translated it work if we have alot of packet loss) and it gives one hell of a driver experience. So the end goal is actually to focus on increasing productivity, since the apps behave faster and every click gets a response, everytime!

So Framehawk is not about saving anything, on the contrary it uses the bandwidth it can get but its also to give the end-user a much better experience it these mobile days were we are faced with much more packet-loss when we were before ,when latency and bandwidth limits were a much bigger problem. Another thing to think about is that giving a better user experience even thou we are faced with these network issues, might allow our users to be even more productive, which in the end results in more money for our buisness.

Another thing to remember is that unlike other protocols which focues on moving the 0 1 0 1 across the wire and then adapting content along the way, so for instance if we start scrolling on a document under a packet loss connection, the protocol is going to spend alot of time trying to repair every packet on the wire as it goes along even thou the end-user just scrolled down 2 pages and want to read a particular page, why spend bandwidth on sending the entire scrolling sequence down the wire?

All the end users want to see is the page after scrolling down, they don’t care if all the packets get pushed down the wire, the just want to see the end-result, which is basically what Framehawk is focusing on.

To quote a good post from Citrix blogs:

A «perfect bytestream» is a computer thing, not a human one. Humans wants to know «are we there yet, and did I like the view out the window?», not «are we there yet, and did every packet arrive properly?» 🙂

Now since the introduction of Framehawk there is still a few features I would like to see in the product so it matures a bit.

  • Support for Netscaler Gateway HA
  • Recalibration during connections
  • Support for AppFlow

Other then that, the latest version of NetScaler build 11. 64 introduced suppor for Unified Gateway, so its more stuff the NetScaler team needs to fix.

Hopefully this gives a good explanation of what Framehawk is and what it isn’t.

#citrix, #framehawk, #thinwire, #xenapp

Office365 on Terminal server done right

So this is a blogpost based upon a session I had at NIC conference, where I spoke about how to optimize the delivery of Office365 in a VDI/RSDH enviroment.

There are multiple stuff we need to think / worry about. Might seem a bit negative, but that is not the idea just being realistic Smilefjes

So this blogpost will cover the following subjects

  • Federation and sync
  • Installing and managing updates
  • Optimizing Office ProPlus for VDI/RDS
  • Office ProPlus optimal delivery
  • Shared Computer Support
  • Skype for Buisness
  • Outlook
  • OneDrive
  • Troubleshooting and general tips for tuning
  • Remote display protocols and when to use when.

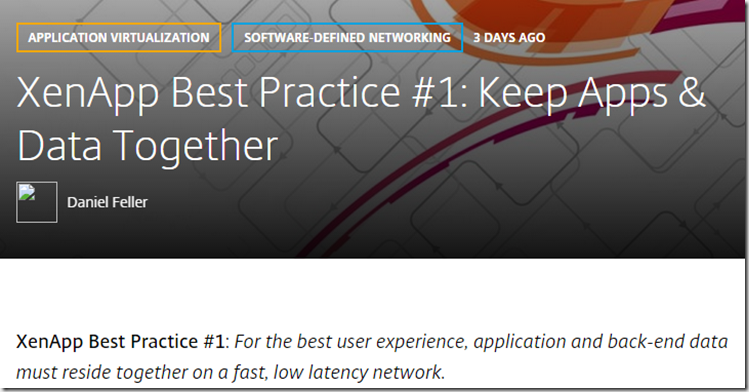
So what is the main issue with using Terminal Servers and Office365? The Distance….

This is the headline for a blogpost on Citrix blogs about XenApp best pratices
image_thumb5

So how to fix this when we have our clients on one side, the infrastructure in another and the Office365 in a different region ? Seperated with long miles and still try to deliver the best experience for the end-user, so In some case we need to compromise to be able to deliver the best user experience. Because that should be our end goal Deliver the best user experience

image_thumb1

User Access

First of is, do we need to have federation or just plain password sync in place? Using password sync is easy and simple to setup and does not require any extra infrastructure. We can also configure it to use Password hash sync which will allow Azure AD to do the authentication process. Problem with doing this is that we lose a lot of stuff which we might use on an on-premises solution

  • Audit policies
  • Existing MFA (If we use Azure AD as authentication point we need to use Azure MFA)
  • Delegated Access via Intune
  • Lockdown and password changes (Since we need change to be synced to Azure AD before the user changes will be taken into effect)

NOTE: Now since I am above average interested in Netscaler I wanted to include another sentence here, for those that don’t know is that Netscaler with AAA can in essence replace ADFS since Netscaler now supports SAML iDP. Some important issues to note is that Netscaler does not support • Single Logout profile; • Identity Provider Discovery profile from the SAML profiles. We can also use Netscaler Unified Gateway with SSO to Office365 with SAML. The setup guide can be found here

https://msandbu.wordpress.com/2015/04/01/netscaler-and-office365-saml-idp-setup/

NOTE: We can also use Vmware Identity manager as an replacement to deliver SSO.

Using ADFS gives alot of advantages that password hash does not.

  • True SSO (While password hash gives Same Sign-on)
  • If we have Audit policies in place
  • Disabled users get locked out immidietly instead of 3 hours wait time until the Azure AD connect syng engine starts replicating, and 5 minutes for password changes.
  • If we have on-premises two-factor authentication we can most likely integrate it with ADFS but not if we have only password hash sync
  • Other security policies, like time of the day restrictions and so on.
  • Some licensing stuff requires federation

So to sum it up, please use federation

Initial Office configuration setup

Secondly, using the Office suite from Office365 uses something called Click-to-run, which is kinda an app-v wrapped Office package from Microsoft, which allows for easy updates from Microsoft directly instead of dabbling with the MSI installer.

In order to customize this installer we need to use the Office deployment toolkit which basically allows us to customize the deployment using an XML file.

The deployment tool has three switches that we can use.

setup.exe /download configuration.xml

setup.exe /configure configuration.xml

setup.exe /packager configuration.xml

NOTE: Using the /packager creates an App-V package of Office365 Click-To-run and requires a clean VM like we do when doing sequencing on App-V, which can then be distributed using existing App-V infrastructure or using other tools. But remember to enable scripting on the App-V client and do not alter the package using sequencing tool it is not supported.

The download part downloads Office based upon the configuration file here we can specify bit editions, versions number, office applications to be included and update path and so on. The Configuration XML file looks like this.

<Configuration>

<Add OfficeClientEdition=»64″ Branch=»Current»>

<Product ID=»O365ProPlusRetail»>

<Language ID=»en-us»/>

</Product>

</Add>

<Updates Enabled=»TRUE» Branch=»Business» UpdatePath=»\\server1\office365″ TargetVersion=»16.0.6366.2036″/>

<Display Level=»None» AcceptEULA=»TRUE»/>

</Configuration>

Now if you are like me and don’t remember all the different XML parameters you can use this site to customize your own XML file –> http://officedev.github.io/Office-IT-Pro-Deployment-Scripts/XmlEditor.html

When you are done configuring the XML file you can choose the export button to have the XML file downloaded.

If we have specified a specific Office version as part of the configuration.xml it will be downloaded to a seperate folder and storaged locally when we run the command setup.exe /download configuration.xml

NOTE: The different build numbers are available here –> http://support2.microsoft.com/gp/office-2013-365-update?

When we are done with the download of the click-to-run installer. We can change the configuration file to reflect the path of the office download

<Configuration> <Add SourcePath=»\\share\office» OfficeClientEdition=»32″ Branch=»Business»>

When we do the setup.exe /configure configuration.xml path

Deployment of Office

The main deployment is done using the setup.exe /configure configuration.xml file on the RSDH host. After the installation is complete

Shared Computer Support

<Display Level="None" AcceptEULA="True" /> 
<Property Name="SharedComputerLicensing" Value="1" />

In the configuration file we need to remember to enable SharedComputerSupport licensing or else we get this error message.

image_thumb11

If you forgot you can also enable is using this registry key (just store it as an .reg file)

Windows Registry Editor Version 5.00

[HKEY_LOCAL_MACHINE\SOFTWARE\Microsoft\Office\15.0\ClickToRun\Configuration]
«InstallationPath»=»C:\\Program Files\\Microsoft Office 15»
«SharedComputerLicensing»=»1

Now we are actually done with the golden image setup, don’t start the application yet if you want to use it for an image. Also make sure that there are no licenses installed on the host, which can be done using this tool.

cd ‘C:\Program Files (x86)\Microsoft Office\Office15’
cscript.exe .\OSPP.VBS /dstatus

image_thumb31

This should be blank!

Another issue with this is that when a user starts an office app for the first time he/she needs to authenticate once, then a token will be stored locally on the %localappdata%\Microsoft\Office\15.0\Licensing folder, and will expire within a couple of days if the user is not active on the terminalserver. Think about it, if we have a large farm with many servers that might be the case and if a user is redirected to another server he/she will need to authenticate again. If the user is going against one server, the token will automatically refresh.
NOTE: This requires Internet access to work.

And important to remember that the Shared Computer support token is bound to the machine, so we cannot roam that token around computers or using any profile management tool.

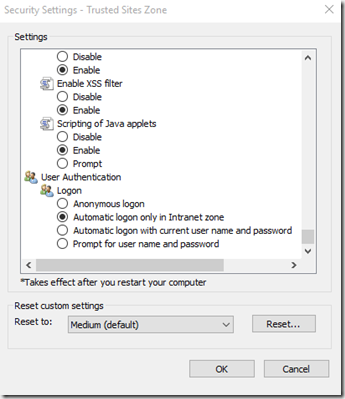
But a nice thing is that if we have ADFS setup, we can setup Office365 to automatically activate against Office365, this is enabled by default. So no pesky logon screens.

Just need to add the ADFS domain site to trusted sites on Internet Explorer and define this settings as well

Automatic logon only in Intranet Zone
image

Which allows us to basically resolve the token issue with Shared Computer Support Smilefjes

Optimizing Skype for Buisness

So in regards to Skype for Buisness what options do we have in order to deliver a good user experience for it ? We have four options that I want to explore upon.

  • VDI plugin
  • Native RDP with UDP
  • Natnix PCoIP
  • Native ICA (w or without audio over UDP)
  • Local app access
  • HDX Optimization Pack 2.0

Now the issue with the first one (which is a Microsoft plugin is that it does not support Office365, it requires on-premises Lync/Skype) another issue that you cannot use VDI plugin and optimization pack at the same time, so if users are using VDI plugin and you want to switch to optimization pack you need to remove the VDI plugin

ICA uses TCP protcol works with most endpoints, since its basically running everyone directly on the server/vdi so the issue here is that we get no server offloading. So if we have 100 users running a video conference we might have a issue Smilefjes If the two other options are not available try to setup HDX realtime using audio over UDP for better audio performance. Both RDP and PCoIP use UDP for Audio/Video and therefore do not require any other specific customization.

But the problems with all these are that they make a tromboning effect and consumes more bandwidth and eats up the resources on the session host

image_thumb7

Local App from Citrix access might be a viable option, which in essence means that a local application will be dragged into the receiver session, but this requires that the enduser has Lync/Skype installed. This also requires platinum licenses so not everyone has that + at it only supports Windows endpoints…

The last and most important piece is the HDX optimization pack which allows the use of server offloading using HDX media engine on the end user device

And the optimization pack supports Office365 with federated user and cloud only users. It also supports the latest clients (Skype for buisness) and can work in conjunction with Netscaler Gateway and Lync edge server for on-premises deployments. So means that we can get Mac/Linux/Windows users using server offloading, and with the latest release it also supports Office click-to-run and works with the native Skype UI

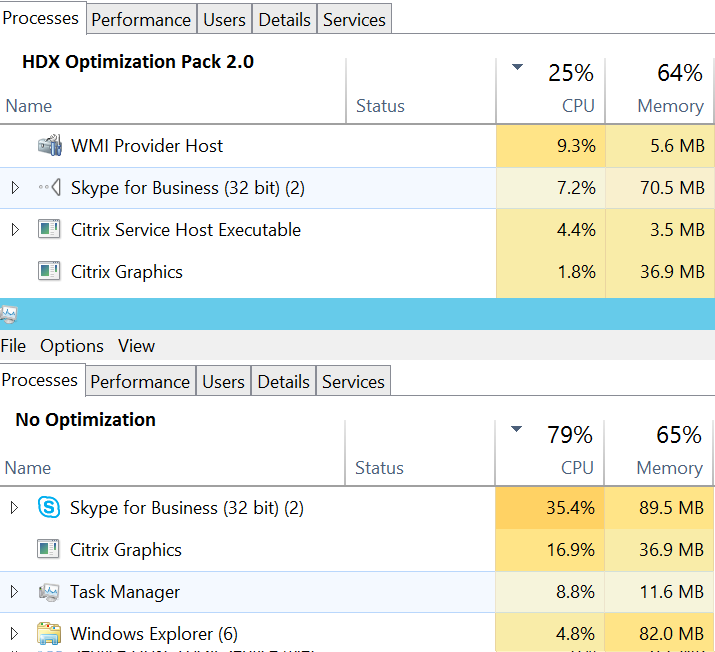
So using this feature we can offload the RSDH/VDI instances from CPU/Memory and eventually GPU directly back to the client. And Audio/video traffic is going to the endpoint directly and not to the remote session

image_thumb51

Here is a simple test showing the difference between running Skype for buisness on a terminal server with and without HDX Optimization Pack 2.0
Permalink til innebygd bilde

Here is a complete blogpost on setting up HDX Optimization Pack 2.0 https://msandbu.wordpress.com/2016/01/02/citrix-hdx-optimization-pack-2-0/

Now for more of the this part, we also have Outlook. Which for many is quite the headache…. and that is most because of the OST files that is dropped in the %localappdata% folder for each user. Office ProPlus has a setting called fast access which means that Outlook will in most cases try to contact Office365 directly, but if the latency is becoming to high, the connection will drop and it will go and search trough the OST files.

Optimizing Outlook

Now this is the big elefant in the room and causes the most headaches. Since Outlook against Office365 can be setup in two modes either using Cached mode and the other using Online mode. Online modes uses direct access to Office365 but users loose features like instant search and such. In order to deliver a good user experience we need to compromise, the general guideline here is to configure cached mode with 3 months, and define to store the OST file (Which contains the emails, calender, etc) and is typically 60-80% than the email folder) on a network share. Since these OST files are by default created in the local appdata profile and using streaming profile management solutions aren’t typically a good fit for the OST file.

. Important to note that Microsoft supports having OST files on a network share, IF! there is adequate bandwidth and low latency… and only if there is one OST file and the users have Outlook 2010 SP1

NOTE: We can use other alternatives such as FSLogix, Unidesk to fix the Profile management in a better way.

Ill come back to the configuration part later in the Policy bits. And important to remember is to use Office Outlook over 2013 SP1 which gives MAPI over HTTP, instead of RCP over HTTP which does not consume that much bandwidth.

OneDrive

In regards to OneDrive try to exclude that from RSDH/VDI instances since the sync engine basically doesnt work very well and now that each user has 1 TB of storagee space, it will flood the storage quicker then anything else, if users are allowed to use it. Also there is no central management capabilities and network shares are not supported.

There are some changes in the upcoming unified client, in terms of deployment and management but still not a good solution.

You can remove it from the Office365 deployment by adding  this in the configuration file.

<ExcludeApp ID=»Groove» />

Optimization and group policy tuning

Now something that should be noted is that before installing Office365 click-to-run you should optimize the RSDH sessions hosts or the VDI instance. A blogpost which was published by Citrix noted a 20% in performance after some simple RSDH optimization was done.

Both Vmware and Citrix have free tools which allow to do RSDH/VDI Optimization which should be looked at before doing anything else.

Now the rest is mostly doing Group Policy tuning. Firstly we need to download the ADMX templates from Microsoft (either 2013 or 2016) then we need to add them to the central store.

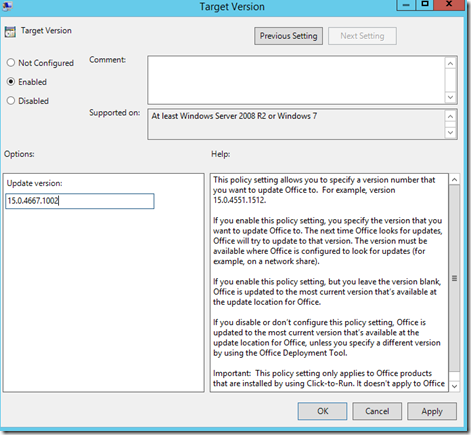
We can then use Group Policy to manage the specific applications and how they behave. Another thing to think about is using Target Version group policy to manage which specific build we want to be on so we don’t have a new build each time Microsoft rolls-out a new version, because from experience I can tell that some new builds include new bugs –> https://msandbu.wordpress.com/2015/03/09/trouble-with-office365-shared-computer-support-on-february-and-december-builds/
image

Now the most important policies are stored in the computer configuration.

Computer Configuration –> Policies –> Administrative Templates –> Microsoft Office 2013 –> Updates

Here there are a few settings we should change to manage updates.

  • Enable Automatic Updates
  • Enable Automatic Upgrades
  • Hide Option to enable or disable updates
  • Update Path
  • Update Deadline
  • Target Version

These control how we do updates, we can specify enable automatic updates, without a update path and a target version, which will essentually make Office auto update to the latest version from Microsoft office. Or we can specify an update path (to a network share were we have downloaded a specific version) specify a target version) and do enable automatic updates and define a baseline) for a a specific OU for instance, this will trigger an update using a built-in task schedulerer which is added with Office, when the deadline is approaching Office has built in triggers to notify end users of the deployment. So using these policies we can have multiple deployment to specific users/computers. Some with the latest version and some using a specific version.

Next thing is for Remote Desktop Services only, if we are using pure RDS to make sure that we have an optimized setup.  NOTE: Do not touch if everything is working as intended.

Computer Policies –> Administrative Templates –> Windows Components –> Remote Desktop Services –> Remote Desktop Session Host –> Remote Session Enviroment

  • Limit maximum color depth (Set to16-bits) less data across the wire)
  • Configure compression for RemoteFX data (set to bandwidth optimized)
  • Configure RemoteFX Adaptive Graphics ( set to bandwidth optimized)

Next there are more Office specific policies to make sure that we disable all the stuff we don’t need.

User Configuration –> Administrative Templates –> Microsoft Office 2013 –> Miscellaneous

  • Do not use hardware graphics acceleration
  • Disable Office animations
  • Disable Office backgrounds
  • Disable the Office start screen
  • Supress the recommended settings dialog

User Configuration –> Administrative Templates  –>Microsoft Office 2013 –> Global Options –> Customizehide

  • Menu animations (disabled!)

Next is under

User Configuration –> Administrative Templates –> Microsoft Office 2013 –> First Run

  • Disable First Run Movie
  • Disable Office First Run Movie on application boot

User Configuration –> Administrative Templates –> Microsoft Office 2013 –> Subscription Activation

  • Automatically activate Office with federated organization credentials

Last but not least, define Cached mode for Outlook

User Configuration –> Administrative Templates –> Microsoft Outlook 2013 –> Account Settings –> Exchange –> Cached Exchange Modes

  • Cached Exchange Mode (File | Cached Exchange Mode)
  • Cached Exchange Mode Sync Settings (3 months)

Then specify the location of the OST files, which of course is somewhere else

User Configuration –> Administrative Templates –> Microsoft Outlook 2013 –> Miscellanous –> PST Settings

  • Default Location for OST files (Change this to a network share

Network and bandwidth tips

Something that you need to be aware of this the bandwidth usage of Office in a terminal server enviroment.

Average latency to Office is 50 – 70 MS

• 2000 «Heavy» users using Online mode in Outlook
About 20 mbps at peak

• 2000 «Heavy» users using Cached mode in Outlook
About 10 mbps at peak

• 2000 «Heavy» users using audio calls in Lync About 110 mbps at peak

• 2000 «Heavy» users working Office using RDP About 180 mbps at peak

Which means using for instance HDX optimization pack for 2000 users might “remove” 110 mbps of bandwidth usage.

Microsoft also has an application called Office365 client analyzer, which can give us a baseline to see how our network is against Office365, such as DNS, Latency to Office365 and such. And DNS is quite important in Office365 because Microsoft uses proximity based load balancing and if your DNS server is located elsewhere then your clients you might be sent in the wrong direction. The client analyzer can give you that information.

image_thumb3

(We could however buy ExpressRoute from Microsoft which would give us low-latency connections directly to their datacenters, but this is only suiteable for LARGER enterprises, since it costs HIGH amounts of $$)

image

But this is for the larger enterprises which allows them to overcome the basic limitations of TCP stack which allow for limited amount of external connection to about 4000 connections at the same time. (One external NAT can support about 4,000 connections, given that Outlook consumes about 4 concurrent connections and Lync some as well)

Because Microsoft recommands that in a online scenario that the clients does not have more then 110 MS latency to Office365, and in my case I have about 60 – 70 MS latency. If we combine that with some packet loss or adjusted MTU well you get the picture Smilefjes 

Using Outlook Online mode, we should have a MAX latency of 110 MS above that will decline the user experience. Another thing is that using online mode disables instant search. We can use the exchange traffic excel calculator from Microsoft to calculate the amount of bandwidth requirements.

Some rule of thumbs, do some calculations! Use the bandwidth calculators for Lync/Exchange which might point you in the right direction. We can also use WAN accelerators (w/caching) for instance which might also lighten the burden on the bandwidth usage. You also need to think about the bandwidth usage if you are allow automatic updates enabled in your enviroment.

Troubleshooting tips

As the last part of this LOOONG post I have some general tips on using Office in a virtual enviroment. This is just gonna be a long list of different tips

  • For Hyper-V deployments, check VMQ and latest NIC drivers
  • 32-bits Office C2R typically works better then 64-bits
  • Antivirus ? Make Exceptions!
  • Remove Office products that you don’t need from the configuration, since this add extra traffic when doing downloads and more stuff added to the virtual machines
  • If you don’t use lync and audio service (disable the audio service! )
  • If using RDSH (Check the Group policy settings I recommended above)
  • If using Citrix or VMware (Make sure to tune the polices for an optimal experience, and using the RSDH/VDI optimization tools from the different vendors)
  • If Outlook is sluggish, check that you have adequate storage I/O to the network share (NO HIGH BANDWIDTH IS NOT ENOUGH IF STORED ON A SIMPLE RAID WITH 10k disks)
  • If all else failes on Outlook (Disable MAPI over HTTP) In some cases when getting new mail takes a long time try to disable this, used to be a known error)

Remote display protocols

Last but not least I want to mention this briefly, if you are setting up a new solution and thinking about choosing one vendor over the other. The first of is

  • Endpoint requirements (Thin clients, Windows, Mac, Linux)
  • Requirements in terms of GPU, Mobile workers etc)

Now we have done some tests, which shown the Citrix has the best feature across the different sub protocols

  • ThinWire (Best across high latency lines, using TCP works over 1800 MS Latency)
  • Framehawk (Work good at 20% packet loss lines)

While PcoIP performs a bit better then RDP, I have another blogpost on the subject here –> https://msandbu.wordpress.com/2015/11/06/putting-thinwire-and-framehawk-to-the-test/

#chelsea, #citrix, #hdx, #ica, #office365, #pcoip, #punchflix, #rds, #vmware

Hiding and publishing applications using XenDesktop 7.7 and Powershell

So when creating a delivery group in Studio you have limited capabilities into how we can control who gets access to a certain delivery group or application. NOTE This is not using Smart Access on the Netscaler, this is purely a Citrix Studio feature

. We have for instance filtering on users

image

And after we have created the delivery group we also have the option to define access rules, and as by default there are two rules that are created pr delivery group.

image

One rule that allows access using Access Gateway and one for direct connections using Storefront. So what if we need more customization options ? Enter PowerShell for Citrix…

First before doing anything we need to import the Citrix module in Powershell,

asnp citrix.*

Then we use the command Get-BrokerAccessPolicyRule (by default there are two rules for each delivery group. one called NAME_AG and one called NAME_Direct. The AG one is used for access via Netscaler Gateway, the other for direct to Storefront.

From this OS_AG Policy we can see that it is enabled, and allowedconnections are configured to be via Netscaler Gateway. And that it is filtered on Domain users.

image

We can see from the other policy, OS_Direct that it is set to enabled and that it is for connections notviaAG.

 image

So how do we hide the delivery group for external users? The simples way is to set the accesspolicy true for AG connections to disable.

Set-BrokerAccessPolicyRule -name OS_AG -Enabled $false

Via Netscaler

image

Via Storefront

image

Or what if we want to exclude it for certain Active Directory User Group? For instance if there are some that are members of many active directory groups but are not allowed access to external sessions.

Set-BrokerAccessPolicyRule -Name OS_AG-ExcludedUserFilterEnabled $True -ExcludedUsers «TEST\Domain Admins»

This will disable external access to the delivery group for alle members of Domain Admins, even if they are allowed access by another group membership.

#citrix, #powershell, #xendesktop

Azure RemoteApp vs RDS Azure IaaS vs Citrix XenDesktop

This is a question that is appearing again, again and again. If I  want an easy way to deliver apps to my customers what should I choose if they are interested in using Azure? and Ive seen so many failing to graps what each of these solutions actually manage to deliver, so hence this blogpost.

So first of let’s explore what Azure RemoteApp is. This is a feature which allows us to deliver Applications using RDP. You use an custom client from Microsoft ontop of the regular MSTSC client, which in essence wraps inn Azure AD authentication and resources on top.

It comes in four flavours. Basic, Standard, Premium and Premium plus. One thing to be aware of is that For Basic and Standard tiers, there is minimum requirement of 20 users for each App Collection. For Premium and Premium Plus, the minimum requirement is 5 users for each App Collection.
So if we choose Basic and only have one user we will be billed for 20 users, same goes with Premium where the minimum is 5 users, other then that we do not need any other licenses, and the subscription model is easy a user/month$

Another thing to think about is that with RemoteApp all users a given 50GB of personal storage using Microsoft’s own User Profile disk, but there is another reason for that which is that Azure RemoteApp consists of dynamic machines, so if we need to update the base image or Microsoft decided to do maintance or update the OS, the machines running the remoteapp service for our customers might be taken down and recreated, which makes it hard to use Azure RemoteApp with services which requires static data such as an database service.

We can of course change this by setting up a hybrid Azure RemoteApp and integrate it with an another Azure IaaS setup or on-premises setup. Another issue that it can only publish applications and not full desktops, and that even thou it leverages Microsoft RDP without the use of UDP with TCP, just TCP, and if you are getting up to about 80/100 MS latency to Azure datacenter and services this might affect the experience for the end-users, but still RemoteApp delivers an simple and in most cases a cheap application delivery system. Also that it enables single-image management.

On the other hand we have use of regular RDS within Azure, what does this give us ?

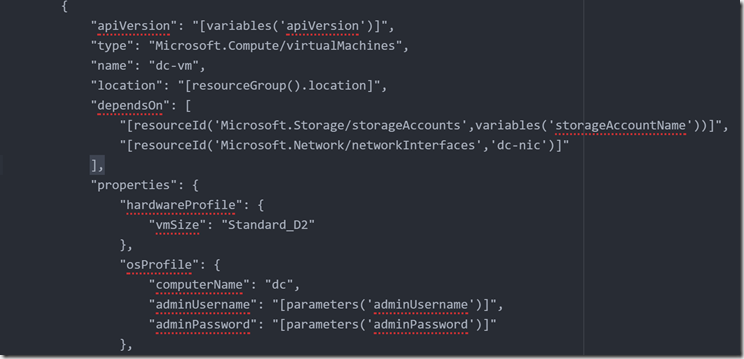
With regular IaaS we can setup this as an “regular” RDS solution, we can also leverage other Azure features such as ARM using templates to automatically provision more resources/RDS servers needed and publish endpoints.

image

We can also define different server sizes that we can choose from of the templates. Now this is in most case like a VM template features even thou it extends outside of the IaaS feature in Azure, but it does not help us with patch management and single image management.

But there are many different sized and editions we can choose from, which allow us to easily to provision resources on demand.

Another upside to using regular RDS is that we can also leverage SQL based applicationss and with the upcoming release of N-series we can also leverage RemoteFX vGPU features which allow usage of OpenGL and DirectX based applications, and with IaaS in Azure we can shut down resources when we are not using the compute power and not needing to pay for it. Which can also be automated using Azure Automation.

Also if we are planning on setting up Azure IaaS with RDS we can also leverage OMS to allow for simple logs and network analysis. Since this is free for up to 500MB and can for instance be leveraged in an IaaS enviroment to see how much traffic is going back and forth and from which service and so on. This is also now supported on Azure RemoteApp as well.

image

Using regular IaaS we can also leverage UDP when setting up endpoints for each resource. Which allow us to use RemoteFX features available for RDS.

image

Now since we already have these options why should we even consider Citrix in Azure?

With the release of XenDesktop 7.7, Citrix has introduced alot of new features, including integration with Azure in terms of proviosning.

Some important details around this.

  • Only supports MCS
  • Only available against SRM not ARM resources

Which allows for simple provisioning using Citrix Studio https://msandbu.wordpress.com/2016/01/02/setting-up-xendesktop-7-7-against-microsoft-azure/

On the other hand Citrix has another feature which can be easily integrated within Azure which is Workspace Cloud. So instead of using ARM to do the provisioning pieces of Azure, we can use Workspace Cloud Lifecycle Management to do the provisioning.

Citrix has created a finished blueprint which allows of a full deployment of Citrix in Azure.

image

But that is still for the provisioning part of the deployment. Other cool features is the different protocols that we can use in Citrix. For instance we can setup use of ThinWire and Framehawk against Azure, only issue is that we cannot use it against Netscaler, since Netscaler in Azure Marketplace is still on a custom 10.5 build. Framehawk is supported on NetScaler Gateway 11.0 build 62.10.

But still the protocol is much more efficient on Citrix which will allow for a much better user experience against Azure. And will the continius development on Citrix happening I also guessing that support for the GPU N-series using GPU Passtrough will allow for HDX 3d PRO support as well.

Ref ThinWire / Framehawk vs RDS
https://msandbu.wordpress.com/2015/11/06/putting-thinwire-and-framehawk-to-the-test/

But in the end, both RDS IaaS and Citrix running on Azure IaaS will create a different cost since this involves other components in Azure

  • Compute
  • RDS CAL
  • Storage
  • Storage Transactions
  • Bandwidth
  • VPN Gateway (Optional)

So before thinking about setting up Citrix / RDS or RemoteApp know about the limitations that are in place, get an overview of the costs assosiated and what are your requirements for a solution.

The integrations in place from Citrix points of view are still lacking in terms of support for the latest feature in Azure, but they are moving forward, but Microsoft is also investing alot of development on Azure RemoteApp which will soon include alot of new features but it still is lacking the features needed for larger buisnesses.

#azure-iaas, #azure-remoteapp, #citrix, #citrix-vs-azure, #rds

Storefront 3.1 Technical Preview and configuration options

With the release of Storefront 3.1, Citrix made alot of options which were earlier only available in PowerShell or a configfile available in the GUI, which makes alot more sense since WebInterface has always had alot of options available in the GUI. Now I was a bit dazzled with the numerous options that are available, so what do they all mean?? Hence this post which is used to explain what the different options do, and even what error messages that bit appear because of them.
First of let’s explore the store options in Storefront.

Store Options

User Subscription (This defines if users are allowed to Subscribe to applications or if applications are being mandatory)

image

For instance Self-service store (GUI Changes to this)

image

Mandatory Store (GUI Changes to this)

image

Kerberos Delegation (Allows ut to use Kerberos Constrained Delegation from StoreFront to Controllers) http://docs.citrix.com/en-us/storefront/3-1/configure-authentication-and-delegation/sf-configure-kcd.html

image

Optimal HDX Routing (Defines if ICA traffic should be routed to Netscaler Gateway even if users are going directly to the StoreFront) We can define a Gateway and attach it to a Farm/Controller, so if we have multiple controllers on different geographic regions we can specify multiple gateways and attach it to the correct delivery controller.

We can also define Direct Access (Which we can enable for each Optimal Gateway) which defines if users which are trying to authenticate internally direct against storefront will also have traffic redirected to the Gateway.

We can also define Optimal Gateway and attach it with Stores which are part of XD 7.7

image

Citrix Online Integration (Defines if GoTo applications should appear in the Store)

image

Advertise Store (Defines if the Store should be available to select from Citrix Receiver client, if we choose to hide the Store the only way to access the store is to setup manually, or using provisioning file)

image

Advanced Settings (Address Resolution Type: Defines which type of address the XML service will respond to Storefront with, by default it is DNS based return, or we can change this to IPv4)

Allow font smoothing: Defines if font smoothing should be enabled in the ICA session

Allow Session Reconnect: Also known as Workspace control, which defines if users can reconnect to existing sessions without restart applications

Allow special folder redirection: Defines if \Document & \Desktops on the local computer should be used in the redirected session. By default the servers profile \Documents \Desktop folder are used

Time-out: Define how long time it should go before the connection times out.

Enable Desktop Viewer: Defines if the Desktop Viewer should be visible in the connection

Enable Enhanced Enumeration: If we have a Storefront configured with mulitple stores, Storefront will contact these Stores in sequencial so if there are alot of resouces this might take some time. With Enhanced Enumeration, Storefront will contact these Stores in Parralell

Maximum Concurrent enumerations: How many concurrent enumeration connections to the Store resources, by default this is 0 which means unlimited

Override ICA client name: Overrides the default ICA client name

Require token consistency: Validates authenticaiton attempts on the Netscaler Gateway and on the Storefront Server, this must be enabled if we want to use Smart Access. This is typically disabled if we want to disable authentication on the Netscaler and do authentication directly to the Storefront server http://support.citrix.com/article/CTX200066

image

Server Communication attempts: How many times Storefront should try to communicate with a Controller before it marks it at down (default: 1)

Next we also have web site receiver configuration in Storefront

Receiver Experience (If we should use the regular Green bubble theme or using the unified experience) Disabling classic experience will also give other options such as configuring apperance as well.

image

Authentication methods (Defines what kind of authentications we can use against Storefront)

image

Website Shortcuts

image

If you wish to add Storefront to another web portal using for instance as an iFrame(will be shown as this)
you need to enter the URL which is allowed to connect to Storefront as an iFrame in the WebSite Shourtcuts.image

Deploy Citrix Receiver (what kind of Receiver should Storefront offer to the authenticated user)

image

And if we choose install locally we have a number of options

image

image

Session settings (How long a session is active before it times out against Storefront)

image

Workspace Control (What should do if a clients is inactive/logs out) Here we can define so that if a user moves from one device to another the user should reconnect to their existing session)

image

Client interface settings (Here we can define certion options such as, if a desktop should be auto launched, if Desktop viewer should be enabled, if users are allowed to download Receiver configuraiton from within Receiver for web, and also what kind of panes should be default and shown within Receiver for web)

image

Advanced settings

image

 Enable Fiddler Tracing: Enables use of fiddler between Receiver for web and other storefront services. Loopback must also be disable.

Enable Folder view: If folders should be used in Receiver for web

Enable loopback communication: Storefront uses 127.0.0.1 adapter for communication between Receiver for web and other storefront services

Enable protcol handler: Enables use of client detection in Google Chrome

Enable strict transport security: Enables the use of HSTS

ICA file cache expiry: The amount of seconds before an ICA file should be stored in memory

Icon resolution: Default pixel size of an application

Loopback port when using HTTP: Which port should be used for communicaiton with loopback adapter for other storefront services

Prompt for untrusted shortcuts: Prompt the user for permissions to launch apps shortcuts from sites that have not been directly setup as trusted.

Resource details:

Strict transport security policy duration: Time policy for HSTS

No last but not least there are some new interesting features on the authentication site, first of there is the password expiration option under Password Options

image

image

When a user logs inn it will look like this.

image

Another new option is the Password validation feature, in a regular scenario we might now have storefront in the same domain as Xenapp or XenDesktop services, and we might not always be able to setup Active directory trusts, instead we need to setup XML service-based authentication, which will allow Storefront to communicate with XML instead of Active Directory and leave the autheticaiton process to the DDCs. Which is typically the case if we have multi-tenant enviroments.

image

Another option that we have is when defining Gateways in Storefront, we can now define if Gateways should have the role of HDX routing only, Authenticaiton only or both. If we choose HDX routing only, we cannot use this gateway for remote access for the store.

image

As we see here (It does not show) The reason for that is that if we want a regular ICA proxy setup to work with Receiver for web and regular receiver we need to configure auth at the Gateway, which means that we need to define auth at the Gateway to be able to use it for remote access against the store.

image

The latest COOL features which is now part of the GUI Storefront is the ability to do User farm mapping. Which in essence Is used to assign a group of users to a selection of Sites/farms. So if we have multiple farms we can define a certain group of users which should be mapped to that farm. This is done on the controller settings

image

Then choose map users to controllers

image

Define AD group

image

Then define which controllers it should contact to display resources.

image

And voila! alot of cool new features in the TP which I makes it to GA soon!
There are some bugs in the GUI but I think we have a fully WI replacement!

#citrix, #optimal-gateway, #storefront, #storefront-3-1-technical-preview, #xendesktop

Setting up XenDesktop 7.7 against Microsoft Azure

Starting of the new year with a long awaited feature on my part, setting up integration between XenDesktop and Microsoft Azure which is now a supported integration in 7.7 which was released now a week ago. This integration allow us to provision virtual machines directly from Studio. NOTE: Important to note however that XenDesktop as of now only supports V1 (Classic) virtual machines in Azure, so no Resource Groups yet, which might make it a bit confiusing for some but ill try to cover it as good as I can.

But a good thing with this is that we can either setup XenDesktop in a hybrid setting where we have the controller and studio running from our local infrastructure or that we are running everything in Azure which is also another setup.

Now after setting up XenDesktop 7.7 you have a new option when setting up a new connection now, you need to get publish information from Azure before continuing this wizard, that can be downloaded from https://manage.windowsazure.com/publishsettings

image

Important that when downloading a publish profile that the subcribtion contains a virtual network (Classic virtual networking) within the region we choose later in the wizard, or else you will not be able to continue the wizard.

This can be viewed/created from the new portal under the “classic” virtual network objects

image

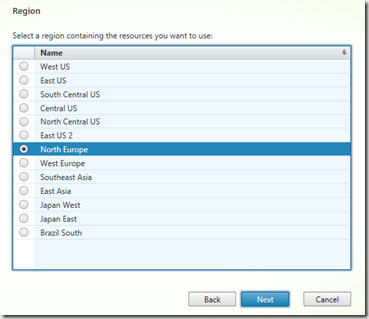
Now after verifying the connection profile you will get an option of different regions available within the subscription.

image

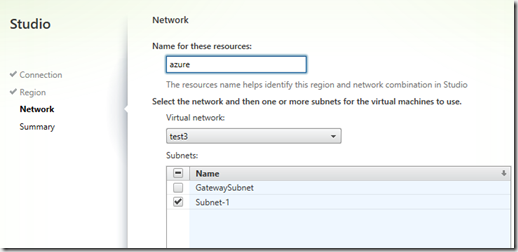
After choosing a region the wizard will list out all available virtual networks within the region, and will by default choose a subnet which has valid IP-range setup.
NOTE: The other subnet is used for Site-to-site VPN and should not be chosed in the wizard.

image

This part just defines which virtual networks the provisioned machines are going to use. So after we are done with the wizard we can get started with the provisioning part. Now in order to use MCS to create a pool of virtual machines in Azure we need to create an master image first. This can be done by creating a virtual machine within Azure, installing the VDA, doing any optimization, installing applications and doing sysprep and shutting down the virtual machines. Then we need to run PowerShell to capture the image. The reason for this is that the portal does not support capturing images in a state called specialized.

NOTE: A simple way to upload the VDA agent to the master image virtual machine is by using for instance Veeam FASTSCP for Azure, which uses WinRM to communicate and be able to download and upload files to the virtual machine.

image

DONT INSTALL ANYTHING SQL related on the C: drive (Since it uses a read/write cache which might end up with a corrupt database, and don’t install anything on the D: drive since this is a temporary drive and will be purged during a restart.

A specialized VM Image is meant to be used as a “snapshot” to deploy a VM to a good known point in time, such as checkpointing a developer machine, before performing a task which may go wrong and render the virtual machine useless.  It is not meant to be a mechanism to clone multiple identical virtual machines in the same virtual network due to the Windows requirement of Sysprep for image replication.

image

ImageName = the image name after the convertion

Name = virtual machine name

ServiceName = Cloud service name

Also important that the vmimage HAS NOT other data disks attached to it as well. After the command is done you can view the image within the Azure Portal and you can see that is has the property specialized

image

Also with this you also now have a master image which you just need to allocate and start when the need for a new update to the master image is needed.

image

So now that the image is in place, we can start to create a machine catalog. When creating a catalog, Studio will try to get all specialized images from the region that we selected

image

Then we can define what kind of virtual machines that we can create.

image

NOTE: Citrix supports a max of 40 virtual machines as of now)

Basic: Has a limit of 300 IOPS pr disk

Standard: Has a limit of 500 IOPS pr disk, newer CPU.

We can also define multiple NIC to the virtual machines, if we have any and select what kind of virtual network it should be attached to. Note that the wizard also defines computer accouts in Active Directory like regular MCS setup, so in order to do that we need to have either a S2S VPN setup so the virtual machines can contact AD or that we have a full Azure setup( site to site setup here –> https://azure.microsoft.com/en-us/documentation/articles/vpn-gateway-site-to-site-create/)  After that we can finish the wizard and Studio will start to provision the virtual machines.

NOTE: This takes time!

image

Eventually when the image is finished creating the virtual machine you will be able to access the virtual machines from a IP from within the Azure region. Stay tuned for a blogpost, involving setting up Azure and Netscaler integration with 7.7

#azure, #citrix, #microsoft-azure, #xendesktop, #xendesktop-7-7

ICA vs PCOIP

First of let me start by stating that the subject of the blogpost is purely to get more viewers… But there is some truth to it, over the last weeks there has been alot of people talking about RDP / ICA / PCOIP and that the protocol wars are over.

There are multiple articles on the subject, but this one started the idea –> http://www.brianmadden.com/blogs/guestbloggers/archive/2015/11/25/are-the-display-protocol-wars-finally-over.aspx

And here as well –> https://twitter.com/michelroth/status/670288837730541568

So I figured since me and a good friend of mine @Mikael_modin have done alot of testing on Framehawk vs ThinWire (and with RDP in the mix) https://msandbu.wordpress.com/2015/11/06/putting-thinwire-and-framehawk-to-the-test/

Where we did a test based upon different packet loss parameters and measured is using uberagent splunk and netbalancer to see how it performed. The test consists about 5 minutes for each test where we did 1 minute of idle workload, 1 minute of web browsing using Chrome on a newspaper, 1 minute of PDF browning and zooming, 1 minute of word typing, Avengers Youtube trailer. The test was to be contucted on the same virtual infrastructure with the same amount of resources available to the guest VM (Windows 10) and no other firewall releated issues, and with just one connection server with a VDI instance. So this is purely a test of resource usage and bandwidth and how it adapts to network changes. There are of course other factors which kick in terms of performance +/- and other things.

Another thing is that I am by means no expert of View, if someone disagreed with the data or if I have stated something wrong please inform me of it.

So therefore I figured it was about time to put PCoIP to the test as well. Now I know that PCoIP has different protocol usage (HTML5/Blast and its own for GPU) but I am testing the native PCoIP Protocol)  and no change besides the default setup.

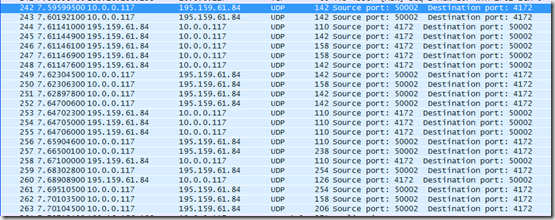
For those unknowning, PCoIP uses TCP & UDP port 4172, where TCP is used for session handshake and UDP is used as the transport of session data. Now the issue with UDP is that its hard to control the traffic flow. PCoIP is a “quite” chatty protocol

image

which means that a better experience (if the line can handle it) so it will be interesting to see how it handles congestion)
So from the initial test (with no limits what so ever)

image

It consumed about 168 MBs of banwidth, with a max amount of 933KB/s which was mostly during the Youtube showing of Chrome.

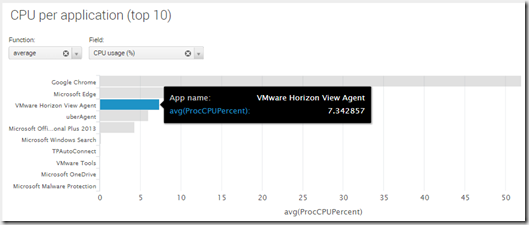
The View agent only used about 7% average CPU during the test.

image

The max amount of CPU at one point was about 23% which was during the youtube testing

image

Not such a heavy user of RAM as well

image

During our test using Framehawk and ThinWire on the same test we could see that Framehawk for instance used about 224 MB/s of bandwidth with a max of 1,2 MBps and oddly enough this was during the PDF scrolling and zooming which generated the most bandwidth.

image

On a side note, framehawk delivered the best experience when it came to the PDF part, it was lightning fast! Thinwire on the other hand used only 47 MBs of bandwidth, most bandwidth was during the Youtube part. Thinwire used the same amount of CPU usage.

image

Now as part of the same test we also turned up the packet loss to a degree that it would be able to reflect upon a real-life scenario. So at 5% packet loss I saw alot of changes

Now PCoIP only used about 38 MBs of banwidth, looking kinda similar to thinmwire usage… But this was quite noticeable from an end user perspective. Not quite sure if there is a built-in mechanism to handle QoS under packet loss.

image

Now when we did this with ThinWire and Framehawk during the same test we got the following results (11 MBs bandwidth)

clip_image025

Framehawk (used about to 300 MBs bandwidth) I’m guessing that it got in ass in gear when it noticed packet loss and therefore tried to compentanse by trying to max my banwidth available.

clip_image020

So in terms of packet loss, Framehawk handles it alot better then PCoIP, and ICA which uses TCP still manages to give a decent user experience but because of the TCP rules and congestion algoritms it not really as useable. Now since there was packet loss and hence less banwidth to transmit, the CPU had less to do.

image

With 10% Packet loss, we could also see a good decrease in bandwidth usage. Which means that it had a hard time keeping up with want I wanted to do, now it was down to 27MB of bandwidth usage, and struggled during the PDF and browsing wasn’t really good.

image

So as a first quick summarization,

  • the View agent is “lighter” meaning that is uses less CPU and memory on each host.
  • Its a chatty protocol, which I’m guessing that it work well in a highly congested network, ICA is also chatty but since it uses TCP it can adapt to the congestion
  • The plus side to it that since there is a steady flow of packets it delivers a good user experience.
  • It cannot handle packet loss as well as Framehawk, it was better then Thinwire on packet loss, but Thinware was never aimed for lossy networks.

Conclusion: Well I’m not gonna post any conclusions related to this post, since in some social media circles..
image

Well let’s just say that you can draw your own conclusion from this blogpost and ill just end the post with the picture of these two cars and you can point out which is which

#citrix, #vmware

Putting ThinWire and Framehawk to the test!

Framehawk and Thinwire – It’s all about the numbers

Recently me and Mikael @mikael_modin attended a Citrix User Group Conference in Norway, where Mikael held a session regarding when and when to use Framehawk, you can read his entire blogpost here –> http://bit.ly/1PV3104 and I have already done some details regarding Framehawk from a networking perspective.

The main point in Mikael’s presentation was that although using Framehawk in situations when packet loss is tremendously better, Thinwire Advance will often be “enough” or even more useful when there is only latency involved. This is because of the use of CPU, RAM and most of all bandwidth.
Another thing he pointed out was that Framehawk needs “a lot” of bandwidth to be at its best.
The recommendations for Thinwire is a minimum of 1,5MBps + 150kbps per user while recommendations for Framehawk is a minimum of 4-5Mbps + 150kbps per user.

There is a lot of naming conventions when it comes to Thinwire. Although we can see Thinwire as one protocol, there are different versions of it.
Thinwire is all about compressing data before sending it. The methods for this are:

· Legacy Thinwire (Pre win8 / Server 2012R2)

· Thinwire Compatibility Mode (New with FP3, also known as Thinwire +, Win8 / Server 2012R2 and later. This version takes advantage of how new operating systems constructs the graphics.
For more info read the following blog post written by Muhammad Dawood http://bit.ly/WEnSDN

· Thinwire Advance (uses H.264 to compress the data)

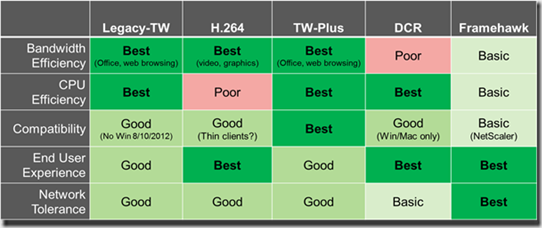
For a more detailed overview when to use each technology, you can refer to the following table:

clip_image002

When we came back home we decided to take a closer look at what impact had on CPU, RAM and bandwidth Thinwire or Framehawk had and we have found some very interesting data.

Our tests includes the following user workload;

· Logging in and waiting 1 minute for the uberagent to gather data and getting the session up and ready.

· Open a PDF file, scrolling up and down for 1 minute. (The PDF is located locally on the VM to exclude network I/O)

· Connect to a webpage www.vg.no, which is a Norwegian newspaper which contains a lot of different objects and high graphics, and scrolling up and down for a 1 minute. 

· We then open Microsoft Word and type randomly for 1 minute.

· Last but not least our favorite opening of the Avengers trailer in fullscreen using Chrome for the full duration of 2 minutes.

This allows us to see which workloads generate how much bandwidth, CPU- and RAM usage with each of the different protocols.

To collect and analyze the data we were using the following tools

· Splunk – Uberagent (Get info we didn’t even think was possible!)

· Netbalancer (Show bandwidth, set packet loss, define bandwidth limits and define latency)

· Citrix Director

  • Displaystatus (to verify the protocol status)

The sample video below shows how the tests is being run. This allows us to closer analyze the sample data from Netbalancer as well.
NOTE: During the testing there might be some slight alterations from test to test since this not an automated test but running as an typical enduser experience, but these were so minor that we can conclude that the numbers are within +/-5%
We had two Windows 10 VDI running the latest release of XenDesktop 7.6 FP3 during the testing phase.
· MCS1002 is for the test02 user, which is not using Framehawk
· MCS1003 is for the test01 user, which has Framehawk, enabled using policies
· Use of Codec were deactivated through policy to ensure that Thinwire was used
The internett connection is a solid 100 MBps, the average connection to the Citrix enviroment is about 10 – 20 MS latency.
The sample video in this URL https://www.youtube.com/watch?v=F89eQPd7shs shows how the tests is being run. This allows us to closer analyze the sample data from Netbalancer as well.
Some notes so far: Some Framehawk sessions get stuck on the Netscaler, we can see existing connections not being dropped correctly, we can see this in the Netscaler GUI under Gateway –> DTLS sessions
After we changed the TCP profiles on the Netscaler we were unable to use Framehawk.
We then needed to reconfigure the DTLS and Certificate settings on the vServer and setup a new connection and Framehawk worked again as expected.

So after the initial run, we can note the following from the Netbalancer data;
We begin with looking at how Framehawk handles bandwidth.
We can see that the total session, which was about 7 minutes, Framehawk uses about 240 MBs of bandwidth to be able to deliver the graphics.
However, it was during the PDF and Webpage part of the test which really pushed it in terms of bandwidth, not the Youtube trailer.
clip_image003
Thinwire on the other hand, used only 47 MBs of bandwidth, and like we would expect more data was being used when showing the trailer than the PDF- and webpage section.
clip_image004
Using Splunk we care able to get a closer look at the Framehawk numbers.
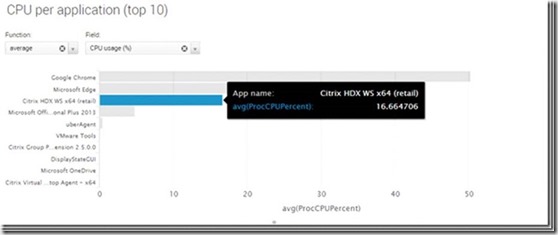
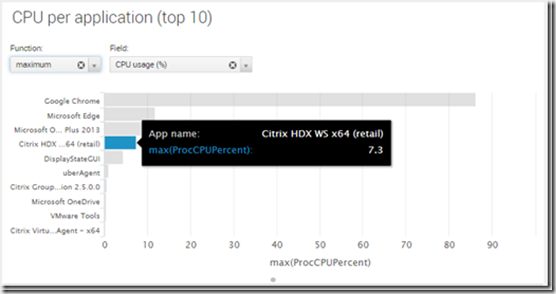
Average CPU usage for the VDA agent was close up to 16% on average.
clip_image005
While using ThinWire the CPU usage was only 6% on average.
clip_image006
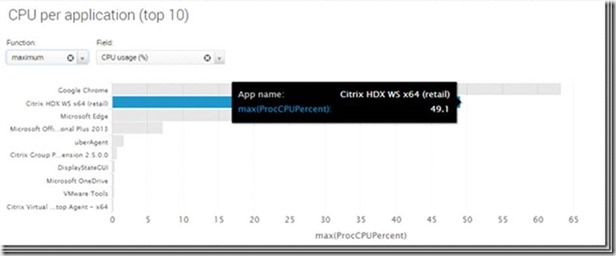
But the maximum amount of CPU usage came from Framehawk, which was close to 50% CPU usage at one point.
clip_image007
While ThinWire on the other hand, was only up to 18%
clip_image008
We can conclude that Framehawk uses much more CPU cycles in order to process the bandwidth, but from our testing we could see that the PDF part which generated a lot more traffic, allowed for a much more smooth experience. Not just from scrolling the document but also zooming in.
On the other side we can also see that Framehawk uses a bit more RAM then ThinWire does, about 400 MB was the maximum number
clip_image009
While Thinwire was about 300 MB
clip_image010
So this was the initial test, which shows that Thinwire uses less bandwidth, less memory and less CPU, but we can see that Framehawk on applications like PDF deliver a better user experience. So now, let us see how they fare when taking into account of latency and packet loss.
2% Packet loss
Framehawk

We started by testing Framehawk at 2% packet loss.
Looking at the bandwidth test we could see that is uses about 16 MB of bandwidth less with the packet loss. It’s still the PDF and Webpage that consumes the most resources, and now it is down to 224 MBs of bandwidth usage
The Maximum CPU usage peaked at 45%
And the average CPU usage was 19%
The amount of RAM used was a slight increase with 4MB
clip_image011
clip_image012
clip_image013
clip_image014

ThinWire

Now here comes the interesting part, using Thinwire at 2% packet loss, (up and down) will trigger a lot of TCP retransmissions because of the packet drops
clip_image015
(Remember that this is using an optimized Netscaler) we can see that ThinWire uses only 12 MBs of bandwidth! This is because of the TCP retransmissions, it will never be able to send large enough packets before the packet loss occurs.
So with Thinwire and 2% packet loss we could see that the bandwidth usage dropped with about 59 MB when we had the packet loss. The maximum bandwidth used in this session was 12Mbps
The maximum was also 50% lower than the reference test and showed only 3%
The average CPU usage was now only 3% (that is 50% of the reference test)
The RAM usage was about 30MB more than earlier
clip_image016
clip_image017

clip_image018

clip_image019

5% Packet loss
Framehawk

At 5% packet loss we can see that is uses about 50 MB of bandwidth extra. It’s still the PDF and Webpage that consumes the most resources, but now it is up to 300 MBs of bandwidth

We can also see that from a resource perspective, it still uses almost the same amount of max CPU %, but this might vary from test to test, but it is close to the 50%)

On average CPU usage we can see that it went up 4% from the initial testing, which makes sense since it needs to send more network packets which uses CPU cycles.

The RAM usage is the same as with 2% packet loss

clip_image020

clip_image021

clip_image023

clip_image024

5% Packet loss
ThinWire

Looking at the bandwidth usage with 5% packet loss and use of Thinwire the number is slightly lower and now uses 11MB

This can also be seen in the CPU usage of the protocol, since the packet loss occurs, the VDA does not need to send so much packets and hence the CPU usage is lower and stops at 7%

Average CPU usage is now just under 3%

RAM however is a bit larger with 330MB

clip_image025

clip_image026

clip_image027

clip_image028

End-user perspective
From an end-user perspective we can safely say that Framehawk delivered a much better experience, if we tried to follow the test from minute to minute, the ThinWire test took about 40 seconds longer just because of the delay from a mouse click to occur and doing things like zooming into a PDF file took so much time that it caused the test to take a longer time to complete.

Winner: Framehawk!

10% Packet loss
Framehawk

clip_image029

With 10% packet loss, we could see that the bandwidth usage went down a bit. That might again be that the packet loss was so high that it was unable to process all the data and hence the total bandwidth usage was lower than it was with 5%, and with the decrease in bandwidth, we can also see the CPU usage go down as well.

The max CPU usage was about the same with 47%

The average CPU usage was 19%

The RAM usage is the same at 404 MB

clip_image030

clip_image031

clip_image032

10% Packet loss
ThinWire

With 10% packet loss Thinwire was down to 6MB and the CPU usage also reflected this by only use 4% at peak and 1.6 % at average
RAM usage was still about the same as earlier and peaked at 326MB

clip_image033

clip_image034

clip_image035

clip_image036

End-user perspective
What we noticed here is that most of the different graphic intensive testing became unresponsive and that the ICA connection froze. The only thing that was really workable was using Word. Opening the PDF, Webpage and youtube became so unresponsive that is was not really workable.

Winner: Framehawk!

CPU Stats on Framehawk and Thinwire
NOTE: We have taken multiple samples of the CPU statistics on the Netscaler so this screenshots represent the average number we saw.
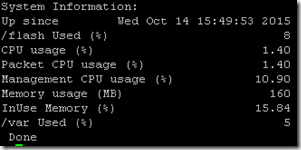
What we can see is that a framehawk which uses more bandwidth also will increase the CPU usage on the packet engines. The Netscaler from an idle state uses about 0 – 1,5 % CPU, which can be seen here à

clip_image037

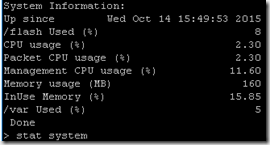
NOTE: This is a VPX 1000 with 2 vCPU (Where we have only 1 packet engine) starting an ICA proxy session with the defaults over thin wire and starting the process that generates the most bandwidth (PDF scrolling and zooming) the packet CPU rises to about <1%

clip_image038

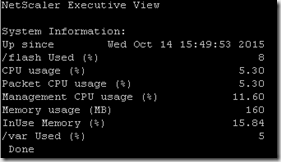
So it’s a minor increase which is expected since ThinWire uses a small amount of bandwidth. Now Framehawk on the other hand will use about 4% of the packet engine CPU. Note again that this was when we kept working with the PDF documentet.
We can conclude that using Framehawk will put a lot more strain on the Netscaler packet engine and therefore we cannot have as many users on the Netscaler.

clip_image039

RDP usage:
We also wanted to give RDP a test under different scenarios. We have some issues fetching out CPU and memory usage since RDP uses DWM and MSTSC which can appear as a sub-process of svchost
We therefore skipped that part and only focused on the bandwidth usage and end-user experience.

First we started out with a test where we have no limitations in form of latency and packet loss (This was using regular RDP against a Windows 10 with TCP/UDP

The initial test shows as we expected, RDP uses 53 MB of bandwidth

clip_image041

We also noticed that under the YouTube part that the Progressive rendering engine kicked in order to ensure optimal delivery but the graphics was ok.

RDP, 2% Packet loss

With 2% Packet loss the bandwidth usage was basically half 26MB of bandwidth

clip_image043

Keystrokes and some operations was a bit delayed, but still workable, on the other hand the progressive rendering engine on the youtube part made the graphics nearly impossible to see what actually happened, even thou audio worked fine.

RDP 5% Packet loss

RDP used about 17MB of bandwidth PDF scrolling and zooming made a huge delay in how the end-user could work. Surfing on the webpage which has a huge amount of graphics, freezed up for a couple of seconds. Youtube itself, well it didn’t work very well.

clip_image045

We can conlude that RDP uses more bandwidth that Thinwire under normal circumstances, but when coming to packet loss it does not deal with that pretty well.

So what does all these data tell us?
We can clearly see that Framehawk and Thinwire has its own use cases.
While Thinwire is the preferred method of delivering graphics, even with high latency, as soon as we experience packet loss off 3% or higher, Framehawk will definitively give a better use experience. Just remember to keep an eye on the resource usage on the VDI.
Especially when using it with XenApp since a spike in the CPU usage will have a great impact on the users who are logged on and will decrease the numenbr of users you can have on each server.

#bandwidth-usage, #citrix, #framehawk, #netscaler, #rdp, #thinwire, #thinwire-legacy, #thinwire-vs-framehawk