Task sequences best practices Configuration Manager 2012

Microsoft has recently released a document series which contain best practices for task sequences with Configuration Manager 2012 R2. This series goes trough a step-by-step in all the different steps in a task sequence.

For all IT-pros working with task sequences I suggest taking a look at the document series here –> http://www.microsoft.com/en-us/download/details.aspx?id=43412

In other related news, my fellow MVP Kent Agerlund has released a new book (updated) for Configuration Manager 2012 R2 master the fundamentals, which you also should take a look at if you want to learn more –> http://www.amazon.co.uk/System-Center-2012-Configuration-Manager/dp/9187445085/ref=sr_1_1?ie=UTF8&qid=1404503771&sr=8-1&keywords=kent+agerlund

#configuration-manager-2012, #sccm, #system-center

Configuration Manager support center

Yesterday, Microsoft released an beta version of a new support tool for Configuration Manager called Configuration Manager Support Center. Which at the moment can be downloaded from Microsoft connect –> http://connect.microsoft.com/ConfigurationManagervnext/Downloads/DownloadDetails.aspx?DownloadID=52192

This tool supports every OS that configuration Manager 2012 R2 supports. It requires that you install the tool on a system that has configuration manager client installed or you will get messages that you cannot connect. It also requires .Net 4.5 installed as well in order to run.

The tool gives us a good overview of logs, WMI, certificates, registry of a client so first we have to start a collection of the different components.

image

It also gives a good overview of basic troubleshooting stuff

image

And it has a built-in CMtrace as well Smilefjes

image

So a good tool to have in your toolset, but remember still in beta so give it a try!

#configuration-manager-2012, #r, #support-cente

Configuration Manager 2012 R2 SDK and Toolkit released

Microsoft yesterday released a updated version of the SDK for Configuration Manager 2012 R2, you can find it here –> http://bit.ly/1bsv2T8

This also includes an updated Application Workflow setup (Which allows you to integrate application approval process into Service Manager instead of IT managers needing to go into Configuration Manager to do application approval processes.

Microsoft has also released an updated version of its Toolkit for Configuration Manager –> http://bit.ly/14TYKRn which I have blogged about before –> https://msandbu.wordpress.com/2013/02/05/configuration-manager-2012-toolkit/

But now there are some new tools included in the package.

  • * DP Job Manager – A tool that helps troubleshoot and manage ongoing content distribution jobs to Configuration Manager distribution points.
  • * Collection Evaluation Viewer – A tool that assists in troubleshooting collection evaluation related issues by viewing collection evaluation details.
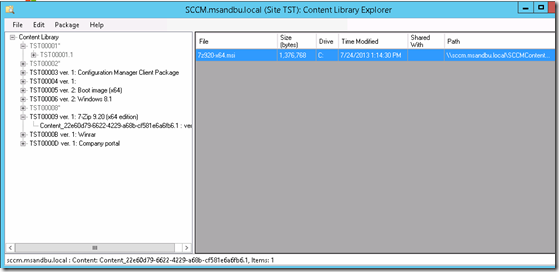
  • * Content Library Explorer – A tool that assists in troubleshooting issues with and viewing the contents of the content library.

Including a Security Configuration Wizard for R2, now the cool thing here is the Content Library Explorer, which allows you to explore content and the source files of applications and such.

image

#configuration-manager-2012, #sccm-2012, #toolkit

Cloud based distribution points

Well, along time since I’ve managed to blog! Smilefjes But ill give a quick update about the book im writing. Im writing a book about Configuration Manager which is going to cover high-availability and performance tuning, really exiting times! It takes up alot of my time therefore my lack of blogging lately.
Anways, this is something I’ve post poned some while now, which is cloud based distribution points!

Cloud-based distribution points is something that came with Service Pack 1 in System Center. Cloud-based DPs are really much like a regular DP except for the following:

* You cannot use a cloud-based distribution point to host software updates
* You cannot use a cloud-based distribution point for PXE or multi-cast deployments
* You cannot use a cloud-based distribution point during a task sequence that requires a task to Download content locally when needed by running task sequence.
* You cannot use a cloud-based distribution point to offer packages that are setup with run from Distribution Point
* You cannot use a cloud-based distribution point to host virtualized applications
* You cannot set a cloud-based distribtuion point as pull-based or as source distribution point.

Content that is sent from the Configuration Manager to Azure is copied encrypted. In order to setup a Cloud DP you need a couple of things.
First of you need a management certificate which you can use against Azure you can follow my recipe from my previous post.
https://msandbu.wordpress.com/2013/01/09/managing-windows-azure-via-windows-powershell/

You also need to generate a certificate which should be created using the same PKI structure as for the regular Configuration Manager solution. This certificate should be created using the web server template. This certificate should contain a FQDN which your clients should be able to resolve using DNS.
You can read more about the certificate here –> http://technet.microsoft.com/en-us/library/230dfec0-bddb-4429-a5db-30020e881f1e#BKMK_clouddp2008_cm2012

After these two prerequsites are in place we can create the distribution point (if you have SP1 the option to create one are under Administration –> Hierachy –> Cloud –>
1

Here we have to enter the subscripbtion ID this we can get from Azure and the management certificate.

2

Next we choose what region and what site this DP should be assosicated with, as well as add a certificate generated by our internal PKI for the DP.
3
Next we configure alerts and thresholds. After this is done we have to change the client policy to allow access to cloud DP

4

And we can se in the monitoring pane that the cloud DP is functional.

5

Under the FQDN enter a name for the server (which resembles the certificate name) this record has to be added the the DNS-zone either internally (if only for internal clients) or on the external zone) the IP-adress of the Distribution Point in Azure is found under cloud services.

image

After this is done, we also have to modify the clients policy settings to allow clients access to the distribution point. If you go into the storage blob and under containers you can see the different packages that have been distributed to the cloud DP.

image

If you want to scale out with more cores to the cloud DP you can go into the cloud service and use the scale function
image

after I have distributed content I can see the package ID under the container in the storage pane.

image

And there we go, will try to write up a follow-up which covers multi cloud DP points.

#configmgr, #configuration-manager-2012, #sysctr, #system-center-2012

Managing Ubuntu Clients with Configuration Manager

Microsoft recently released a preview of System Center 2012 R2 and with it, they released a new version of the additional clients for Configuration Manager.
You can download them from here –> http://www.microsoft.com/en-us/download/details.aspx?id=39360

The pack includes clients for:

  • AIX Version 7.1, 6.1, 5.3
  • Solaris Version 11 (SPARC and x86) , 10 (SPARC and x86), 9 (SPARC)
  • HP-UX Version 11iv2 (PA-RISC and IA64) , 11iv3 (PA-RISC and IA64)
  • RHEL Version 6 (x64 and x86) , 5 (x64 and x86), 4 (x64 and x86)
  • SLES Version 11 (x64 and x86), 10 (x64 and x86), 9 (x86)
  • CentOS Version 6 (x64 and x86), 5 (x64 and x86)
  • Debian Version 6 (x64 and x86), 5 (x64 and x86)
  • Ubuntu Version 12.4 LTS (x64 and x86), 10.4 LTS (x64 and x86)
  • Oracle Linux 6 (x64 and x86), 5 (x64 and x86)
    • Mac OS X 10.6 (Snow Leopard)
    • Mac OS X 10.7 (Lion)
    • Mac OS X 10.8 (Mountain Lion)

For my part I see more and more using Mac in the enterprise, but at my former job we had alot of RHEL and Ubuntu users as well, so therefore I wanted to show how we can manage these types of clients in the enterprise.

Now in order to setup a client we need to download two files to the ubuntu computer.
The CCM-universal package and the install file.

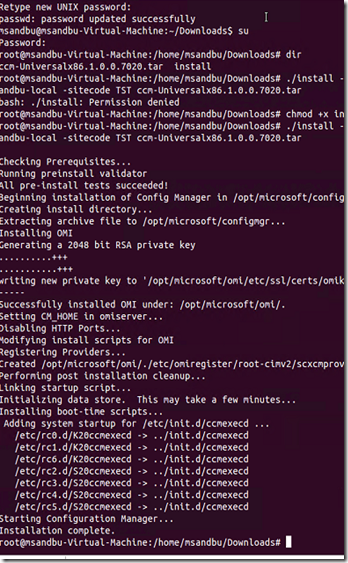
After the files are downloaded you have to open terminal and run the following command from the download folder

NOTE: Be sure that the linux client can find the ConfigMgr servers by nslookup.
You might need to alter the resolv.conf file to point to another DNS server.
You might also need to define a domain name in order to use the FQDN
domainname AD.fqdn from terminal

./install -mp <computer> -sitecode <sitecode> <property #1> <property #2> <client installation package>

NOTE: You have to change the rights on the install file by running chmod +x install from temrinal

So in my case ./install –mp configmgr.msandbu.local –sitecode TST ccm-Universal-x86.tar

image

image

After this is done you can review logs from the /var/opt/microsoft/scxcm.log folder.
NOTE: If you run the installation again you will get a message if you wish to overwrite in case you entered the wrong info during setup, if you wish to uinstall it completely you can run the command /opt/microsoft/configmgr/bin/uninstall

Note: from CU1 Linux clients now support FSP as well which you can specify during the installation. –fsp fsppoint.fqdn

#configuration-manager-2012, #sccm-2012, #ubuntu

Configuration Manager 2012 Client Communication & Hardware Planning

Now Configuration Manager is a complex beast, when designing a ConfigMgr site you have to plan carefully your network because there is going to be a lot of traffic going back and forth from your servers to your clients, and from your servers to your other servers. So you have to take some considerations on how many clients and how many distribution points you are going to have for your site, also depending on what kind of features you are going to use.

Now before we start with the networking part, let’s review the supported configuration and hardware requirements.

CAS:
25 child primary sites.
400.000 clients

Primary Site:
250 secondary sites.
100,000 clients
10,000 devices running windows embedded
10 Management Points
250 Distribution Point
1 Fallback Status Point
Multiple Application Catalog Website Point

Secondary Site:
5,000 clients
1 Management Point

Management Point:
25,000 clients

Fallback Status Point:
100,000 clients

Distribution Point:
4,000 clients

Software Update Point:
25,000 clients

Application Catalog Website Point:
400,000 clients

Application Catalog Web Service Point:
400,000 clients

And as you can see this can lead up to a VERY complex setup if you have a large setup. Microsoft has also deployed Configuration Manager on their own computers

And Microsoft also have made a good Hardware Requirement for list.

clip_image001
You can read more about it here –> http://bit.ly/S3fRJB

Clients searches for a management point by using the following options in the order specified:

  1. Management point (If specified by agent installation)
  2. Active Directory Domain Services
  3. DNS

Now when an agent connects to a MP it makes a list of all the Management Point which is within the Boundary and if the client has PKI certificate installed it makes a priority list over all
MP’s that has HTTPS enabled.
Now let’s start with the client communication to the servers. There are 3 ports that are the common used
Port 443 HTTPS = Used to communicate with a management point over HTTPS
Port 445 SMB = Used to communicate
Port 80 = Used to contact the Fallback status point
New with SP1! Port 10123 = Client Notification, to start or initiate an malware or policy update/scan
Port 9 UDP = Wake on Lan
You can see more about the port requirements for ConfigMgr here –> http://technet.microsoft.com/en-us/library/hh427328.aspx
Now clients connect to a distribution point either via HTTP or HTTPS using BITS. Now in order to limit the usage of network you have to specify a client setting for BITS.
Here we can define the bandwidth usage and throttling time.

image

You can also specify BITS settings in Group Policy. You need to remember that you have to plan on what features that you are going to use.
If you are using Software Metering, Software Inventory, Baselines & Compliance, Hardware Inventory etc. So there is a lot of feature that can generate a lot of traffic.

#configmgr, #configuration-manager-2012, #sccm, #system-center

Automating Configuration Manager 2012 SP1 with PowerShell

First part of this series, I showed how you could run and install all the necessary prerequisites silent and automated, this time I will write a bit more instead of just adding the commands.
In Service Pack 1, Configuration Manager will finally include cmdlets for PowerShell this allows for a scripted and automated setup process. Therefore I took the liberty of creating this post which will show you how-to.

Now with this you can actually create a script for a new customer (If you already have knowledge of the customers infrastructure) with contains all the necessary you need to setup a fully site. Then where you are at the customer, run the script and take the rest of the day of.

Now what do we need in order to setup a fully Configuration Manager site?

We need a boundary group (Which contains a boundary, refer my earlier post –> ) Which again contains a distribution group and is assigned a site.
And we need to activate discovery objects to fetch information such as Users, Group, Computer objects.
We also need to setup AD publish (In case we did a manual ConfigMgr site agent install we wouldn’t have to setup this but for the administration ease we are going to do so)
Next we are going to Create Computer Collection which is going to include our test servers. We are also going to Create User Collection b
After that we are going to Create an application which we are going to deploy to our computer collection

All using PowerShell.
Now in order to start PowerShell against Configuration Manager, just click the file button inside the Console and press the Connect using PowerShell.

You can use the get-command –module ConfigurationManager to show all the commands available for Configuration Manager
You can also use the get-help cmdlets if you are unsure of the parameters that you need to use.
Also you can use the get-help cmdlets –examples if you want to show some examples.

NOTE: Will trying to get this fully automated, I find its hard with the current release of the PowerShell cmdlets but still I’ve gotten far.  So this post will be updated periodically.

Create a new Boundary: New-Cmboundary -type ADsite -value «Default-First-Site-Name»

Create a new BoundaryGroup: New-CmboundaryGroup -name Test -DefaultSiteCode TST

Add boundary to group:
Add-CMBoundaryToGroup -Boudaryid 16777218 -GroupName «Test»

I got this BoundaryID using Get-CMboundary since the command didn’t parse the value ID properly.

You can use the Get-Cmboundary and Get-CmBoundaryGroup to view the values. And you need to add the site code to the command so it assigns
that as the default site for the boundary group.

Get info from Active Directory Forest: New-CMactiveDirectoryForest -ForestFqdn demo.local -EnableDiscovery $true

Install Configuraiton Manager Agent: Install-CMClient -DeviceName ConfigMgr -includeDomainController $false -AlwaysInstallclient $false -SiteCode TST

Create a new device collection: New-CMdevicecollection -name «My Servers» -LimitingCollectionName «All Systems» -RefreshType Manual

Still more to come

#configmgr-2012, #configuration-manager-2012, #powershell, #system-center-2012

Integrating XenApp and Configuration Manager 2012

Finally the day has come, as I mentioned in the previous post the TechPreview of XenApp connector for Configuration Manager 2012 is now released on Citrix.
or as they call it “Project Thor” it allows for a flexible application delivery solution that combines the best of both worlds (Configuration Manager and XenApp)
I’ve managed to deploy the connector and give you a demonstration of how it works.

The package consist of the client components ( Reciver etc) PCM (Power and Capacity Management Components ) And the Connector itself.
The Client Component XenAppDTHandler (Has to be installed on all the clients before you can use XenApp published)

image

And we start by installing the connector on the SCCM server.
1

Start and accept the license terms,
2

Include all the roles and extensions, click next and Install!

3

4

After the install is finished the setup will run the Integration Configuration itself,
So you should create a separate Service Account for this purpose.
You see the requirements it needs.
5
Note that if you have created a service account and forgot to add it to “log on as a service” rights Citrix will handle this for you.

7
So just click Yes and move forward,

9

After that specify a Citrix server that the connector will use. In my case I choose my only Citrix server, (Which has the Data store and the XML service )
Then the setup verifies that I can connect to the server, it not you will get an error message during verification.
10
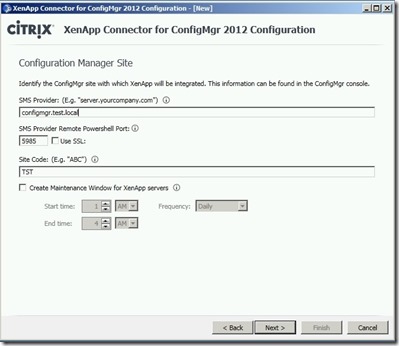
After that you need to enter the Configuration Manager site (the Setup will automatically read the local site it is connected to)
And verify the connection.

11

If you get this error message you need to run the following commands.
Enable-PSremoting –Force
Set-item WSman:\localhost\Client\TrustedHosts hostname.domain.local –Force
Restart-Service winrm –Force

Then press Yes and continue.
12
Now you get the summary screen, press Apply.
13
If everything goes as planned you will get this screen Smile
(NOTE: you can also see these applications appear after the installation )

6

Now you can open the Configuration Manager console and under Software –> Application Management you can now see XenApp.
As you can see here we only have 1 option, which is “Create Publication”
This will create an published application on the XenApp server which is avaliable for Configuration Manager
14

We can start by publishing an application –>
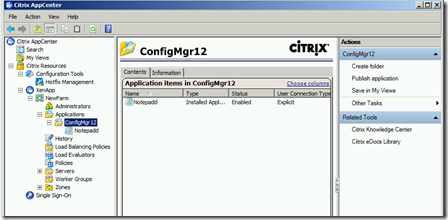
In this case Notepad (This will by default appear under Applications/ConfigMgr12 on the XenApp console)
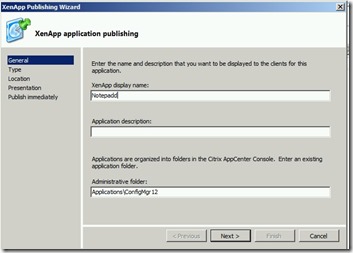
15
Click next –>
16
Choose a XenApp installed application –>
17
Choose the Command line click next –>
18
This wizard is much like the wizard in XenApp same configuration settings and so on. Click finish.

19

And here you have all the advanced settings like encrytion etc.If you open XenApp AppCenter you can now see the application (This update goes every 10 min but you can force an update to the XenApp server by running the sync tool installed)
image

so now we can create an deployment type with XenApp.

image
With the possibility which comes with SP1 (Mac and Linux support we have loads of options!)
Here we can add the newly created Notepad ( I fixed the display name before running the wizard Smile
image

Click next –> And we can create requirements for this deployment.
ill write more about this feature as soon as I have the time, with integration of SP1 as well, stay tuned Smile

NOTE: If you have some issues with the connector you can review the log files found under C:\Program Files\Citrix\XenApp Connector for ConfigMgr 2012\Connector Service\logs
NOTE: There is also created an Collection which consists of the XenApp servers. Do not edit this, the connector will add all the XenApp servers automatically from the farm.

image

#citrix, #configuration-manager-2012, #system-center-2012, #xenapp