SCCM 2012 part 3, client configuration.

In my previous post, we configured some server roles, created boundaries, imported users and computers, and we checked that the installed server roles actually worked Smile

Part 1# System Center 2012, SCCM part 1
Part 2# SCCM 2012, Part 2 configuration

Now we are going to go trough the Client Policy settings, create a new dynamic collection for Windows 8, and distribute a client (Manually and via the console )

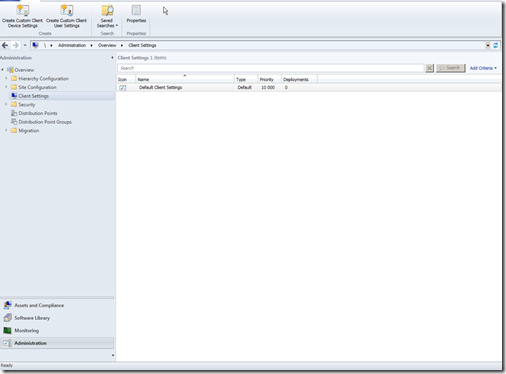
We can by checking the Client settings, start the console and go into Administration –> Client Settings
image

Remember that you can have multiple client settings, since we are going to create a new dynamic collection, we can click the button on the top menu called Create Custom Client Device Settings, in pop-up window that appears we have the option to choose what we want this new policy to include. So if we don’t choose for instance “Network Access Protection” , that client will then get the “Network Access Protection” info from the Default client settings.
But you can also see that the Default Client Settings has a priority of 10 000, so If I were to create a NAP policy which has the priority of 10, then that policy would override the default one.

So lets create that custom policy Smile
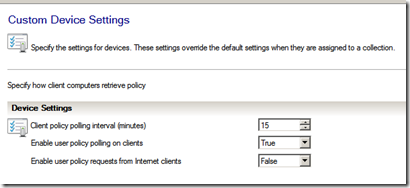
Which will have these settings, (For best practices give it a unique name and give it a good description )

image

We can start by looking at the Client Policy, this is were you define how often the client should do a policy refresh against the site ( As you can see its 60 min by default, and on internet facing clients it is disabled until they are back on the lan ) Im going to tune that down to 15 min (Since this site will only have a few clients ) Remember that by lowering this will cause a large increase on data to your site so don’t overdo it!

image

Next we go to the Compliance Settings (Which basically just says if the clients so run baselines and return with a compliance (we will get back to that later) By default this is set to true so we will leave it at that,

image

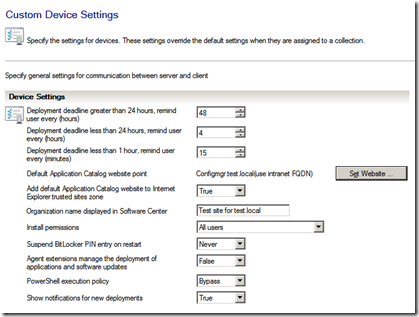
Next is Computer Agent, most of the Client settings are put here. Here we define our Deployment deadlines, and we define the URL of the application catalog (Since this is already installed on the same server, I’ve just set that to automatically detect, and remember to set the “add default app…. to trusted sites” to True so you don’t encounter any issues regarding the portal. And If you want the users to have permission to install software we set that value to true.

image

Now next to computer restart, just leave that to the default.
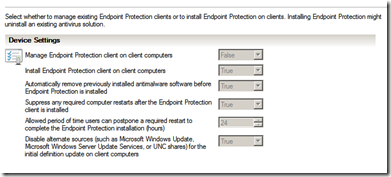
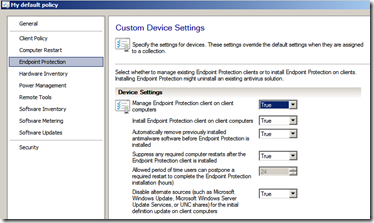
And then Endpoint protection.

image

As you can see here, the options are greyed out… Why ?
Because we forgot to install the Endpoint protection rule, so we have to install that after, but lets finish the policy first.
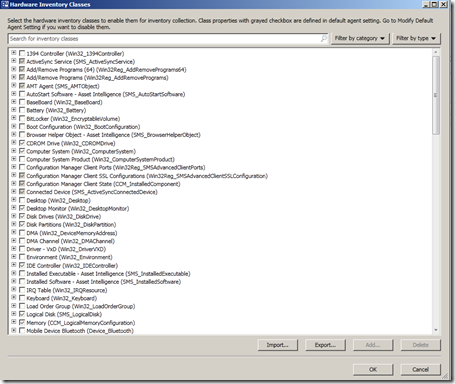
(Then we will go back and alter the Endpoint policies ) Hardware inventory this is enabled by default, but we should double-check and se if we want it to report more or less. So push on the “Set classes” The list that you see here is what the ConfigMgr agent will report back to the site regarding hardware.

image

So if you want the Agent to report more regarding hardware just mark the class you want info on. In my case I want the agent to report back if it has a TPM (Trusted Platform Module) chip so I mark that and press OK.

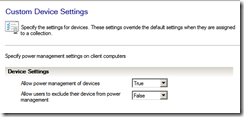
Next we have power management, which basically does is enable power management on the client. And/Or allows your users to exclude their clients from power management.

image

We will get back to that later. So let this stay at the default, so we go into Remote Tools.
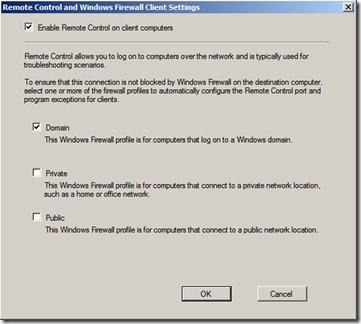
By default you have the option to activate Remote Desktop, Remote Assistance and something called
Remote Control (This only works when the clients are connected to the site, so it won’t work on
internet facing clients since it needs Kerberos, but if you are using Direct Access it will work)

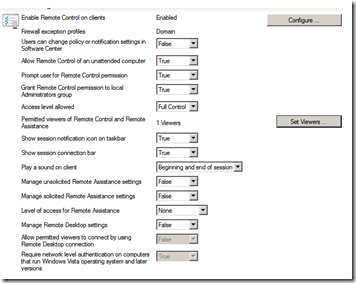
But lets start with the first option, enabling Remote Control.

image

Next I add myself as a Remotr control and Remote Assitance viewer and change any other settings I wish.

image

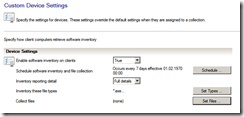
Software inventory, enables the agent to collect information about software installed on the clients.
Here you decide which type of files the agent should get info about, I’m going to just include .exe files here
since this covers most of the applications that I want.

image

Software Metering, allows you to monitor the usage of specific application. Which is useful if you have
concurrent license usage. This option just enables software metering on clients.

image

Software Updates, allows the agent to do software update on the clients, just leave this at the default.
image

Now that we have gone trough the policy settings, click OK and we get back to the Console.
We see that the policy has the priority of 1, but it needs to be deployed to a collection of
computers before it is actually used.

So now we can go to create the dynamic computer collection.
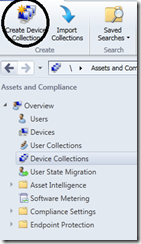
Since we want a collection that includes ONLY Windows 7 computers, go into Assets and Compliance ->
Device Collection -> there you have the option to create a new device collection.

image

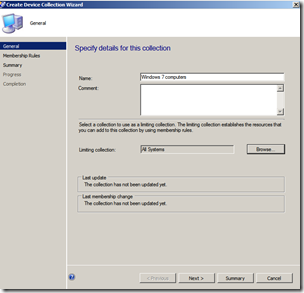
So Give it a name and choose a limiting collection (This means that the query will run on the limiting collection and say “Hey windows 7 computers I want you to join my collection as well”)

image

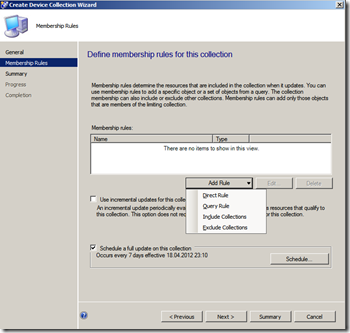
Click next, and here is were we choose a query rule.

image

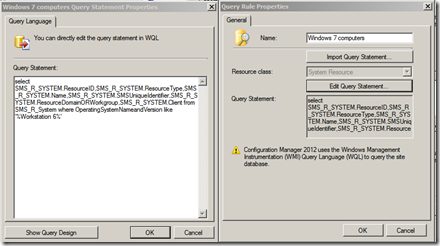
In the query rule , we can enter this query.
select SMS_R_SYSTEM.ResourceID,SMS_R_SYSTEM.ResourceType,SMS_R_SYSTEM.Name,SMS_R_SYSTEM.SMSUniqueIdentifier,SMS_R_SYSTEM.ResourceDomainORWorkgroup,SMS_R_SYSTEM.Client from sms_r_system where OperatingSystemNameandVersion like ‘%Workstation 6%’
So now it looks like this

image

Tthis query will only include workstation computers that have version 6%. FYI you have tons of options regarding queries here. You can for instance, create a dynamic collection that checks if the client has Office installed, if it hasn’t it will join that collection you create and you can have office as a required software deployment for that collection, and when the application is installed and the next time the query is run the computer is going to be removed from that collection.
Now we can just finish the Query wizard, and create the collection. So now we turn to the client. We can install the client manually, group policy, push install via console. For this demo we are going to use the client push.
I just want to include that if you are going to install the client manually you have a lot of parameters available.
You can see all the switch parameters for the setup here –> http://technet.microsoft.com/en-us/library/cc181242.aspx
For instance if you haven’t expanded the AD schema with the SCCM update, you will need to add the parameter ccmsetup.exe /MP:10.0.0.0(IP) SMSSITECODE=TST (If you set the SMSSITECODE=AUTO) It will try to get the site code from AD.
So ill just add my Windows 7 computer to the domain, and the AD sync will automatically add it to the SITE. As you can see it appears in the collection.

image

It also says Site code = TST even thou I haven’t installed the client yet, why ?
Because this computer is part of the TST boundary. Now before we install we need to install the Endpoint protection role.

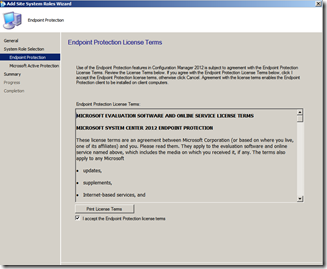
So go to the administration –> Servers and site system roles –> right click on your primary server and choose add site system role. Then we choose the Endpoint protection role. this time we can continue with the setup.

image

Basically just accept the terms, choose “Do not join MAPS” , next , next finish. We go back to the Client policy settings we created and alter the “Endpoint Protection settings.” Choose enable on the “Manage endpoint protection client” and leave the rest to default, and choose OK.

image

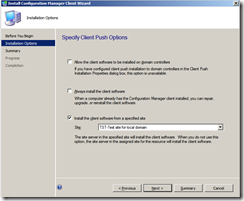
Now, go back to the collection, right click on the client and choose install client.
Mark the last part, next , next , finish.

image 

If you now open the log ccm.log in the configuration manager folder. You can see it tries to install the agentimage
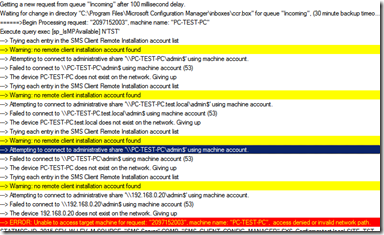
But since it doesn’t have admin access on that computer we have to give it that.
After we done that, try installing the agent again.
Now when you’ve done that, open task manager and choose processes on the client.
You can now see that its trying to install the agent.

image

If you want to check the progress, there are some setup logs created in the C:\windows\ccmsetup folder.
ccmsetup.log and client.msi.log

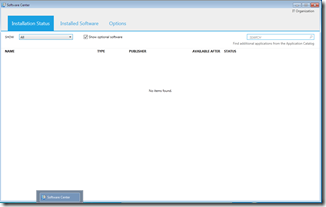
When the installation is complete you will get a new application called Software center in your start menu.

image

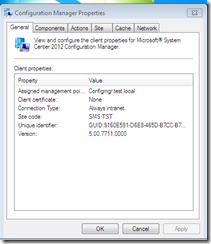
And a new option in the control panel called, Configuration Manager Properties.

image

Since this just recently finished installing not all the configuration items are displaying yet (will cover that in my next post) But you can see that my agent is now connected to the MP Configmgr.test.local and assigned to the site TST.
And is now appearing in my ConfigrMgr console as active.

#bandieuhoacuanphuc, #baoduongdieuhoaanphuc, #ban_dieu_hoa_cu_an_phuc, #client-configuration-sccm-2012, #client-install-sccm-2012, #configmgr2012, #custom-client-policy-settings, #ha_tuan_khang, #lapdieuhoaanhuc, #muadieuhoacu, #sccm, #seoconghuong, #signal_buiding, #suadieuhoaanphuc, #trendy, #user_is_king

SCCM 2012, Part 2 configuration

This part will consist of doing the basic configurations that make ConfigMgr 2012 actually work in a domain.
There are a couple of steps that we need to do before we can distribute the client across our domain.

First of we can start the console ( Usually located on the desktop ) Go into the administration tab.
then from the left menu select Boundaries and right click and select create boundary.

image

Since I only have 1 domain that I wish to create a boundary for, I choose Active Directory sites from the drop down menu, I choose browse and select
the (Default-first-site-name) And give it a good description.

image

Click Apply then OK. As of now, you just created a boundary but you haven’t linked it to a ConfigMgr site so It doesn’t do much until we’ve done the rest.
Next we have to create a Boundary group. Go back to the Administration –> Hierarchy Configuration –> Boundary Group. Right click and select create new boundary group.
Start by giving it a valid name, adding the boundary that we created in the previous step. Then click references, then select “Use this boundary group for my site assignment”.
Then click the add button below and choose the site server that you’ve installed Configmgr on.Click apply and OK.

If you go back to the boundary menu and choose properties of that boundary that you created ealier and go onto the “Boundary group” tab you will now see that the group is listed there.
image

What you’ve done now is create a boundary for this Site. Which means when a client installs the SCCM agent, it will query the system. The System will check “hmm is this client within my boundary?, it sees that it belongs to the Active
directory site that you listed in the boundary and say ok it is part of my boundary so I will give to access to this site”
Next we have to activate Active Directory discovery, so that the configmgr system will find our users, groups and computers from AD.
So Go to the Administration tab again –> Hierarchy Configuration –> Discovery Methods.
What we are looking for now is Active Directory system discovery (Since we want Configmgr to find our computers from the domain)
Right click on system discovery, and choose properties. Press the enable Active Directory system discovery, then press the star button and choose browse. Then choose the OU which your clients are located, then click OK.
go to the polling schedule and change it to 1 day.

image

Click apply, choose yes on the “Run discovery as soon as possible?” question and press OK.
If you go to the Monitoring tab and into the Site system –> component status. And find the SMS_AD_SYSTEM_DISCOVERY_AGENT, right click
show messages, all. And you can see that the discovery process has already run, and according to the log it found 3 valid systems.

image

If we go into the Assets and compliance menu, then into devices, and all systems we find our 3 computers.

image

Now we could basically just deploy our client to our computers but we are missing some other pieces that we need to put in place first.
Since of configmgr 2012 Microsoft has labeled it User-centric meaning that we are very interested in the user not so much the computer the user sits on (well we are a little bit interested ) but the
user sitting behind the computer isn’t. He/her wants his/hers software available on every computer they sit on. So in order to deploy software to the user, we have to import our users from AD into ConfigMgr.
So again we go back to Administration tab again –> Hierarchy Configuration –> Discovery Methods. And enable user discovery just as we enabled system discovery (If you want to deploy software to spesific groups, which most are) enable the
group discovery as well.

When you have activated the user discovery, and the process has run, your users will now appear under Assets and compliance –> Users.
If you right-click a user and press properties you will see that it was the discovery that populated this user in to ConfigMgr.

image

As you can see it says “SMS_AD_USER_DISCOVERY” under agent name.

image

Now we have done much of the configuration that we need. Next we need to install the other required roles to our site before we start rolling out the agent to our domain. So go to Administration –> Site configuration –> Servers and site system roles, on the right side choose your primary Configrmgr, right click and select Add Site System Role

image

On the first screen that appears, just leave it as the default. Since this is not a internet facing site we don’t need to enter FQDN.
And Since the computer account still has administrator access I can leave it at that.

image

The roles I am going to install now are
“Application Catalog Web Service Point” This is the service that the application catalog website Is going to query, if you have a large domain I suggest to install 2 servers with the application catalog website, and 1 dedicated web service point.
”Application Catalog Website Point” This is the self-service portal that users can enter to choose software that they want to install.
”Reporting Services Point” Provides the communication between ConfigMgr server and the SQL reporting services server, and installing the default reports.
”Software update point” Used for patching computers in the SCCM site (Requires WSUS 3.0 SP2) It also required if you wish to deploy Endpoint Protection Point, which we are going to install later.
So click next,

image

If you don’t have a proxy server just click next here,

image

Here you have to select if WSUS is already configured on which ports in the IIS,
If you are uncertain start the IIS config and check the bindings to see what ports it is configured to.
In my case it is a custom website, so I choose that and click next.

Now in order to save a lot of screenshots, but its pretty straight forward from here.

On the next pane, choose Synchronize from Microsoft Update, click next, on Synchronization Schedule leave it at the default, on Supersedence Rules leave it at default, on Classifications you choose what patches you are interested in Critical, features, service packs etc, on Products ( Choose those products you are have in your environment ot you might end up with a lot of data that you don’t need. On the Languages pane also choose those languages you have.
Now that we are done with that we continue on to the Reporting Services Point.

The setup automatically chooses the server which has the ConfigMgr Database installed, so click verify.
Under Reporting Services server instance, select the default instance from the drop down menu.
image

Then click next, during the Application Catalog Web Services just leave it at the default, unless you have a certificate that you want to use for https.

image

Then click next, now for the Application Web site role, just leave that also at the default.

Untitled

And click next and you can choose a color theme for your portal and enter a title for it.

2

Click next, then the summary will appear then click finish. And the server roles will become installed.
Now that the roles are installed, lets check that they are functioning as they should.
Lets start by checking the reporting service, go into monitoring and then choose reporting –> reports (might take a while before the reports appear) Then run a random report (Administration Activity Log)

 image

The report seems to be running fine, so it appears the the reporting service is functioning. I can also doublecheck that the component is reporting as it should by going into Monitoring –> System Status –> Componets status and checking the
SMS_SRS_REPORTING_POINT

image

Now on to the software updating point, go into the software library –> Software updates –> right click on All Software updates and choose syncronize now.

image

As you can see down below,  it says busy. And if you open Windows Update Services console you will see that it is synchronizing. This might take some time, depending on what products and languages you choosed.

image

As this is synchronizing, I will check that the role has been installed probably.

image

It seems to be functioning as it should. After the sync it seems to we working properly. Well this will not be tested until we have some clients to test it on Smile

image

Now back to the application web portal, I get an error, I right click on SMS_PORTALWEB_CONTROL_MANAGER and choose show all messages.

image

image

In order to fix this, you have to run the command, aspnet_regiis.exe –I from c:\windows\microsoft.net\framework\v4.0.30319 in CMD.
Then I reinstall the Application web role from the server and volia! now It seems to be functioning as it should.

image

Now open internet explorer to the server http://server/cmapplicationcatalog
Remember that you have to have Silverlight installed in order for it to function.

image

Voila! I haven’t created any applications that should be avalible yet. But you should always create the framework before you create the content.
Now we are finished with part 2 of this SCCM guide, next one will focus on client settings, endpoint , software update, remote control and how to push your sccm agents out to the domain.

#configmgr2012, #sccm, #system-center, #system-center-2012

System Center 2012, SCCM part 1

Phuh! This easter has been alot to do, reading for my MCP exam and setting up my new home lab enviroment. So far I have setup most of the servers, they consist of:
1: AD + DNS
2:  SQL w/Reporting Services
3: SCCM w/DP, MP, Application web site point, PXE role, Reporting point (all in one)
4: SCVMM Management + Self Service Portal
5: SCOM w/Management Server
6: SCSM

So im going to start with the innstallation of SCCM 2012. I presume that you have a basic understanding of what SCCM is, if not I suggest heading over to Microsoft -> http://www.microsoft.com/en-us/server-cloud/system-center/configuration-manager-2012.aspx In short it is a system management framework, used to manage computers (Software deployment, patching, OSD, AV, Baselines and compliance, reporting ++++ )
Before we start with the installation be sure to check that you have either of these versions of SQL server installed.

  • SQL Server 2008 SP2 with Cumulative Update 9
  • SQL Server 2008 SP3 with Cumulative Update 4
  • SQL Server 2008 R2 with SP1 and Cumulative Update 4
  • The instance of SQL Server in use at each site must use the following collation: SQL_Latin1_General_CP1_CI_AS

To check what version of SQL server you have installed start SMSS, and then click About on the Help menu.
sccm1-sql
You can download the SCCM 2012 RC from here http://www.microsoft.com/en-us/server-cloud/system-center/configuration-manager-2012-trial.aspx

And then the Server that  is going to have SCCM installed needs
.Net 4.0 (http://www.microsoft.com/download/en/details.aspx?id=17851)
.Net 3.5 SP1 (servermanagercmd -install Net-Framework)
Remote Differencial Compression (Servermanagercmd -Install Rdc)
WSUS 3.0 SP2 If you are going to use it for Patch Management (Which im going to do )You also need to do some changes in Active Directory (You need a user with domain admin access to change this )  This is because SCCM will publish information in AD that the clients will access later (more info on that later). (You don’t have to to this if you want to but it makes it easier for the clients to find what server the agent should communicate to)

Perform this on a  Active Directory Domain Controller as a Domain Administrator

Open ADSI Edit, click on Action, Connect To and click Ok, Double Click on Default Naming Context and the DC= that appears below it. Click on the + and scroll down to CN=System.

Right Click on CN=System and choose New, Object
sccm-ad1

Choose Container from the options,
sccm-ad2
click Next and enter System Management as the value.
sccm-ad3
Click Next and Finish .Open Active Directory Users and Computers. Click on view, select Advanced Features.Select the System Management Container, and right click it, choose All Tasks and Delegate Control
sccm-ad4
When the Welcome to Delegation of Control Wizard appears click next, then click Add. click on Object Types, select Computers. Type in your SCCM server name and click on Check Names (It my case my server name is SCCM (I changed it later to configmgr) so therefore enter the name of your server here)
sccm-ad5

Click Ok, then Next. Choose Create a Custom Task to Delegate, click next, make sure This folder, existing objects in this folder and creation of new objects in this folder is selected.
click next, select the 3 permissions General, Property-Specific and Creation-deletion of specific child objectsare selected then place a check mark in FULL CONTROL, and click next then Finish.
If you don’t do this, you will recive some errors from the SCCM server and the agents  (Since by default SCCM tries to publish its information to AD)
Next we need to extended the AD schema, do this on your Active Directory server as well, browse the network to your sccm server \\sccm\isodrive$ and locate the folder where you uncompressed SCCM 2012 and find \SMSSetup\Bin\x64\Extadsch.exe, right click and choose Run As Administrator,
sccm-ad6
sccm-ad7
 
after you have done this there will be generated a log file on your c:\ ExtADSch.log so please check this for error before continuing, if it is successful it should look like this.
sccm-ad8

Now when you start the wizard, you have the option to download the prerequisites,  I suggest you start by download those to a local folder on the server since we need them later in the setup. 
sccm2

After they are downloaded continue with the install.

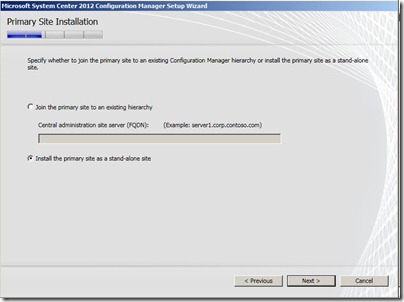
Since this is a new install, We choose the Install a Configuration Manager primary site (The other option, install Configuration Manager Central administration site also known as a CAS is used to centrally manage multiple CM sites. more on that later)
sccm-setup2
Since I don’t have a product key I choose evaluation
sccm-setup3
Accept the license terms
sccm-setup4
Accept more license terms
sccm-setup5

Browse the path to the previous downloaded prerequisites
sccm-setup6

I choose english here

sccm-setup7-language

Same here

sccm-setup8-language

Here we enter a site code, which consists of 3 letters, this site code is used as a boundary so the clients know that when it belongs to that particular site it should contact these servers. Much like when you live in Oslo, you know that you need to contact the local police station in case something happens 🙂
In the site name just type something relevant, this information will also appear in the application web portal we are going to install later.

sccm-setup9

Next I choose, install the primary site as a standalone site ( Since this is a singel domain )

sccm-setup10

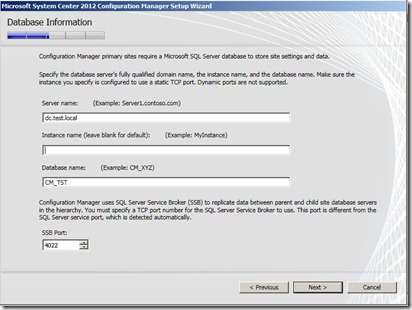
Now enter the name of the SQL server (Need to make sure that port 1433, and 4022 is open in order for it to work ) (Also you need to give the computer account administrative access on the SQL server and on the server you are installing SCCM on. )

sccm-setup11-dba


review the SMS provider settings,

sccm-setup13

Client computer communication settings, select Configure the Communication method on each site system, since I don’t have a Root CA I need to choose http,

sccm-setup14

Next I choose to install a Management Point & Distribution Point on this site, that will communicate via http

sccm-setup15

Now you get the summary screen just doublecheck that this is correct and continue,

Next, now its going to check the prerequisites.  This consists of checking if the server has rights to publish information to AD, if the AD schema is populated with the new SCCM schema, if the SQL server is responding, if WSUS and/or AIK (You don’t need to have these installed since you might be using some other solution for patch management, so these will just give you a warning if you don’t have it installed) + some more. You can check the setup log file on C:\ drive and you can see what checks the setup does.

In my case I forgot to install WSUS, and I forgot to give the server administrative rights on the server, so I need to fix that before we continue (As you can see, we can’t continue until we fixed the problems that are listed as critical, you can have multiple warnings but still continue with the install )

sccm-setup16
sccm-setup17

Now that I’ve the previous steps, we only got some warning messages, So I continue with the installation (Since my SQL server is running on a low specced Virtual machine I get those error messages)

Voila, installation if complete, if I check in Active Directory now you can see that it has automaticly published information about that site.
sccm-setup19
sccm-setup20

PS: IF something went wrong during the installation doublecheck the log C:\ConfigMgrSetup.log it might contain information what went wrong.
In case you might want to install cmtrace which is a log viewing tool which resides on the installation media of configmgr under Tools.

Now I can open the console so we can continue with the configuration, so stay tuned for part 2 of this SCCM blogathon.

#active-directory, #configmgr2012, #microsoft, #sccm, #sql, #systemcenter, #wsus