Creating a virtual network for Virtual Machine Manager

This is going to be a long one, and I want it done properly! Smilefjes Since I have seen multiple blogs containing the same recipe over and over again on how to setup networking within Virtual Machine Manager I have yet to see a blog post that actually describes and shows how it all links together, yeah everyone can create a network within VMM and describe how to do it but to show the “big picture” is something else.

So the things I am going to go trough.
1: Logical Networks
2: VM Networks
3: Port profiles and Port Classifications (Uplinks and how to attach VLANs to a host)
4: Logical Switch and NIC Teaming
5: The Big Picture how it is all linked together.
 
Lets start with the first things first, the Logical Network.
Logical Network is a container. When you create a logical Network you need to create Network Sites within it. Network Sites might be different locations or depending on the site of your company different networks.

For instance I can create a Logical Network called Sandbu, within it I have 3 sites, which will be for my different networks. Within these sites I need to attach all my VLANs which I need on my virtulization hosts.
Important to note that I do not attach a logical network to something, but  I attach my network sites to a host group or multiple host group.  I can also create an IP-pool from each VLAN I associate with each of the Network Sites. In my case I only needed an IP-pool for where my Virtual Machines are going to be placed, the rest will be using DHCP. The IP-pool is associated with a VLAN, so when I want to provision my VMs I can use from the IP-pool which the VMM maintains or I can use DHCP. The overview will look like this.

image

So what actually happens to the hyper-v hosts when I attach a network site to the host groups ? Not much actually, the hosts get the site “linked” to them, so when I go to Hardware of the host and look on the Network Adapters I can see that my newly created network site appears under.
image

This is because I linked the network site to the host group this host resides in.
What happens if I associate a logical network with the sites to this host ?
Not much, it limits the host to the use of these VLANs if I for instance wanted to create a network switch.

image

Ill leave it at that at the moment.
Now we have created a logical network, attached network sites added VLANs and created a IP-pool of adresses. Next we need to create VM Networks.
VM Network are virtual network which are networks useable for virtual machines or virtual nic who are part of a NIC team.

Since our network sites are VM traffic, Storage and management which will all go trough the a virtual NIC and trough a switch we need to create VM Networks for them.
After we have created the VM networks for each VLAN.

So in my case I need to create three networks, one for virtual machines, one for management and one for storage. Important to note that VM networks are associated with a VLAN within a network site. Here I can now create a vm network for my virtual machines from the network site I created earlier with an IP-pool.

image

Now since the VM networks are linked to the Logical Networks, and the Logical Networks are linked to the Host groups the hosts will have them as well. We can see this when we try to edit the network settings of a virtual machine on one of the hosts.

Now since I have three VM networks I can choose from each of them.

image

I have three VM networks to choose from in my case. I can also create a hardware profile which uses the VM network by default so I dont have to change network settings each time.

Now the next parts are port profiles and port classifications.
Port Classifications
are just to describe a virtual port profile (even thou you can not link it directly, you can only link it when you create a logical switch)
So when we create a port classifications this is all we do

image

Note there are alot of predefined port classifications here as well.
Next is the port profiles.
There are two types of port profiles. One is an Uplink Port Profile (Which is actually a profile for how to setup NIC teaming)  Here we select what kind of NIC teaming we want.
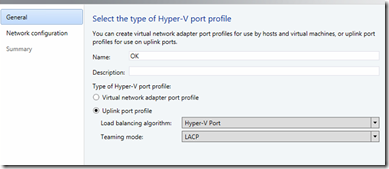
image

Uplink Port Profiles are also linked to a Network Site. If we want the three network sites trunked via the Uplink Port (NIC teaming) we need to add all sites.

And the other port profile is virtual network adapter port profile (Here we can define offload settings and what type of security settings and bandwitdth settings). Note that a virtual network adapter port profile is not linked to a network site or a logical network.
After we have created the uplink port profiles and the virtual network adapter port profiles we have to create a last magical component which is a Logical Switch.

A Logical Switch is just a template actually. Its based upon the extensible switch which comes with 2012 and includes the uplink port profile, and virtual port adapter profile and what extensions that is going to be included.

And there we link the port classification to the virtual network port profiles. So when we create the logical switch it bind (Different Port Profiles, Extensions) and adds the template to a switch.

And since the uplink port profile is linked to the host group we can now create a logical switch on a host group. So to be able to create a logical switch on a host we need to make sure that the logical network and network sites are assosiated with the host.

So after the switch is created we can add it to a host.
image

After we have created the logical switch we can then add virtual network adapters for the different services, then the virtual network adapter can be added to a VM network and added a port classification.

image

Note that these virtual network adapters are not the ones that can be created by using NIC teaming manager (These network adapters can only be created via powershell or via SCVMM)
So now when I check my virtual machines on this host I can move them to the newly created switch and choose Subnet.

image

So the big picture. (This took some time to create via Visio)
Logical Overview

image

Physical Overview

image

Done for to now, hopefully this post made sense for some! Smilefjes

#scvmm-2012, #system-center, #virtual-machine-manager

System Center Management Pack for VMM Fabric Dashboard 2012 R2 released

Today Microsoft released a Management Pack for VMM 2012R2 Fabric (or a dashboard view)
Which can be found here –> http://www.microsoft.com/en-us/download/details.aspx?id=39635

If you want to install this, there are a couple of prerequistes that you need to take care of.
(Which are not stated on the download page)
First you need to install some additional management packs on SCOM

  • Windows Server Internet Information Services 2003
  • Management packs that are required by the management pack for Windows Server 2008 Internet Information Services 7:
    • Windows Server 2008 Operating System (Discovery)
    • Windows Server Operating System Library
  • Windows Server 2008 Internet Information Services 7
  • Windows Server Internet Information Services Library
  • SQL Server Core Library

And then you have to connect VMM 2012R2 with OPSMGR2012R2
Which can be done under settings and System Center settings –>

image

After that is done, SCVMM will import some additional management packs into SCOM (For VMM monitoring) and then you can import the downloaded dashboard.

You will find the dashboard under Monitoring –> System Center Virtual Machine Manager –> Cloud Health Dashboard

image

And from here I can for instance view the Fabric Health Dashboard which will give me more detailed info om my virtual infrastructure.

image

Network Node monitoring physical networks (So you would have to enable network monitoring in SCOM in order to get information)
The purpose of this dashboard is just to give you a quick overview of (What is the health of my cloud?)

#fabric-monitoring, #opsmgr, #private-cloud, #scvmm-2012, #system-center

Adding SCVMM server to Provisioning Server 6.1

If you want to connect to SCVMM with PVS you need to do some changes on the SCVMM server first. Now why would you add a connection to SCVMM from PVS?

Using a Provisioning Services streamed vDisk, the XenDesktop Setup Wizard assists in deploying virtual desktops to a number of cloned virtual machines (VMs) as well as to devices using the Personal vDisk feature.

Use the wizard to:

  • Create virtual machines on an XenDesktop hosted hypervisor, from an existing template:
    • XenServer
    • Hyper-V via SCVMM
    • ESX via V-Center

System Center Virtual Machine Management (SCVMM) servers require that PowerShell 2.0 is installed and configured for the number of connections. The number of required connections for an SCVMM server should be greater than or equal to the number of hosted hypervisors used by the setup wizard for virtual machine cloning. For example: to set connections to 25 from a Powershell prompt, run: winrm set winrm/config/winrs @{MaxShellsPerUser=»25″}winrm set winrm/config/winrs @{MaxConcurrentUsers=»25″}. For Microsoft SCVMM to work with XenDesktop, the user must run the following PowerShell command; set-ExecutionPolicy unrestricted on SCVMM.

You might also need to run the winrm quickconfig on the SCVMM server.

image

Right click on Hosts, and select Add host, from the menu choose SCVMM/Hyper-V –>

image

Enter the IP Address of the server

image

Enter credentials and click verify.

image

NOTE: If you get any errors here, doublecheck the winrm config on the scvmm server and check that there aren’t any firewall blocking the connection.

#pvs-6-1-and-scvmm, #scvmm-2012

SCVMM 2012

So I’m back on the System Center track, this time I’m going to continue with SCVMM which basically is the frontline product for Microsoft’s “Cloud” concept.
What is SCVMM (System Center Virtual Machine Manager) ? is it Microsoft’s management product to manage Hyper-v, it is the Microsoft equivalent of vCenter.
Of course with it you can also manage other type-1 hypervisors such as Xenserver and VMware ESXi, from one console.

SCVMM has come along way since the first release in 2007, and there are tons of new features available in the latest release such as.

  • Defining logical networks, IP pools, MAC address pools, VIP pools for load balancers
  • Service Templates
  • Power Optimization
  • Hyper-V and Cluster Lifecycle Management – Deploy Hyper-V to bare metal server, create Hyper-V clusters, orchestrate patching of a Hyper-V Cluster
  • Storage Management – Classify storage, Manage Storage Pools and LUNs
  • New Self-service portal
  • Service Creation Designer
  • + More

So if you haven’t touched SCVMM yet, I suggest you download it and try it on a VM.

http://www.microsoft.com/en-us/server-cloud/system-center/datacenter-management-trial.aspx

SCVMM consists of the following roles.

1 * DB
1 * Management server (Which is the brain behind the operations
1 * Self-service portal (Which is the web site where users can operate their own vms or order new ones)
And 1 or more Hyper-V servers

Now during the typing of this post I had some trouble with one of my home-lab servers so I don’t have a hyper-v server to connect to VMM, but all the hyper-v hosts that you want to manage via vmm needs to have the vmm agent installed. Which you
can find on the installation media of vmm. But I’m going to go trough the installation of vmm and setup the basics and setup the self-service portal. First of have a Windows Server 2008 R2 with Service Pack 1 installed before you continue.

1

The setup menu is the same as the other SC products, in my case I remove the mark from “Get the latest” and click Install.
2

I wish to install the VMM management server, console and the Self-service portal on the same server.

3

Click next here, this will set the product in evaluation mode.

4

Accept the terms and click next.

5

Click yes or no here.

6

I choose no here since I have my own WSUS server that will handle updates for this product.
7

Select the installation location and choose next,

8

Now you will get a prerequisite check,
note that the management servers needs.
.Net 3.5
Windows AIK for Windows 7 http://go.microsoft.com/fwlink/p/?LinkID=194654
(in my case I get a warning since I only have 2 GB of ram for my server, but since its just a warning I can continue)

9

Next I choose the database configuration, enter the server name of your sql server, and with credentials that you know has access to the db server, and click Next.

10

Now we have to configure an service account for VMM, (You should create a new account for this purpose)
If you want to have HA management server choose to store the keys in AD.
(NOTE: After the installation is done you can view the encrypted information in AD Users & computers )
image

Click next on the setup,
11

Review the port setup and choose next,

12

This is the self-service portal setup, since I have the Management server on the same server as the self-service portal I just have to enter the host name of that server in the vm server name.
And also I don’t have any other web sites on this server so I just click next.

13

Now I enter the information regarding the library I don’t have a lot of storage available so I just choose the local drive.
NOTE: .The library contains files stored on library shares, and it contains operating system, hardware, and template configurations stored in the VMM database. Library resources are added, created, used, and managed in Library view here –>

 image
The best practice is to have this on a SAN, so other VMM servers can access the same library.

Then click next and install.

If everything completed successfully you should see this screen.

14

If you bump into some errors, check the event log and/or under c:\program data\ vmmlogs.
If not choose close.

15

Now we can start the console from the start menu.
NB: If you altered the port settings during setup remember the port nr for “communication with the vmm console” and click Connect.

16

So this is the console of VMM, now its just a pretty empty shell. Before we continue exploring the console I want to finish setting up the self-service portal. Enter the IIS management and change the authentication setup of the self-service portal to Windows Authentication, so that we get SSO for internal users.
17

After that Is done you can open the Web site.

18

When you open it you will get the following message, note that the account you use to install vmm automatically becomes a full administrator, but!
even thou my account has full administrator It is not allowed access to the self-service portal. So before we continue we have to add my account to access the self-service portal. So open the VMM console,
Goto Settings –>  User Roles –> And choose Create User Role


19 

Give the role a fitting name and choose next,

20

Choose Self-service user, then click next,

21

Add a user from AD to the role, in my case I want my administrator account. And click next.

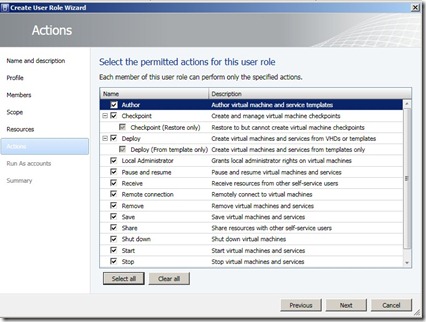
22
now choose what rights this user gets inside the self-service portal, then click next, next – finish.

Now this time when I open the Self-service portal I get access.
NOTE: You should use https for the self-service portal using an external cert for improved security.

23

That’s part 1, when I get my Hyper-v server up and running again I will continue on creating services, templates and clouds

#rbac-scvmm-2012, #scvmm-2012, #self-service-scvmm-2012