Moved site to https://msandbu.org

Hi!

I’m still getting a lot of traffic on this site, and still have some WordPress followers and RSS followers, and for those, I want to mention that I’ve moved my site to
https://msandbu.org (Been using this for the last couple of years now)

And secondly, for those that are interested in downloading my ebooks you can find them there as well –> https://msandbu.org/books/

Hope to see you there!

Importance of community–Introducing Slack Team for NetScaler and Citrix XenDesktop/XenApp

Over the years have spent endless times in forums and such I have always found the community a valuable asset to help even in desperate times when I’m stuck with an upgrade that does not work or get some feedback when I’m wondering about if “Will X work with Y?”

Also with my blogging I have gotten alot of requests on email about different topics, and sometimes it might go days before I even have the time to respond! Not because I don’t want to, just that there are only 24 hours in one day, and my day to day schedule is pretty full.

Now spending time on forums it pretty time consuming and just waiting for a reply from someone,  but nowadays I  find myself moving more and more away from forums and move more into Slack.

Slackis a real-time messaging tool, which I now use to collaborate with many different partners/vendors/programs and such its an easy way to IM with others. Now a while back I decided to create a Slack Team dedicated to NetScaler and today we have about 40 people in the different channels there, which is an easy way to get in touch with alot of knowledgeable people if you just want to ask a question or want to discuss features . And a couple of days I ago I also created a Slack Channel just for the purpose of XenDesktop / XenApp as well, where people are joining slow and steady.

If you want to join either of these channels, send me an email to msandbu@gmail.com and ill get you invited.

New opportunities! Cloud Architect at Evry

So last year I switched jobs to Exclusive Networks here in Norway, which was distributor which focused on Nutanix, Arista, vArmour, AviNetworks, VMturbo as part of their BigTec portfolio and so on which was a looooong gap from my regular day-to-day work which focused on Microsoft, and ohhh boy did I learn a lot during this one year time! especially on HCI and pure data center networking.

But for personal reasons I’m again decided to switch to another opportunity which was as a Cloud Architect at Evry. Evry is one of largest IT companies in Evry, and they just so happen to have an office 2 minutes walking distance from my house!

Of course that is convenient but the main driver is what they are doing moving forward! They are focusing on AzureStack https://www.evry.com/globalassets/marked/it-galla-pres-2016/evry-forst-i-norge-med-azure-stack.pdf and plan to be one of the first deployment of AzureStack in Norway, which I wanted to be part of moving forward. They also have a new initiative focusing purely on Cloud Services which I hope to play a part in as well http://www.digi.no/artikler/evry-varsler-okt-satsing-pa-nettskyen-ibm-avtalen-var-bare-starten/350634 and hopefully I can do a little bit of other stuff as well which I have a desire for Smilefjes

So I look forward to meeting new colleagues and learning even more in the upcoming months!

Delivering XenDesktop from Microsoft Azure using Azure Resource Manager

Last week, Citrix announced support for Microsoft Azure Resource Manager in XenDesktop. As of now this feature is only available in Citrix Cloud. Because Citrix has the common policy that features comes in Cloud first then on the on-premises deployment.

Using Azure Resource manager the setup has been simplified alot!  My lab is quite simple to setup, we need an Active Directory setup, an Windows Server 2012 R2 with the cloud connector installed. We also need a Windows Server 2012 R2 with the RSDH role installed with the VDA agent.

The VDA agent can be found and downloaded from here – https://www.citrix.com/downloads/citrix-cloud/product-software/xenapp-and-xendesktop-service.html

So we also need a Citrix Cloud sub or a trial, when doing into the management console and into connection we will now have Azure as a Connection Type.

We need to enter a subscription ID which we can find from within the Azure Console, and define a Zone name for these resources.  Then choose Create New, from there it will ask you to authenticate against Azure AD using your subscription credentials.

image

After you have successfully authenticated it will say “connected”

image

Next choose which region you want to provision resources in

image

And lastly define which Virtual network (and subnet) you want the connection to provision resources in.
We can define use of multiple subnets here.

image

The resources that appear in the wizard will depend on what already exists in the region and the active subscription. Now that we have an connection to Azure we can start creating our machine catalog.

Now before we create a Machine Catalog we need to have a template machine fininshed setup. The easiest way to setup a template machine is first by installing a virtual machine using the marketplace template

image

And make sure that this RSDH server is placed within the same virtual network or make sure that it can connect to the Cloud Connector server since that act as a delivery controller for the VDA. After you have successfully setup the server shut it down

image

So now after we are done with this we can go on with the setup within Citrix Cloud.

image

image

Now before we go ahead and find the master image we need to find where our Virtual machine template is stored in. So we need to locate the storage account that is uses.

image

So when choosing Master image, we first need to locate which resource group the virtual machine is located in and then going into the stoarge account, vhds and choosing the VHD file of the virtual machine, which will be uses as the template image.

image

We now also have the option to choose if we want to use Standard disks or Premium disks.

image

We also here define how many virtual machines we want to provisoin and what type of machine instances we want to use. The Standard_DS1_v2 It is based on the latest generation 2.4 GHz Intel Xeon® E5-2673 v3 (Haswell)

image

And then we need to choose where the NICs are going to be connected to, this is defined in the connection resource.

image

And then we have  the same procedure for Computer accounts.

image

And also domain credentials.

image

image

Then when we click Finish, let it roll!
You can see in the portal, that Citrix Cloud will create a new resource group where it stores the images and VHD files

image

now this setup is going to take some time, since it needs to copy the vhd file from one storage account to another.  Now since this takes some time, stay tuned for part 2 where I show NetScaler Gateway services attached with Azure RM setup in XenDesktop

The case of the unexplained! NetScaler Gateway ICA SSL error 29

So I had a friend reach out to me earlier today, because he was having some troubles with a NetScaler Gateway setup where he was unable to launch ICA sessions after setting up the Gateway and Storefront. All certs were in place, and authentication worked as it should, and STA was configured properly.

No events appeared in Storefront, and after a while he sent me a trace file which I could do some more digging.

X ALL THE THINGS - Troubleshoot! all the trace files!

After doing some digging and we gpt information about a VDA agent which the NetScaler was trying to contact, I noticed this error message in WireShark

I did a filter search in Wireshark, when I filtered based upon the SNIP address which was used in this case and the VDA agent, and I came out with this

image

So this basically that the SNIP address is trying to establish a TCP handshake with the VDA agent but It does not receive any reply from the destination address. So it was basically an Firewall ACL that was missing for the ports against the particular subnet!

So make sure that the firewall rules are in place before doing a setup! Smilefjes So is there any way that I can confirm that a particular NetScaler SNIP is unable to communicate with the VDA before blaming the networking team ?

Setup a service check using TCP against any VDA server on that particular subnet

image

Just remember to specify a NetProfile if you have multiple SNIP’s which are able to reach the server in the backend. NetScaler can round-robin use SNIP’s if there are multiple available which can reach the server network.

Arkin Overview–VMware NSX visibility

A few weeks back, VMware announced the acquisition of Arkin, with their platform (Arkin Visibility and Operations Platform) Arkin has out-of-box integrations with virtualization (ex: VMware vCenter, VMware NSX, Palo Alto Virtual Firewall) as well as physical infrastructure components (physical chassis, switches and routers), providing end to end visibility and analytics into the network.

Even though VMware has alot of built-in feature in NSX, visibility of the networking combining the usage of VXLAN, VLANs, Hardware vTeps, Distributed firewall rules and so on makes it hard to troubleshoot in case of packet drops, firewall rules not configured properly, and seeing the direct traffic flow. Because even if NSX bring alot of good features to the table it makes networking alot more complex, especially those which are used to an old fashion networking stack.

So will Arkin make this alot simpler? I decided to take a closer look at the product. (Since it wasen’t simple to get a demo license, I decided to try the online trial that they offer, which simulates a “real enviroment” which mixes VXLAN, VLANs and different switches (Cisco, Arista) and some dFW rules in the mix.

image

So at first login, you get a “Google” like search engine which allows us to query for different objects and get information, and I can also choose different objects which I can dig into. For instance if I search after “Arista” since I know there are multiple Arista switches in the demo enviroment, I automatically get a list of all Arista switches

image

Same if I search after VXLAN, I get of all VXLAN’s definined from the NSX controllers.

image

So if I click on a specific VXLAN I get a detailed overview of the VXLAN, which ESXi hosts have the VXLAN mapped, which dFW rules are in place, and in the middle I see which core switches act as the upload for each dwSwitch.

image

I can also see which objects have been changed, and see the L2 metrics for the specific VXLAN. I can also see alerts for differnt objects within the topology.

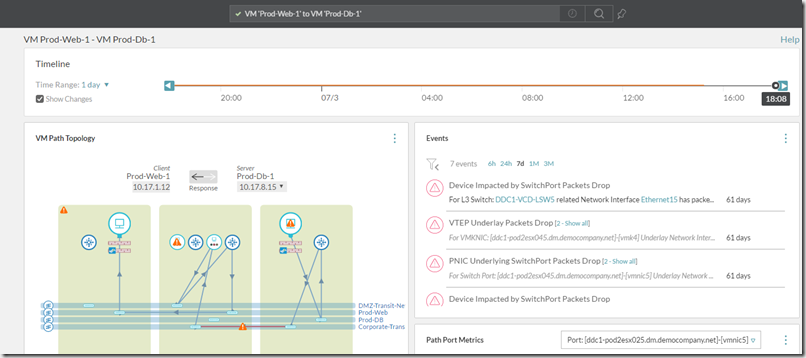
The most awesome feature is VM path topology, being able to see how the traffic flows from a specific virtual machine to another. In this case we can see that a virtual machine has to go a dVRF, go to an edge router and the to the VM on another host. Also in the mix you can see that we have some Palo Alto extensions setup has which are presented in the topology as well.

image

Now Arkin provides the full visibility into the networking segment, I think the issue is how VMware is going to license this as a product! I’ve seen rumours that It costs about 750$ per socket on hypervisor level (and integrating into the physical network is no additional cost) and with NSX costing about (standard 2000$, Advanced 4500$ and enterprise 7000$) I’m guessing this is going to be only part of the enterprise license, but I hope that this does not afffect the pricing level as well. Since it gives NSX a much needed visibility boost which vRealize haven’t given us so far.

Security overview with Windows 10 and Dive into Windows Defender Advanced threat protection

Remember back to the Windows XP/Vista days? Life was alot simple from a security perspective. Yeah we got virus and malware, yeah we got spyware and yeah we got malware like we have been used too for the last decade. What did Microsoft have to offer us in terms of protection and security mechanims?

  • We got introduced to User Access Control in Vista
  • We got introduced to Windows Defender which was a form of Forefront Protection
  • We got security updates and such from Windows update
  • We got Bitlocker to do drive encryption
  • Windows Firewall could filter ingoing and outgoing traffic!
  • Drivers needed to be digitally signed!

But of course alot was still up to the third party vendors which delivered their endpoint security solutions (Norman, Symantec, Trend, etc…) Which was there to stop whatever else tried to come in.

So much was introduced into the operating system in especially Vista to try to protect against virus and malware which required elevated user rights (which was the aim of UAC) to try and stop these types of attacks. Now fast forward to 2016, the security landscape has changed, most IT-pros know that in most cases it is not a case of if you get hacked, because in most cases YOU will get hacked! and Microsoft is fully aware of this, and has stepped up their game (Leveled up to lvl 100!)

Because now organized crime is the largest threat and we have different types of Ransomware which can automatically encrypt files and require large amounts of money to decrypt them. These ransomware’s are always evolving, which makes it hard to use signature based detection systems, so it often the case to try and minize the damage.

Another issue is username & passwords, with the large amount of different websites getting hacked each day with people leveraging the same username and password both at work and for personal stuff the use of two-factor authentication is becoming more and more the defacto standard. 

And of course in larger enterprises there is always the risk of getting hacked from the “inside” and having security mechanisms which can protect against these types of attacks.

So there have been numerous security enhancements in Windows 10 because Microsoft wants the consumers to have built-in protection instead of the 60-day trial of some “random” third party vendor they get when the buy it from the store.

So what’s new from a security persective in Windows 10?

  • Microsoft Passport
      • Windows Hello (Which allows for biometric or PIN based two-factor authentication, which makes it more user friendly to get two-factor authentication)
  • Credential Guard (Credential Guard aims to protect domain corporate credentials from theft and reuse by malware. With Credential Guard, Windows 10 implemented an architectural change that fundamentally prevents the current forms of the pass-the-hash (PtH) attack.)
  • Windows Defender (with Network Inspection System) which is now enabled by default
  • Network based start Bitlocker (Allows corporate Computers to boot without typing bitlocker pin in corporate networks)
  • SMB signing and mutual authentication (such as Kerberos) to SYSVOL (To migiate against MItM)
  • UEFI Secure boot
  • Early Launch Antimalware (Which allows certified antimalware solutions to start before malware processes start to run)
  • Health Attestation (The device’s firmware logs the boot process, and Windows 10 can send it to a trusted server that can check and assess the device’s health.)
  • Device Guard (to only running code that’s signed by trusted signers, as defined by your Code Integrity policy)
  • Windows Heap
    • Internal data structures that the heap uses are now better protected against memory corruption.
    • Heap memory allocations now have randomized locations and sizes, which makes it more difficult for an attacker to predict the location of critical memory to overwrite. Specifically, Windows 10 adds a random offset to the address of a newly allocated heap, which makes the allocation much less predictable.
    • Windows 10 uses “guard pages” before and after blocks of memory as tripwires. If an attacker attempts to write past a block of memory (a common technique known as a buffer overflow), the attacker will have to overwrite a guard page. Any attempt to modify a guard page is considered a memory corruption, and Windows 10 responds by instantly terminating the app.

So even all these security features are included in the operating system. What if a disgruntled employee wants to take files outside of the buisness or if files get lost on a USB thumbdrive? There are more features to come!

First thing is Windows Information Protection! (Formerly known as Enterprise Data Protection) which is coming in the next release of Windows 10 ( Windows 10 Anniversary Update.)

This feature will allow for seperation of data between personal and corporate and wherver the device it resides on it can be wiped. Data based upon policies can be encrypted at rest.

And using this will also be visible when saving files to the local system, where corporate content can be stored in specific folders.

Now this feature handles data protection and leak protection of files. But back to ransomware and such, in many cases it is a case of minimizing the threats that occur, and get the overview of what’s happening. Microsoft found that it takes an enterprise more than 200 days to detect a security breach and 80 days to contain it. During this time, attackers can wreak havoc on a corporate network.

Windows Defender Advanced Threat Protection

Enter Windows Defender Advanced Threat Protection! This is a feature which is now in Public Preview, which will be available for Windows 10 enterprise users, which leverages the Windows Defender feature in Windows 10 to do post-breach investigation and it is «not a realtime protection feature” The feature consists of 3 parts:

1. The Client:  built into Windows 10 Anniversary Update, that logs  detailed security events and behaviors on the endpoint. It’s a fully integrated component of the Windows 10 Operating System.

2. Cloud Security Analytics Service: combines data from endpoints with Microsoft’s broad data optics from over 1 billion Windows devices, 2.5 trillion indexed Web URLs, 600 million online reputation look-ups, and over 1 million suspicious files analyzed to detect anomalous behaviors, adversary techniques and identify similarities to known attacks. The service runs on Microsoft’s scalable Big Data platform, and combines Indicators of Attacks (IOAs), behavioral analytics, and machine learning rules.

3. Microsoft and Community Threat Intelligence: Microsoft’s own Hunters and researchers constantly investigate data, identify new behavioral patterns, and correlate collected data with existing Indicators of Compromises (IOCs) collected from past attacks and the security community.

Since the agent is already “built-in” its a matter of on-boarding the client and getting it up and running. As part of the public preview I have one of my computers added to the solution.

image

As we can see we have a timeline of different processes and threats that get detected. I did a simple EICAR test, which was automatically removed by Windows Defender but was also added to ATP

image

I can also do more deep-dive into a specific event to see what happend.

image

I can also see for instance which IP addresses that has been communicated from the corporate network. For instance if a computer or a group of computers have been communicating with a “known” C&C for botnets for instance

image

We can also deep-dive into detected malware to see occurences world-wide from Microsoft (Alot of EICAR occureences… ) Smilefjes Also I can see if this has been observed from other agents in the organization.
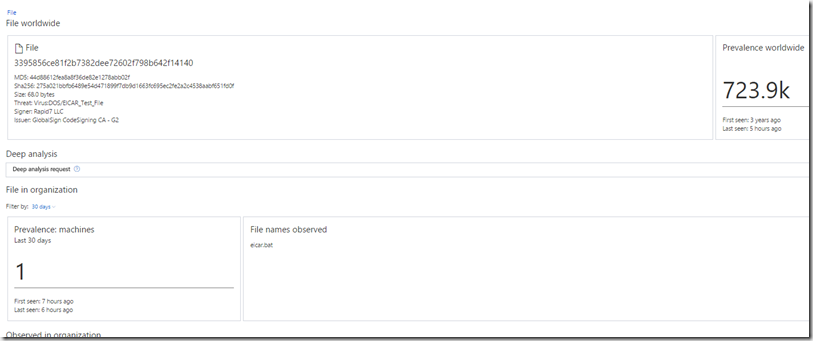
image

NOTE: I had some issues with the agent on my laptop since it for some reason only reported back data every 60 minutes, this was because my laptop wasn’t connected to a power source, so in order to reduce battery usage is falled back to that setting. It will do the same on a metered connection. When I connected a power source again I’t went back to sending data every 5 minutes.

I can see this solution as an preview of what’s to come from the ATP, as of now it can give good insight into “what’s happening” and using the timeline, we have a good overview of the history. Given that Microsoft has ALOT of data from billion of devices, both using windows update, defender, system center endpoint protection, and also alot new data will come from Microsoft OMS as well. This will clearly be the stepping stone into more advanced protection features from Microsoft

Setting up NMAS with remote Docker integration with Ubuntu docker hosts

I’ve previosly blogged about setting up NMAS and setting up Netscaler CPX

CPX here –> https://msandbu.wordpress.com/2016/05/14/setting-up-the-netscaler-cpx-load-balancing-on-a-ubuntu-docker-host-with-nginx/

Now with the upcoming features in NMAS one of the cool stuff is being able to manage and deploy CPX instances directly fron NMAS. All we need to do is configure the dockers hosts properly with remote Docker API. (Which means that we do not need to install the CPX on the docker host manually) Remember that CPX is only supported on Ubuntu!

It’s been tricky to find the correct setup for the remote API, since this is the API that NMAS uses to configure the CPX instances.  So here are the steps that needs to be done on the docker host before we can manage it using NMAS

   
Edit the file /lib/systemd/system/docker.service using for instance VI

sudo vi /lib/systemd/system/docker.service

Edit the ExecStart line so it looks like this.

ExecStart=/usr/bin/docker daemon -H fd:// -H tcp://0.0.0.0:4243

After this change has been made save the file, which is typically done using ZZ Then run the systemctl daemon-reload command and then restart the docker service

sudo service docker restart

Then last but not least, use curl to see if it is communicating properly using the default remote API port 4232.

curl http://localhost:4243/version

image

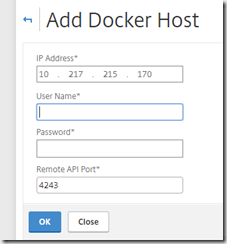
and voila! all the configuration is done on the ubuntu host and can now be added into NMAS. Now go into the NMAS console. Go into Infrastructure –> Instances –> NetScaler CPX –> Docker hosts and click Add (Enter the IP address of the ubuntu hosts.

image

and voila!

image

So now I can go and provision CPX’s instances based upon the image I have

image

After the instance has been added, I can get a dashboard view of the CPX instance running in NMAS

image

So now I can get started with setting up services and provision other instances, learn more on our upcoming webinar on July 13 –> http://bit.ly/2993ifP

NetScaler 11.1 what’s new?

NOTE: More detailes to come during the day! Smilefjes

So for some time now I have been part of the NetScaler 11.1 Beta, and as part of that I’ve been able to dig deep into the new features which are part of the GA release which came out earlier today.

So what’s new? There are some LARGE features which I have been looking forward to, and there are also some minor changes which are very welcome to the release! I can also take note that the upgrade from 11.0 to 11.1 in the beta firmware worked flawless.

New slick and improved interface, which is blaazing fast! I’m not kidding it is alot faster then the older 11.0 HTML 5 based web UI.

image

Even though you might think that there wasn’t much to be done there, but the interface is extremly fast now! and makes it a snap to do things in the UI.

It also includes Google like search to make it easier to navigate and locate different objects and policies.

image

and of course the simplest things are often the best, the save icon will now notify if there are unsaved changes on the appliance.

image

Simpler redirect of ports and HTTP to HTTPS from within the load balancing settings of a virtual server. This is only available on regular Load balancing virtual server.

image

New Theme portal which incorperates Unified Gateway look and feel. SO now the Unified Experience theme from Storefront is not included in NetScaler Gateway as its own theme. Bye bye old file share UI.

image

Which can now be configured from within the Virtual server

image

Now the coolest feature with 11.1 is the NetScaler Gateway feature and Always On! Which is an alternative to Direct Access and allows for the VPN client to start at boot-time and establish a connection with the NetScaler Gateway vServer at login.

This setting can be configured from within the session policy (Always ON = EaseofUse means that the client will try to connect automatically) and client control specifies if the user is allowed to disconnect the session or not.

image

But note that this feature like other VPN features requires a universal license for the enduser. Now as part of that the endpoint client also gotten a fresh new UI

image

With some better looking options pane as well,

image

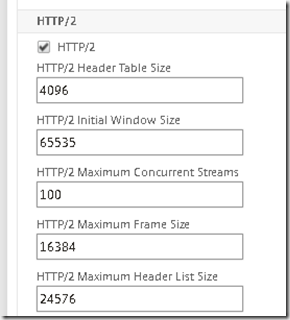
HTTP/2 support for HTTP profiles for VPX! (This makes implementing HTTP/2 even easier! from a Microsoft point of view you need IIS 2016 to get HTTP/2 support, but if you are fronting a webpage with Netscaler you can just active this in HTTP profile! (Most web sites use HTTP/2 today so its a simple as a check box)

image

Easier managment of SSL (Certs, Keys and so on)! Doing certificate managmenet on a NetScaler hasn’t always been the easiest thing to do, sure it has gotten alot better! and with the 11.1 release its even easier, with an own menu option to list out the different stuff. We can also see that files are sorted based upon if they are keys /CSRs or certs.

image

VLAN to VXLAN bridge (This is more for MPX support but it allows us to map an VNI to a VLAN on the physical network, which allows to do ( clearlyhardware vTEP) support which is great!

image

Generate SAML Metadata to For instance Microsoft Azure or import the metadata into ADFS makes it even easier to set it up.

image

Configure HA heartbeat monitor on each Interface on NetScaler yay!

image

ICA latency profiles! Which can be bound to an ICA policy, which can be instance be used to determine if Drive mapping should be allowed if latency is above <40 MS latency for instance. ICA latency profiles is attached with an ICA policy and action. Which can then be sorted based upon different expressions as well.

image

Now at the end there are only two things that I need to know more about which is (Pooled licensing and delta compression) Which I would love to know more about but I haven’t been able to get alot of information about it yet.

image

Also some other mentions about new features that are included.

  • SNI support for backend resources
  • Support for TCP fast open in TCP Profiles
  • TCP Hystart is disabled in the TCP profile ( this gives you better throughput in high-speed networks with high packet loss)
  • New API called Install which can be used to update/downgrade appliances
  • You can use a bulk GET API to fetch bindings of all the entities of a given entity type.
  • The «start nstrace» command has a new parameter, -capsslkeys, with which you can capture the SSL master keys for all SSL sessions. If the capsslkeys option is enabled, a file named nstrace.sslkeys is generated along with the packet trace and imported into Wireshark to decrypt the SSL traffic in the trace file.

Think that is most of the updates from 11.1 stay tuned for our upcoming webinar from the MYCUGC Networking SIG to a little bit more deep dive on the 11.1 release, more information here –> http://bit.ly/2993ifP

#236, #nufc

New whitepaper–Comparison between Liquidware Labs FlexApp and Vmware AppVolumes

So I’ve been working for this for some time after I had a presentation about Application layering a couple on months back at NIC conference and on Citrix User Group here in Norway. There are alot of products/vendors in this space, so this time I decided to focus on VMware and Liquidware Labs and more detailed on their application layering technology describing their architecture, strenghts / weaknesses and a feature comparison and my initial conclusion from each product.

So to go get the whitepaper, you can get it here –> http://bit.ly/290DhMM

If you have ANY feedback or if you find spelling errors, wrong information, feedback please let me know at msandbu@gmail.com